
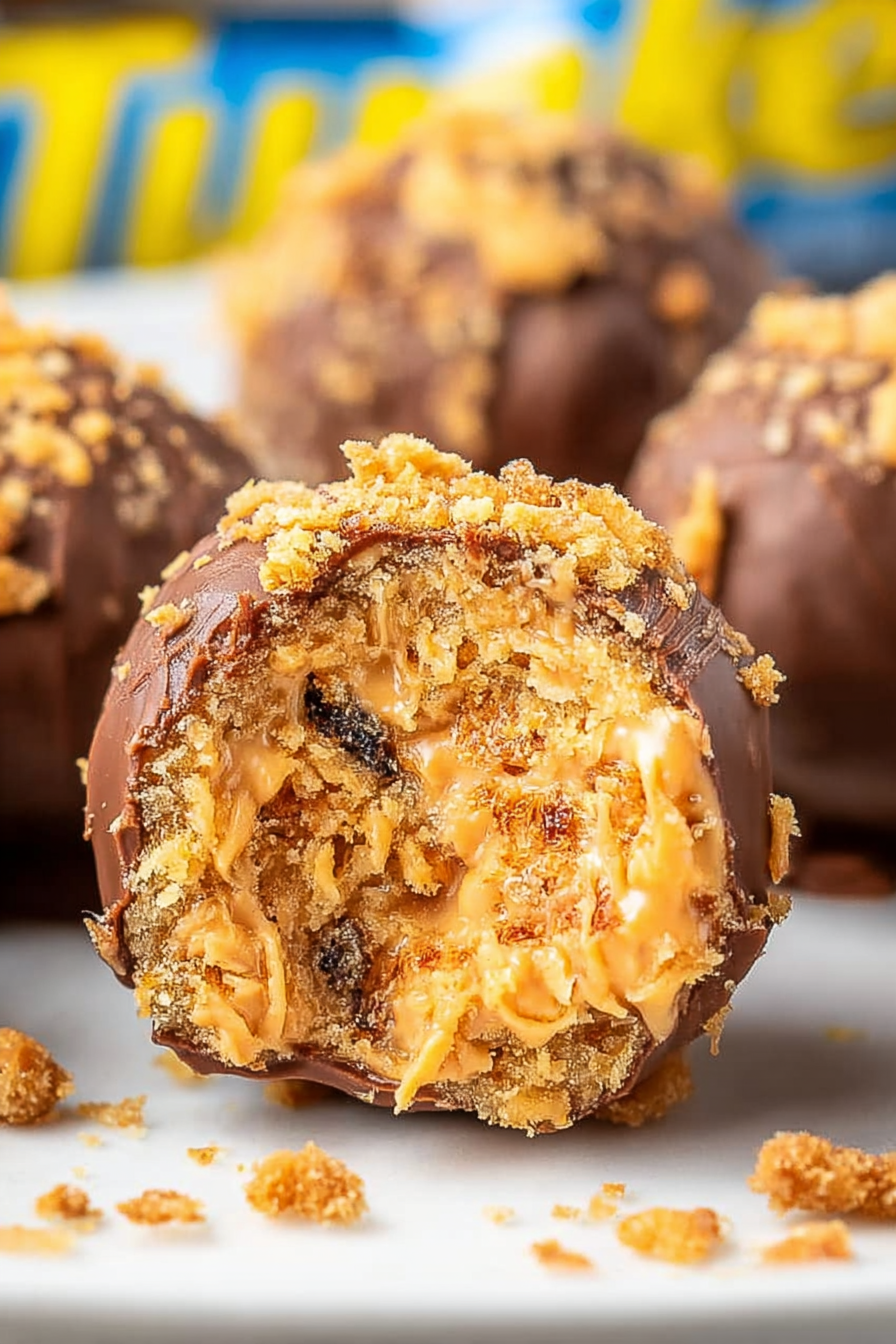
Imagine biting into a tiny sphere of pure delight, where the rich, nutty flavor of peanut butter meets a satisfying crunch, all coated in a luscious chocolate embrace. These Butterfinger Balls are not just a treat; they are a mini-vacation for your taste buds, a guaranteed crowd-pleaser, and ridiculously fun to make.
We all deserve a little joy, especially when it comes in the form of a no-bake confection that takes minutes to whip up. Picture these delightful Butterfinger Balls gracing your next gathering, each one a testament to simple pleasures and unforgettable flavors. Get ready to transform your kitchen into a candy-making haven.
Here’s why you’ll absolutely adore these Butterfinger Balls:
- Effortlessly crafted with minimal ingredients, these treats come together in a flash, perfect for satisfying sudden sweet cravings.
- The perfect blend of crunchy peanut butter, chocolate, and a hint of sweetness creates an irresistible symphony of flavors.
- Their bite-sized shape and appealing presentation make them an ideal addition to any dessert table or party platter.
- Easily adaptable with different chocolate coatings or toppings, these balls offer endless possibilities for creative customization.
Ingredients for Butterfinger Balls
Here’s what you’ll need to make this delicious dish:
The full ingredients list, including measurements, is provided in the recipe card directly below.
How to Make Butterfinger Balls
Follow these simple steps to prepare this delicious dish:
Step 1: Crush the Butterfinger Candy Bars
Unwrap the Butterfinger candy bars and place them in a zip-top bag. Use a rolling pin or a meat mallet to crush them into small pieces. You want a mixture of fine crumbs and slightly larger chunks for texture.
Step 2: Combine Peanut Butter Mixture
In a large bowl, combine the creamy peanut butter and powdered sugar. Mix well until a smooth, dough-like consistency forms. It’s easiest to use an electric mixer, but you can also mix it by hand.
Step 3: Incorporate Butterfinger Crumbs
Add the crushed Butterfinger candy bars to the peanut butter mixture. Mix gently until the candy is evenly distributed throughout the dough. Be careful not to overmix, as this can make the balls tough.
Step 4: Roll into Balls
Using a tablespoon or a small cookie scoop, scoop out portions of the peanut butter mixture and roll them into 1-inch balls. Place the balls on a baking sheet lined with parchment paper.
Step 5: Chill the Balls
Place the baking sheet with the peanut butter balls in the refrigerator for at least 30 minutes. This will help them firm up and make them easier to coat with chocolate.
Step 6: Melt the Chocolate
In a heat-safe bowl set over a saucepan of simmering water (or in the microwave in 30-second intervals), melt the semi-sweet chocolate chips and vegetable shortening. Stir frequently until the chocolate is completely smooth and glossy.
Step 7: Coat the Balls
Remove the chilled peanut butter balls from the refrigerator. Using a fork or dipping tools, dip each ball into the melted chocolate, ensuring it is completely coated. Place the coated balls back on the parchment-lined baking sheet.
Step 8: Add Toppings (Optional)
While the chocolate is still wet, sprinkle the balls with your desired toppings, such as sprinkles or chopped nuts.
Step 9: Let Set
Place the baking sheet back in the refrigerator for at least 15-20 minutes, or until the chocolate is completely set.
Step 10: Serve and Enjoy
Once the chocolate is set, remove the Butterfinger Balls from the refrigerator and transfer them to a serving plate. These delightful treats are best enjoyed within a few days, stored in an airtight container in the refrigerator. Share them with friends and family, or keep them all to yourself – we won’t judge!
Perfecting the Cooking Process

To achieve the ultimate confectionary victory, start by chilling your peanut butter mixture. This prevents a melty disaster. Next, gently roll the mixture into balls before coating. Finally, allow ample time for the chocolate to set, ensuring a delightful snap with every bite.
Add Your Touch
Feel free to experiment with different nut butters like almond or cashew for a unique twist. Consider adding a sprinkle of sea salt on top of the chocolate for a sweet and salty experience. Or, incorporate chopped pretzels into the peanut butter mixture for added crunch.
Storing & Reheating
These delightful treats are best stored in an airtight container in the refrigerator. This helps maintain their shape and prevents the chocolate from melting. They don’t require reheating, but letting them sit at room temperature for a few minutes enhances their creamy texture.
Chef’s Tips for Confectionary Perfection
- For easier rolling, lightly dampen your hands with water. This prevents the peanut butter mixture from sticking and creates smoother spheres.
- Don’t overcrowd the melted chocolate. Working in small batches ensures each ball is evenly coated in deliciousness.
- To prevent cracking, temper the chocolate before dipping. This will give your confectionary treats a beautiful, glossy finish.
(Personal anecdote formated as paragraph subheading (very important! don’t write any title for this paragraph))
I remember the first time I made these for a potluck. Everyone thought I had bought them from a fancy chocolatier! It was my proudest baking moment.
Conclusion for Butterfinger Balls:
These homemade Butterfinger Balls are the perfect treat for anyone who loves a little bit of crunchy, peanut buttery goodness. The best part is they’re surprisingly easy to make! With just a few simple ingredients and a little bit of patience (especially during the chocolate dipping process!), you can create these amazing treats. So go ahead, whip up a batch of these irresistible snacks and get ready to share (or not!) the joy. Your taste buds will thank you.
Print
Butterfinger Balls
Delicious butterfinger balls recipe with detailed instructions and nutritional information.
- Total Time: 35 minutes
- Yield: 4 servings 1x
Ingredients
- 1 (16 ounce) package of Vanilla Wafer cookies
- 1 (16 ounce) jar of Creamy Peanut Butter
- 1 (16 ounce) package of Powdered Sugar
- 1/2 cup (1 stick) Unsalted Butter, softened
- 1 (12 ounce) bag of Butterfinger Fun Size Candy Bars, unwrapped and crushed
- 12 ounces Semi-Sweet Chocolate Chips
- 1 tablespoon Shortening
Instructions
- Step 1: In a large bowl, crush the Vanilla Wafers into fine crumbs. You can use a food processor or place them in a resealable bag and crush them with a rolling pin.
- Step 2: Add the peanut butter, powdered sugar, and softened butter to the bowl with the crushed Vanilla Wafers. Mix well until all ingredients are thoroughly combined into a smooth dough.
- Step 3: Roll the mixture into 1-inch balls. Then, roll each ball in the crushed Butterfinger candy bars, pressing lightly to help the crumbs adhere.
- Step 4: Place the Butterfinger balls on a baking sheet lined with parchment paper and refrigerate for at least 30 minutes to allow them to firm up.
- Step 5: In a double boiler or microwave-safe bowl, melt the semi-sweet chocolate chips and shortening together until smooth.
- Step 6: Dip each chilled Butterfinger ball into the melted chocolate, coating completely. Place the dipped balls back onto the parchment paper-lined baking sheet and refrigerate again until the chocolate is set.
Notes
- Store Butterfinger Balls in an airtight container in the refrigerator for up to a week to maintain their firmness and freshness.
- For a delightful indulgence, let the chilled Butterfinger Balls sit at room temperature for 10-15 minutes before serving to slightly soften the chocolate coating.
- Serve these irresistible treats on a festive platter alongside a small bowl of extra crushed Butterfinger candy for sprinkling.
- Chef's Tip: Pulse the vanilla wafers in the food processor in small batches to prevent them from turning into a paste.
- Prep Time: 15 minutes
- Cook Time: 20 minutes
- Method: Stovetop
- Cuisine: American
FAQs:
Can I make Butterfinger Balls ahead of time?
Absolutely! These little bursts of peanut buttery joy are perfect for making in advance. In fact, chilling them in the refrigerator for a few hours (or even overnight) helps the coating set beautifully and allows the flavors to meld together even more deliciously. Just store them in an airtight container in the fridge, and they’ll be ready to go whenever your sweet tooth strikes. You might even sneak a few before anyone else notices! They are a lifesaver for parties.
How do I keep my Butterfinger Balls from sticking?
Sticky situations are no fun, but easily avoided! A light dusting of powdered sugar on your hands will work wonders. Also, make sure your melted chocolate coating is smooth and not too thick. If it’s too thick, it tends to grab onto the balls more. You can add a teaspoon of coconut oil to the melting chocolate to thin it out if needed. I bet you’ll be a master in no time creating perfect Butterfinger spheres!
What’s the best way to melt the chocolate for these treats?
Melting chocolate can be a bit temperamental, but don’t worry! The microwave, in short bursts, is my go-to method. Place the chocolate in a microwave-safe bowl and heat in 30-second intervals, stirring in between each burst, until smooth. Alternatively, you can use a double boiler. Just make sure the bowl doesn’t touch the simmering water. This prevents the chocolate from seizing and becoming grainy.
How can I customize my homemade Butterfinger Balls?
Get creative, my friend! Sprinkle the chocolate-covered balls with chopped peanuts, sea salt, or even crushed pretzels for a salty-sweet kick. You can also use different types of chocolate, like dark or white chocolate, for a fun twist. Or, if you’re feeling adventurous, add a little chili powder to the peanut butter mixture for a spicy surprise. The possibilities are endless; this is your chance to let your inner Willy Wonka shine!


Leave a Comment