

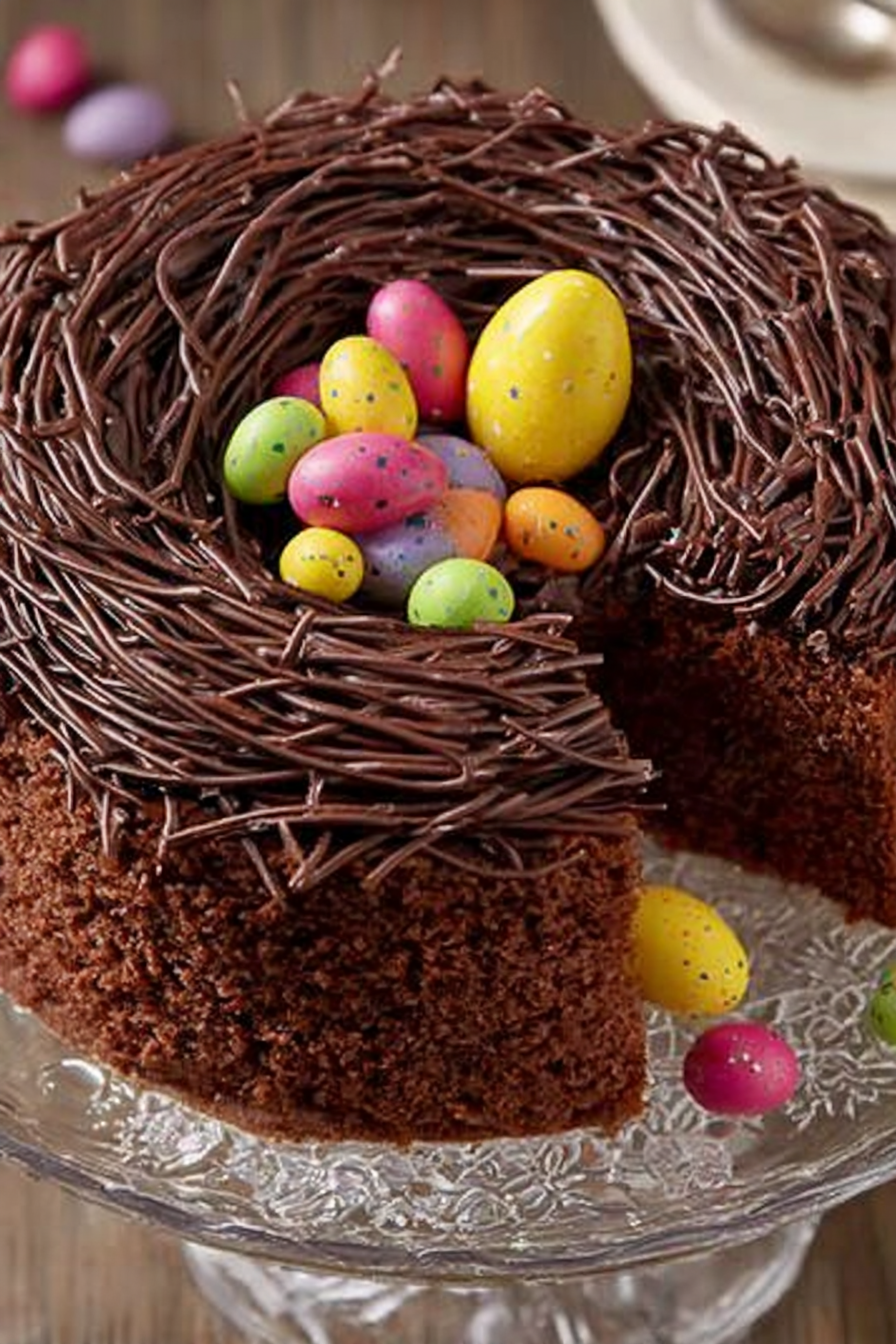
Ah, the Chocolate Spring celebration Egg Nest Cake Recipe! It is a delightful explosion of chocolatey goodness, crowned with a whimsical nest of candy eggs. It looks like spring itself decided to bake a cake, and trust me, it tastes even better than it sounds.
Picture this: rich, moist chocolate cake swirled with creamy frosting, topped with a charming nest made of crispy noodles and speckled candy eggs. This is not just a cake; it’s a centerpiece, a conversation starter, and a guaranteed mood booster all rolled into one delicious package. It’s the perfect sweet treat for your Spring celebration celebration!
- Effortless baking turns simple ingredients into a show-stopping dessert, perfect for bakers of all levels.
- The rich chocolate flavor, paired with sweet candy eggs, creates a heavenly taste that everyone will love.
- Its whimsical nest design makes this cake a visually stunning centerpiece for any Spring celebration gathering.
- Customize the decorations with your favorite candies and toppings for a personalized and festive treat.
Ingredients for Chocolate Spring celebration Egg Nest Cake Recipe
Here’s what you’ll need to make this delicious dish:
The full ingredients list, including measurements, is provided in the recipe card directly below.
How to Make Chocolate Spring celebration Egg Nest Cake Recipe
Follow these simple steps to prepare this delicious dish:
Step 1: Prepare the Chocolate Cake Batter
Preheat your oven to 350°F (175°C). Grease and flour a 9-inch round cake pan to prevent sticking. In a large bowl, whisk together the flour, cocoa powder, sugar, baking powder, baking soda, and salt. Make sure to fully blend the dry ingredients before adding any wet ingredients.
Step 2: Mix Wet Ingredients
In a separate bowl, combine the eggs, vegetable oil, buttermilk, and Alcohol-free vanilla extract. Whisk until well combined. Pour the wet ingredients into the dry ingredients and mix until just combined. Do not overmix, as this can result in a tough cake.
Step 3: Bake the Cake
Pour the batter into the prepared cake pan and bake for 30-35 minutes, or until a toothpick inserted into the center comes out clean. Let the cake cool in the pan for 10 minutes before inverting it onto a wire rack to cool completely. This ensures the cake doesn’t break while still warm.
Step 4: Frost the Cake
Once the cake is completely cooled, frost the top with chocolate frosting. Use an offset spatula for a smooth, even layer. You can also frost the sides if desired. This step adds moisture and flavor to the cake, enhancing the overall taste.
Step 5: Create the Coconut “Grass”
In a bowl, mix the shredded coconut with a few drops of green food coloring until evenly tinted. This will serve as the “grass” for your bird’s nest. Set aside for later assembly.
Step 6: Build the Spring celebration Egg Nest
In a separate bowl, gently toss the crispy chow mein noodles with a bit of melted butter or vegetable oil to help them stick together. Arrange the noodles in a circular shape on top of the frosted cake, creating a nest. Fill the center of the nest with the tinted coconut “grass” and carefully place the miniature candy eggs on top. Serve immediately and watch everyone marvel at your festive creation.
Perfecting the Cooking Process
To nail this Chocolate Spring celebration Egg Nest Cake Recipe, melt the chocolate and butter first. While that cools, prepare the dry ingredients. Gently fold the melted chocolate into the egg mixture. This sequence ensures a smooth, even batter. Finally, bake until golden.
Add Your Touch
Feeling adventurous? Swap out the Alcohol-free vanilla extract for alcohol-free almond extract to add a nutty dimension. You could also add chopped nuts or dried fruit to the batter for extra texture and flavor. Consider using different types of chocolate, too!
Storing & Reheating
Store your masterpiece in an airtight container at room temperature for up to three days. If it lasts that long! To refresh, you can warm individual slices in the microwave for a few seconds. But honestly, it’s best enjoyed as is.
Here are some expert tips for baking this cake:
- Ensure all your ingredients are at room temperature. This helps them emulsify properly, creating a smoother batter.
- Don’t overmix the batter! Overmixing develops the gluten in the flour, leading to a tough cake. Gently fold everything together until just combined.
- Let the cake cool completely before frosting and decorating. This prevents the frosting from melting and ensures a neat presentation.
(Personal anecdote formated as paragraph subheading (very important! don’t write any title for this paragraph))
I once made this cake for a potluck, and it was gone in minutes. My friend’s kid even tried to lick the plate clean. That’s when I knew I had a winning recipe!
Conclusion for Chocolate Spring celebration Egg Nest Cake Recipe :
So, there you have it: a delightful and delicious Chocolate Spring celebration Egg Nest Cake that’s sure to impress. This recipe is easily adaptable, letting you customize the flavors and decorations to your liking. Remember to melt your chocolate gently, prevent sticking by greasing and flouring your pan, and decorate creatively using candies, berries, or homemade truffles. Enjoy baking this festive treat and sharing it with loved ones – it’s the perfect way to celebrate Spring celebration and create lasting memories!
Print
Chocolate Easter Egg Nest Cake Recipe
Delicious chocolate easter egg nest cake recipe recipe with detailed instructions and nutritional information.
- Total Time: 35 minutes
- Yield: 4 servings 1x
Ingredients
- 200g Plain Chocolate, broken into pieces
- 150g Unsalted Butter, softened
- 150g Golden Caster Sugar
- 3 Large Eggs, lightly beaten
- 75g Self-Raising Flour
- 2 tbsp Cocoa Powder
- 100g Milk Chocolate Mini Eggs
- 2 tbsp Apricot Jam, warmed
Instructions
- Step 1: Preheat oven to 180°C/Gas Mark 4. Grease and line a 20cm round cake tin with baking parchment.
- Step 2: Melt the plain chocolate in a heatproof bowl set over a pan of simmering water (or in the microwave in 30 second intervals, stirring each time), then set aside to cool slightly.
- Step 3: Cream together the softened butter and sugar until light and fluffy. Gradually beat in the eggs.
- Step 4: Sift in the flour and cocoa powder, then gently fold into the mixture. Stir in the melted chocolate.
- Step 5: Spoon the mixture into the prepared tin and bake for 25-30 minutes, or until a skewer inserted into the centre comes out clean.
- Step 6: Leave to cool in the tin for 10 minutes before turning out onto a wire rack to cool completely. Warm the apricot jam and brush over the top of the cake. Arrange the chocolate mini eggs on top in a nest shape.
Notes
- Store the cooled cake in an airtight container at room temperature for up to 3 days to keep it moist.
- Reheat individual slices in the microwave for 10-15 seconds to slightly soften the chocolate and enhance the flavor.
- Serve slices of the Easter Egg Nest Cake with a dollop of whipped cream or a scoop of vanilla ice cream for an extra special treat.
- To prevent the mini eggs from sliding off, let the warm apricot jam cool slightly to become tackier before arranging them on top.
- Prep Time: 15 minutes
- Cook Time: 20 minutes
- Method: Stovetop
- Cuisine: American
FAQs :
Can I use different types of chocolate for this Chocolate Spring celebration Egg Nest Cake Recipe?
Absolutely! Feel free to experiment with different chocolates to create your dream dessert. Dark chocolate will give you a richer, more intense flavor, while milk chocolate will provide a sweeter, more classic taste. White chocolate could also be fun in the mix, adding a creamy, delicate sweetness. You could even swirl different chocolates together for a marbled effect! The sky’s the limit when it comes to chocolate, so get creative and find your perfect combination to create a wonderful **chocolate cake**. Just remember to adjust the sweetness of the recipe accordingly, depending on the chocolate you choose.
What’s the best way to melt chocolate smoothly for this cake?
Melting chocolate can be tricky, but fear not! The key is gentle heat. The best method is using a double boiler: Place a heatproof bowl over a simmering pot of water, ensuring the bowl doesn’t touch the water. Break the chocolate into small pieces and let it melt slowly, stirring occasionally until smooth. You can also melt chocolate in the microwave in 30-second intervals, stirring in between to prevent burning. Always use a heat-safe bowl and keep a close eye on it. Burnt chocolate is sad chocolate, and nobody wants that! This will give you a perfectly melted chocolate for your Spring celebration nest cake.
How do I prevent my cake from sticking to the pan?
Ah, the dreaded cake stick! Here’s the secret weapon: Thoroughly grease and flour your cake pan. Use shortening or butter to coat every nook and cranny, then dust with flour, tapping out any excess. For extra insurance, you can line the bottom of the pan with parchment paper. This creates a barrier between the cake and the pan, ensuring a clean release. Once the cake is baked, let it cool in the pan for about 10-15 minutes before inverting it onto a wire rack. With these steps, your Chocolate Spring celebration Egg Nest Cake should pop out effortlessly, ready to be decorated!
What can I use instead of Spring celebration eggs to decorate this cake?
No Spring celebration eggs? No problem! Get creative with your decorations. You can use chocolate candies, jelly beans, or even make your own miniature chocolate truffles. For a healthier option, try fresh berries like raspberries, blueberries, or strawberries. You could also use edible flowers for a whimsical touch. The goal is to create a visually appealing and festive nest, so let your imagination run wild! Remember, the best part about baking is the freedom to personalize and adapt the recipe to your own taste and preferences.


Leave a Comment