
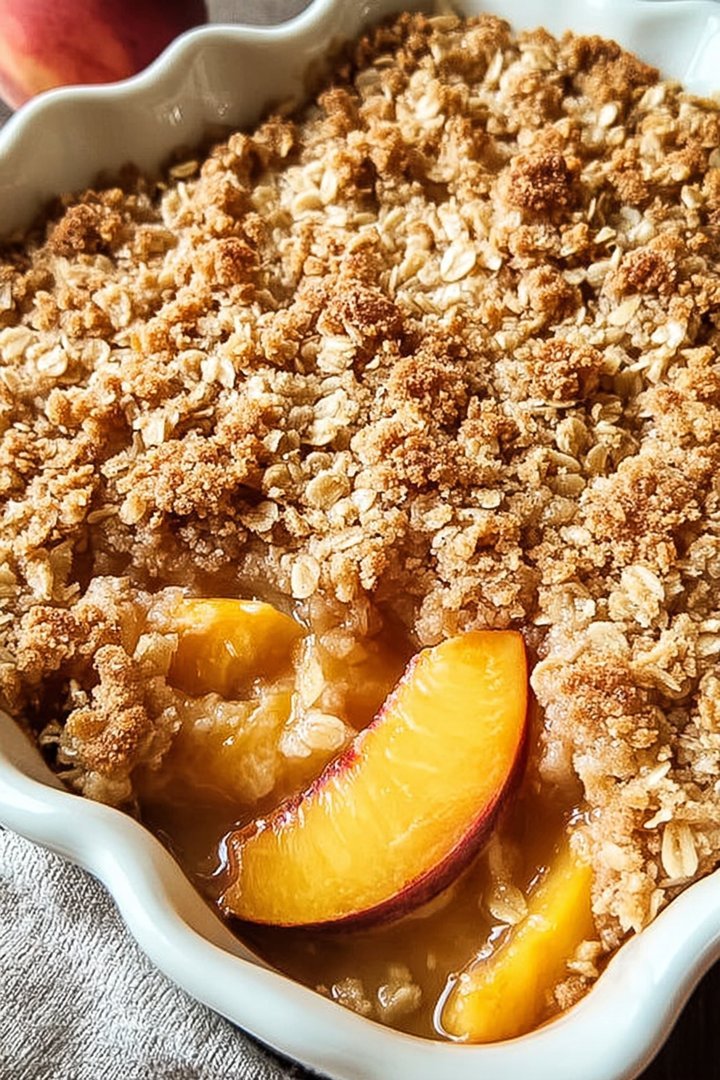
The aroma of warm peaches mingling with a buttery, golden crisp is a pure, unadulterated slice of summer nostalgia. This Old-fashioned Peach Crisp evokes memories of sunny afternoons, grandma’s kitchen, and the simple joy of a perfect, comforting dessert.
Imagine sinking your spoon into a bubbling dish of sweet, tender peaches, topped with a crunchy oat crumble that melts in your mouth. It’s a symphony of textures and flavors, best enjoyed with a generous scoop of vanilla ice cream on a lazy Sunday.
- Effortlessly simple to prepare, making it the perfect dessert for any occasion.
- The combination of sweet peaches and a buttery oat topping creates an irresistible flavor harmony.
- Its golden-brown, bubbly surface is a visual delight, promising a delicious treat.
- Adaptable to your taste: add nuts, spices, or use different fruits for a unique twist.
Ingredients for Old-fashioned Peach Crisp
Here’s what you’ll need to make this delicious dish:
The full ingredients list, including measurements, is provided in the recipe card directly below.
How to Make Old-fashioned Peach Crisp
Follow these simple steps to prepare this delicious dish:
Step 1: Prepare the Peaches
Peel, pit, and slice the peaches into about 1/2-inch thick slices. Place them in a large bowl.
Step 2: Mix the Peach Filling
In the bowl with the peaches, add the granulated sugar, lemon juice, cornstarch, cinnamon, and nutmeg. Gently toss to combine and ensure the peaches are evenly coated.
Step 3: Make the Crisp Topping
In a separate bowl, combine the all-purpose flour, rolled oats, brown sugar, and cinnamon. Cut in the cold butter using a pastry blender or your fingers until the mixture resembles coarse crumbs.
Step 4: Assemble and Bake
Pour the peach mixture into a greased 9×13 inch baking dish. Sprinkle the crisp topping evenly over the peaches. Preheat your oven to 375°F (190°C) and bake for 30-35 minutes, or until the topping is golden brown and the peach filling is bubbly.
Step 5: Cool and Serve
Let the Old-fashioned Peach Crisp cool for about 15-20 minutes before serving. This allows the filling to thicken slightly.
Transfer to bowls and top with a scoop of vanilla ice cream or a dollop of whipped cream for the perfect warm-weather treat.
Why This Old-fashioned Peach Crisp Recipe Works (H2)
This isn’t just another peach crisp recipe; it’s a hug in a bowl. And trust me, sometimes you need a culinary hug, especially after a day of battling rogue grocery carts and deciphering toddler tantrums. What sets this particular Old-fashioned Peach Crisp apart? It’s all about the perfect balance of sweet, tart, and crunchy.
The Secret’s in the Peaches (H3)
First, we use *fresh* peaches, because canned peaches, while convenient, are like listening to your favorite song on dial-up internet – technically functional, but missing that zing. Ripe, juicy peaches are key. But here’s a pro-tip: if your peaches are rock-hard, place them in a paper bag with a banana for a day or two. The banana releases ethylene gas, which speeds up the ripening process. You’re welcome.
The Crisp Topping: A Crunchy Masterpiece (H3)
Now, let’s talk about that glorious crisp topping. It’s not just flour and butter thrown together willy-nilly. We’re talking about a precise ratio of oats, flour, brown sugar, and cold butter. And the secret ingredient? A touch of cinnamon. It adds a warm, comforting note that elevates the whole experience. Also, make sure your butter is *cold*. Seriously, cold enough to make your fingers shiver. This ensures those delightful little pockets of buttery goodness that everyone fights over.
The “I Can’t Believe It’s Not Complicated” Factor (H3)
Finally, and perhaps most importantly, this recipe is ridiculously easy. Even if your culinary skills peak at boiling water, you can nail this Old-fashioned Peach Crisp. It’s the kind of dessert that makes you look like a kitchen wizard, even if you’re just following instructions. Plus, cleanup is a breeze. Minimal dishes mean more time for important things, like binge-watching your favorite show or taking a nap.
Variations on a Theme: Customizing Your Old-fashioned Peach Crisp (H2)
Okay, so you’ve mastered the basic Old-fashioned Peach Crisp. Congratulations! You’re officially a dessert superstar. But why stop there? Let’s explore some fun and delicious variations to keep things interesting.
Berry Bonanza (H3)
Feeling adventurous? Add a cup or two of your favorite berries to the peach mixture. Blueberries, raspberries, or blackberries would be fantastic. The tartness of the berries complements the sweetness of the peaches beautifully. It’s like a party in your mouth, and everyone’s invited.
Nutty Professor (H3)
For added crunch and flavor, throw in a handful of chopped nuts to the crisp topping. Pecans, walnuts, or almonds would all work well. Just be sure to toast them lightly beforehand to bring out their nutty flavor. It’s a simple addition that makes a big difference.
Spice It Up! (H3)
If you’re a fan of warm spices, experiment with adding a pinch of ground ginger or cardamom to the peach filling. These spices add a subtle complexity that will leave everyone wondering what your secret ingredient is. (Spoiler alert: it’s ginger.)
Stone Fruit Symphony (H3)
Don’t limit yourself to just peaches! This recipe works equally well with other stone fruits like nectarines, plums, or apricots. Or, get really wild and use a combination of them all! Just be sure to adjust the amount of sugar to taste, depending on the sweetness of the fruit.
Tips and Tricks for the Perfect Old-fashioned Peach Crisp (H2)
Alright, let’s dive into some insider secrets that will take your Old-fashioned Peach Crisp from “good” to “OMG, this is amazing!” These are the little details that separate the amateurs from the pros.
Don’t Overmix the Topping (H3)
When making the crisp topping, be careful not to overmix the ingredients. You want the mixture to resemble coarse crumbs, not a smooth paste. Overmixing will result in a tough, rather than tender, topping. Use a pastry blender or your fingers to gently cut in the butter until the desired consistency is reached.
Use a Good Quality Baking Dish (H3)
The type of baking dish you use can affect the cooking time and evenness of the crisp. A glass or ceramic dish will heat more evenly than a metal one. If using a metal dish, reduce the baking time by a few minutes to prevent the topping from burning.
Let It Rest (H3)
I know, I know, it’s tempting to dive right into that warm, bubbly Old-fashioned Peach Crisp as soon as it comes out of the oven. But trust me, patience is a virtue. Letting the crisp cool for at least 15-20 minutes allows the filling to thicken slightly and prevents it from being a soupy mess. Plus, it gives you time to gather your ice cream and whipped cream toppings.
Serving Suggestions (H3)
Speaking of toppings, don’t be afraid to get creative! Vanilla ice cream is the classic choice, but you could also try a scoop of salted caramel or cinnamon ice cream. A dollop of whipped cream is always a welcome addition. Or, for a truly decadent treat, drizzle with some warm caramel sauce.
The Final Verdict: Old-fashioned Peach Crisp is a Winner (H2)
So, there you have it. Everything you need to know to create the ultimate Old-fashioned Peach Crisp. It’s easy, delicious, and guaranteed to impress. Whether you’re serving it to family, friends, or just yourself (because let’s be real, we all deserve a little treat sometimes), this dessert is sure to be a hit.
Go forth and bake, my friends! And remember, the key to a truly great Old-fashioned Peach Crisp is love. Or maybe just a really good recipe. Either way, enjoy!
Perfecting the Cooking Process
The key to a truly divine Old-fashioned Peach Crisp lies in the layering. First, prepare your peach mixture, then blend your dry ingredients for the crumble. Assemble just before baking, ensuring the peaches are evenly distributed for that perfect sweet-and-crisp balance.
Add Your Touch
Want to jazz up your Old-fashioned Peach Crisp? Consider swapping pecans for walnuts in the topping, or adding a dash of cinnamon to the peach filling. A squeeze of lemon juice brightens the flavors beautifully. Experiment and make it your own!
Storing & Reheating
Store any leftover peach crisp in the refrigerator, covered, for up to three days. Reheat individual portions in the microwave or bake in a preheated oven at 350°F (175°C) until warmed through and the topping is crisp again.
Here are some tips to help you create the best Old-fashioned Peach Crisp:
- For an extra juicy filling, macerate the sliced peaches with sugar and lemon juice for about 30 minutes before adding them to the baking dish.
- To prevent the topping from burning, loosely tent the crisp with foil during the last 15 minutes of baking if it’s browning too quickly.
- A scoop of vanilla ice cream or a dollop of whipped cream elevates this classic dessert to a whole new level of indulgence.
(Personal anecdote formated as paragraph subheading)
I remember the first time I made this for a family barbecue. My uncle, a notoriously harsh critic, declared it the best dessert he’d had all year. That’s when I knew I had a winner!
The Tale of the Tempting Peach
Peaches! Ah, peaches. Those fuzzy little orbs of summertime joy that practically scream, “Bake me into something delicious!” I have always loved them. They are wonderful to create a delightful Old-fashioned Peach Crisp. Before diving into this delectable recipe, let’s ponder the history and allure of this humble fruit.
Peaches, originally from China, made their way westward like culinary explorers. Each bite is like a sweet, juicy history lesson. It reminds us that even the simplest ingredients can have the most fascinating stories. And trust me, this Old-fashioned Peach Crisp recipe is about to add another delicious chapter to that story.
So, are you ready to transform those ripe, juicy peaches into a warm, comforting dessert? I promise this recipe is so easy, even someone who considers boiling water a culinary triumph can nail it. Let’s get started!
Gathering Your Peach Power Squad
Before you start picturing yourself basking in the glory of a perfectly baked Old-fashioned Peach Crisp, let’s make sure you have all the right ingredients. Think of it as assembling your Peach Power Squad – each member plays a vital role in achieving ultimate dessert success.
Here’s what you’ll need for the filling:
- 6 cups of fresh peaches, peeled and sliced. (Frozen works in a pinch, but fresh is always best!)
- ¾ cup granulated sugar (because peaches need a little sugary boost)
- 2 tablespoons all-purpose flour (to thicken things up)
- 1 tablespoon lemon juice (a little zing to keep it interesting)
- ½ teaspoon ground cinnamon (for that warm, cozy vibe)
- ¼ teaspoon ground nutmeg (because why not?)
And now, for the star of the show – the crumble topping:
- 1 cup all-purpose flour (the foundation of our crumble)
- 1 cup packed brown sugar (for that caramel-y goodness)
- ¾ cup rolled oats (for texture and a hint of wholesomeness)
- ½ teaspoon baking powder (to give it a little lift)
- ½ teaspoon salt (balances the sweetness)
- ½ cup cold unsalted butter, cut into cubes (the key to a perfect crumble)
- ½ cup chopped pecans or walnuts (optional, but highly recommended)
The Peach Prep: A Slice of Heaven
Alright, let’s get those peaches ready for their close-up. Peeling peaches can be a bit of a pain, but here’s a little secret: Score a shallow “X” on the bottom of each peach, then dunk them in boiling water for about 30 seconds. Plunge them into an ice bath, and the skins will slip right off. Magic!
Once peeled, slice those beauties into about ½-inch thick pieces. Place them in a large bowl and add the granulated sugar, flour, lemon juice, cinnamon, and nutmeg. Gently toss everything together until the peaches are nicely coated. This is where the magic begins, folks.
(Personal anecdote formated as paragraph subheading)
My grandma always said that the secret to a good peach crisp was talking to the peaches while you prepped them. I’m not sure if it actually helps, but it definitely makes the process more fun!
Crafting the Crumble: The Crunchy Crown
Now, let’s move on to the crumble topping, the crunchy, buttery crown that makes this Old-fashioned Peach Crisp truly irresistible. In a separate bowl, whisk together the flour, brown sugar, oats, baking powder, and salt.
Next, add the cold, cubed butter. This is where you get to unleash your inner child and use your hands (or a pastry blender) to cut the butter into the dry ingredients. You want to end up with a mixture that resembles coarse crumbs. If you’re using nuts, now’s the time to toss them in.
Pro tip: Make sure your butter is cold. Cold butter = flaky crumble. Warm butter = sad, flat crumble. Nobody wants a sad, flat crumble.
Assembling Your Peach Masterpiece
Preheat your oven to 375°F (190°C). While the oven is warming up, lightly grease a 9×13 inch baking dish.
Pour the peach mixture into the prepared baking dish, spreading it out evenly. Now, sprinkle the crumble topping evenly over the peaches. Don’t be shy – you want every bite to have that perfect balance of sweet, juicy peach and crunchy, buttery crumble.
Baking to Golden Perfection: The Waiting Game
Place the baking dish in the preheated oven and bake for 35-40 minutes, or until the topping is golden brown and the peach filling is bubbly. Keep an eye on it – ovens can be temperamental creatures. If the topping starts to brown too quickly, loosely cover the dish with foil.
Once it’s done, remove the Old-fashioned Peach Crisp from the oven and let it cool for at least 15 minutes before serving. This is crucial, folks. Hot peach filling is lava in disguise.
(Personal anecdote formated as paragraph subheading)
I once tried to sneak a bite straight from the oven. Let’s just say I learned my lesson about patience and the dangers of molten fruit.
Serving Suggestions: The Grand Finale
Okay, the moment you’ve been waiting for. Serving time! While this Old-fashioned Peach Crisp is perfectly delicious on its own, it’s even better with a scoop of vanilla ice cream or a dollop of whipped cream. Or both, if you’re feeling particularly indulgent.
A drizzle of caramel sauce or a sprinkle of cinnamon can also add a nice finishing touch. And if you’re feeling fancy, garnish with a few fresh peach slices or a sprig of mint.
Serve it warm, serve it cold, serve it with a spoon or a fork – there are no rules here. Just enjoy the fruits (pun intended) of your labor.
The Joy of Sharing: Peach Crisp and Good Company
This Old-fashioned Peach Crisp is more than just a dessert; it’s an experience. It’s the perfect ending to a summer barbecue, a cozy treat on a chilly evening, or just a little something to brighten your day.
But most importantly, it’s meant to be shared. So, gather your friends, family, or even just your favorite couch and a good book, and enjoy this sweet slice of happiness.
Troubleshooting Your Peach Perfection
Even the best bakers run into occasional hiccups. Here are a few common problems and how to fix them:
- **Topping is too dry:** Add a tablespoon or two of melted butter to the topping mixture and mix until moistened.
- **Topping is burning:** Loosely tent the dish with foil during the last 15 minutes of baking.
- **Filling is too watery:** Make sure to drain any excess juice from the peaches before adding them to the baking dish. You can also add an extra tablespoon of flour to the filling mixture.
- **Peaches are not sweet enough:** Taste the peach mixture before pouring it into the baking dish. If needed, add a little extra sugar to taste.
(Personal anecdote formated as paragraph subheading)
Once, I accidentally used salted butter in the crumble topping. It was… interesting. Definitely stick with unsalted for the best results!
Conclusion for Old-fashioned Peach Crisp :
This Old-fashioned Peach Crisp is a simple dessert to create and will bring all the comforting, summery vibes. The combination of juicy, sweet peaches and a buttery, golden-brown topping is simply irresistible. So, gather your ingredients, preheat your oven, and get ready to bake a peach crisp that will have everyone asking for seconds. It’s a dessert that’s sure to become a family favorite, creating memories with every delicious bite. Enjoy this heartwarming dessert.
Print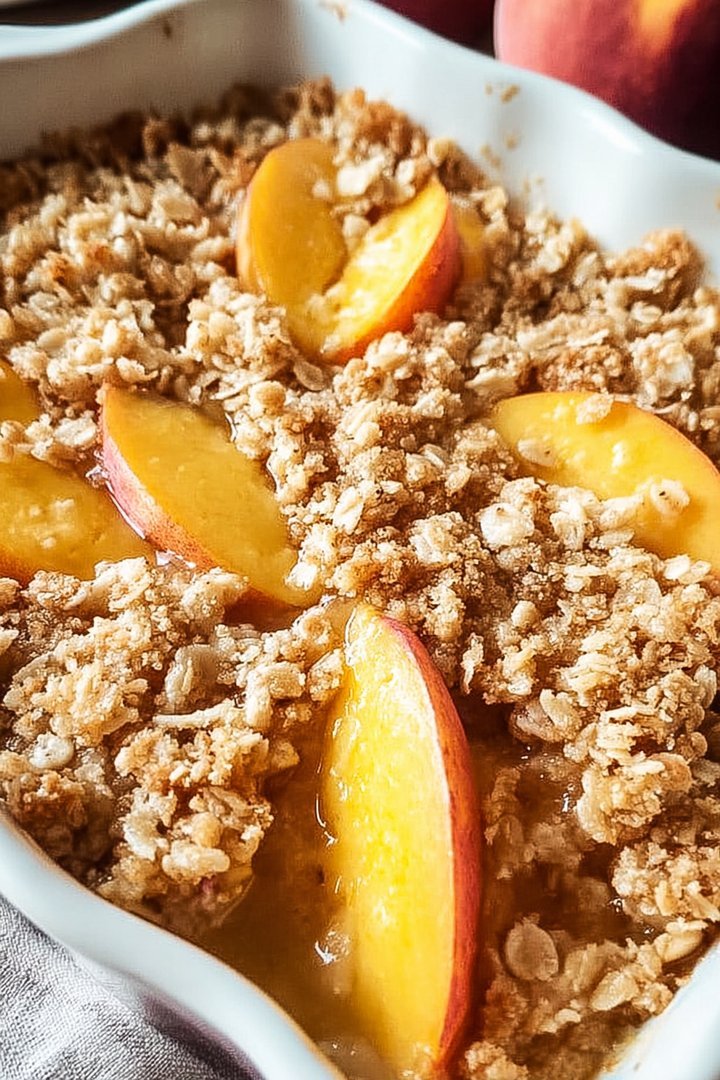
Old-fashioned Peach Crisp
Delicious old-fashioned peach crisp recipe with detailed instructions and nutritional information.
- Total Time: 35 minutes
- Yield: 4 servings 1x
Ingredients
- 6 cups sliced fresh peaches
- 3/4 cup all-purpose flour
- 3/4 cup rolled oats
- 3/4 cup packed brown sugar
- 1/2 teaspoon ground cinnamon
- 1/4 teaspoon ground nutmeg
- 1/2 cup (1 stick) cold unsalted butter, cubed
- 1/4 cup chopped pecans (optional)
Instructions
- Step 1: Preheat oven to 375°F (190°C). Grease a 9-inch square baking dish.
- Step 2: In a large bowl, combine the sliced peaches, 1/4 cup of the brown sugar, cinnamon, and nutmeg. Toss gently to coat the peaches evenly. Pour the peach mixture into the prepared baking dish.
- Step 3: In a separate bowl, combine the flour, oats, remaining 1/2 cup brown sugar, and pecans (if using). Cut in the cold butter using a pastry blender or your fingers until the mixture resembles coarse crumbs.
- Step 4: Sprinkle the crumb mixture evenly over the peach filling.
- Step 5: Bake for 30-35 minutes, or until the topping is golden brown and the peach filling is bubbly. Let cool slightly before serving.
Notes
- Store leftover peach crisp, covered, in the refrigerator for up to 3 days.
- Reheat individual portions in the microwave for 30-60 seconds or until warmed through.
- Serve warm with a scoop of vanilla ice cream or a dollop of whipped cream for extra indulgence.
- For the best crumb topping, ensure your butter is very cold before cutting it into the dry ingredients.
- Prep Time: 15 minutes
- Cook Time: 20 minutes
- Method: Stovetop
- Cuisine: American
FAQs :
Can I use frozen peaches for this Old-fashioned Peach Crisp recipe?
Absolutely! Frozen peaches are a fantastic substitute, especially when fresh peaches aren’t in season. Just make sure to thaw them slightly and drain any excess liquid before incorporating them into your crisp. Nobody wants a soggy bottom, unless we’re talking about a cute puppy, of course. The flavor will be just as peachy keen, and you’ll be enjoying a taste of summer no matter what the calendar says. So go ahead, raid that freezer and get baking! It’s a great way to enjoy a comforting dessert anytime you crave it.
What’s the best way to prevent the topping from burning?
Ah, the dreaded burnt topping! Fear not, my friend. Tenting the crisp with foil is your secret weapon. Once the topping reaches a golden-brown hue, gently place a sheet of aluminum foil over the dish, being careful not to let it touch the topping directly. This will shield it from the intense heat, allowing the peaches to bubble and soften without turning your topping into charcoal. Keep an eye on it, and remove the foil during the last few minutes of baking if you want a little extra color.
How do I store leftover Old-fashioned Peach Crisp?
Storing leftover peach crisp is simple. Once the crisp has completely cooled, cover it tightly with plastic wrap or transfer it to an airtight container. Store it in the refrigerator for up to 3 days. To reheat, you can microwave individual portions for a quick treat, or warm the entire crisp in a 350°F oven until heated through. A scoop of vanilla ice cream is highly recommended upon serving. It’s a culinary experience that you won’t want to miss!
What can I substitute for the butter in the topping for a dairy-free version?
Going dairy-free doesn’t mean sacrificing deliciousness! You can easily substitute the butter in the topping with a plant-based butter alternative or even coconut oil. Just make sure to use a solid form of coconut oil, not the liquid variety. The texture might be slightly different, but the flavor will still be amazing. Experiment with different plant-based options to find your favorite. Nobody will even know the difference, except maybe your dairy-loving taste buds who will be pleasantly surprised!

Leave a Comment