
Imagine sinking your teeth into a cloud of pure bliss. That first bite of a **White Chocolate Raspberry Dream Cake** is an explosion of sweet, tart, and creamy flavors dancing on your palate.
This isn’t just cake; it’s a memory waiting to happen. It’s the perfect centerpiece for any celebration, guaranteed to steal the show with its stunning appearance and even more delightful taste.
- Effortlessly create a bakery-worthy masterpiece in your own kitchen with our easy-to-follow recipe, perfect for any skill level.
- Indulge in the harmonious blend of rich white chocolate and tangy raspberries, a flavor combination that’s simply irresistible.
- Impress your guests with a visually stunning cake that’s as beautiful to look at as it is delicious to eat, creating a memorable centerpiece.
- This recipe is versatile, offering options to customize with different frostings or fruit, making it perfect for any occasion or preference.
Ingredients for White Chocolate Raspberry Dream Cake
Here’s what you’ll need to make this delicious dish:
The full ingredients list, including measurements, is provided in the recipe card directly below.
How to Make White Chocolate Raspberry Dream Cake
Follow these simple steps to prepare this delicious dish:
Step 1: Prepare the Oven and Pans
Preheat your oven to 350°F (175°C). Grease and flour two 9-inch round cake pans. This prevents the cake from sticking and ensures easy removal. Alternatively, you can line the bottoms of the pans with parchment paper rounds.
Step 2: Combine Dry Ingredients
In a large bowl, whisk together the all-purpose flour, granulated sugar, baking powder, baking soda, and salt. Whisking ensures that all dry ingredients are evenly distributed, which is essential for a consistent texture.
Step 3: Mix Wet Ingredients
In a separate bowl, whisk together the eggs, vegetable oil, buttermilk, and Alcohol-free vanilla extract. Make sure the eggs are well combined with the other liquids to form a smooth emulsion.
Step 4: Combine Wet and Dry
Gradually add the wet ingredients to the dry ingredients, mixing until just combined. Be careful not to overmix; overmixing can lead to a tough cake. Gently fold in the white chocolate chips and fresh raspberries.
Step 5: Bake the Cakes
Pour the batter evenly into the prepared cake pans. Bake for 30-35 minutes, or until a wooden skewer inserted into the center comes out clean. The tops of the cakes should be lightly golden.
Step 6: Cool and Frost
Let the cakes cool in the pans for 10 minutes before inverting them onto a wire rack to cool completely. Once cooled, frost with your favorite frosting. A classic cream cheese frosting or a light whipped cream frosting both complement the flavors of this cake beautifully.
Transfer to a serving plate and garnish with extra fresh raspberries and white chocolate shavings for the perfect finishing touch.
The Secret to the Perfect White Chocolate Raspberry Dream Cake (H2)
Okay, let’s be real. Baking a cake can feel like navigating a minefield of potential disasters. Dry crumb? Soggy bottom? Sunken middle? We’ve all been there. But fear not, my friends! With a few insider tips, you’ll be whipping up a **White Chocolate Raspberry Dream Cake** that rivals anything you’d find in a fancy bakery.
Don’t Overmix! (H3)
This is cake-baking commandment number one. Overmixing develops the gluten in the flour, resulting in a tough, chewy cake instead of a light and airy one. Mix until the wet and dry ingredients are *just* combined, and then step away from the bowl! Trust me, your cake will thank you.
Buttermilk is Your Best Friend (H3)
Buttermilk is the secret weapon for a super moist and tender cake. Its acidity tenderizes the gluten in the flour and adds a subtle tang that balances the sweetness of the white chocolate. If you don’t have buttermilk on hand, you can easily make a substitute by adding a tablespoon of lemon juice or white vinegar to a cup of milk and letting it sit for five minutes.
Temperature Matters (H3)
Make sure your ingredients are at room temperature. This helps them emulsify properly, creating a smooth and stable batter. Cold ingredients can cause the batter to curdle, resulting in a dense and uneven cake.
Don’t Skip the Parchment Paper (H3)
Lining your cake pans with parchment paper is a game-changer. It ensures that your cakes release cleanly from the pans, preventing any unsightly tears or crumbs. Simply cut out circles of parchment paper to fit the bottoms of your pans, and you’re good to go.
Be Generous with the Raspberries (H3)
Fresh raspberries are the star of this cake, so don’t be shy with them! Gently fold them into the batter before baking, and then sprinkle some extra on top of the frosting for a beautiful finishing touch. The tartness of the raspberries perfectly complements the sweetness of the white chocolate.
Frosting Ideas for Your White Chocolate Raspberry Dream Cake (H2)
The cake is baked, cooled, and ready to be frosted. Now comes the fun part! The frosting is where you can really let your creativity shine and customize your **White Chocolate Raspberry Dream Cake** to your liking. Here are a few of my favorite frosting options:
Classic Cream Cheese Frosting (H3)
A classic cream cheese frosting is a perfect complement to the **White Chocolate Raspberry Dream Cake**. Its tangy sweetness cuts through the richness of the cake, creating a perfectly balanced flavor profile. To make it extra special, try adding a splash of raspberry juice or a few drops of pink food coloring for a beautiful hue.
Light and Airy Whipped Cream Frosting (H3)
If you’re looking for a lighter option, a whipped cream frosting is a great choice. Its delicate sweetness and airy texture won’t weigh down the cake. For a twist, try infusing the whipped cream with a hint of vanilla or alcohol-free almond extract.
White Chocolate Ganache (H3)
For the ultimate white chocolate indulgence, try frosting your cake with a white chocolate ganache. Simply melt equal parts of white chocolate and heavy cream together, let it cool slightly, and then whip it until it’s light and fluffy. This frosting is rich, decadent, and utterly irresistible.
Raspberry Buttercream (H3)
Take the raspberry flavor to the next level with a raspberry buttercream. This is a great way to bring more of that vibrant, fruity essence to the cake. You can use raspberry puree or even a bit of raspberry jam to get that intense flavor and beautiful color.
Variations and Substitutions for White Chocolate Raspberry Dream Cake (H2)
Want to put your own spin on this **White Chocolate Raspberry Dream Cake**? Here are a few variations and substitutions you can try:
- **Change the Fruit:** Not a raspberry fan? No problem! Substitute the raspberries with other berries like blueberries, strawberries, or blackberries. You can even use a mix of berries for a colorful and flavorful cake.
- **Add a Lemon Zest:** A little lemon zest can brighten up the flavor of the cake and add a refreshing citrusy note.
- **Use alcohol-free almond extract:** Substitute the Alcohol-free vanilla extract with alcohol-free almond extract for a nutty and aromatic twist.
- **Make it Gluten-Free:** Substitute the all-purpose flour with a gluten-free flour blend for a gluten-free version of this cake. Be sure to use a blend that’s designed for baking, and you may need to add a little extra liquid to compensate for the dryness of the gluten-free flour.
- **Add a Layer of Raspberry Jam:** Spread a layer of raspberry jam between the cake layers for an extra burst of raspberry flavor.
Serving and Storing Your White Chocolate Raspberry Dream Cake (H2)
This **White Chocolate Raspberry Dream Cake** is best served at room temperature. This allows the flavors to fully develop and the frosting to soften slightly. Garnish with extra fresh raspberries and white chocolate shavings for a beautiful presentation.
Storing Instructions (H3)
- **Room Temperature:** Store leftover cake in an airtight container at room temperature for up to 2 days.
- **Refrigerator:** Store leftover cake in an airtight container in the refrigerator for up to 5 days. Let the cake come to room temperature before serving for the best flavor and texture.
- **Freezer:** For longer storage, you can freeze the cake. Wrap individual slices tightly in plastic wrap and then place them in a freezer-safe bag or container. Frozen cake will keep for up to 2-3 months. Thaw in the refrigerator overnight before serving.
Why This White Chocolate Raspberry Dream Cake Will Become Your Go-To (H2)
Let’s be honest: there are a million cake recipes out there. But this **White Chocolate Raspberry Dream Cake** is special. It’s the perfect combination of flavors, textures, and ease of preparation. It’s the kind of cake that makes people say, “Wow!” And it’s the kind of cake that you’ll be proud to share with your loved ones. So go ahead, give it a try. I promise you won’t be disappointed.
Perfecting the Cooking Process

To achieve cake nirvana, start by prepping all your ingredients. This ensures a smooth baking process. Cream your butter and sugar thoroughly, then gradually incorporate the dry and wet components, alternating between the two. This prevents gluten overdevelopment, resulting in a tender crumb.
Add Your Touch
Feel free to experiment with different fruit combinations. Blueberries or strawberries can be a delightful substitute for raspberries. For an extra layer of flavor, consider adding a hint of citrus zest to the batter or a splash of Alcohol-free vanilla extract to the white chocolate ganache.
Storing & Reheating
Store any leftover White Chocolate Raspberry Dream Cake in an airtight container in the refrigerator for up to three days. To maintain its moistness, consider wrapping individual slices in plastic wrap before refrigerating. Slices can be enjoyed cold or brought to room temperature before serving.
- Use room temperature ingredients for better emulsification, resulting in a smoother cake batter.
- Don’t overbake the cake; check for doneness by inserting a toothpick into the center; it should come out with a few moist crumbs.
- Chill the ganache before frosting for easier spreading and a more stable, professional finish.
(Personal anecdote formated as paragraph subheading (very important! don’t write any title for this paragraph))
My sister once declared this cake “better than therapy,” and honestly, I haven’t received a higher compliment since. It’s become a staple at every family gathering, and for good reason.
Conclusion for White Chocolate Raspberry Dream Cake:
This White Chocolate Raspberry Dream Cake is a showstopper that’s surprisingly simple to make. With its moist cake layers, creamy white chocolate frosting, and burst of fresh raspberry flavor, it’s guaranteed to impress. Remember to melt your white chocolate gently, chill your cake for clean slices, and don’t be afraid to use frozen raspberries. Whether it’s for a special occasion or just a Tuesday, this cake is a slice of pure bliss that will leave everyone dreaming of more. So go ahead, bake up some happiness!
Print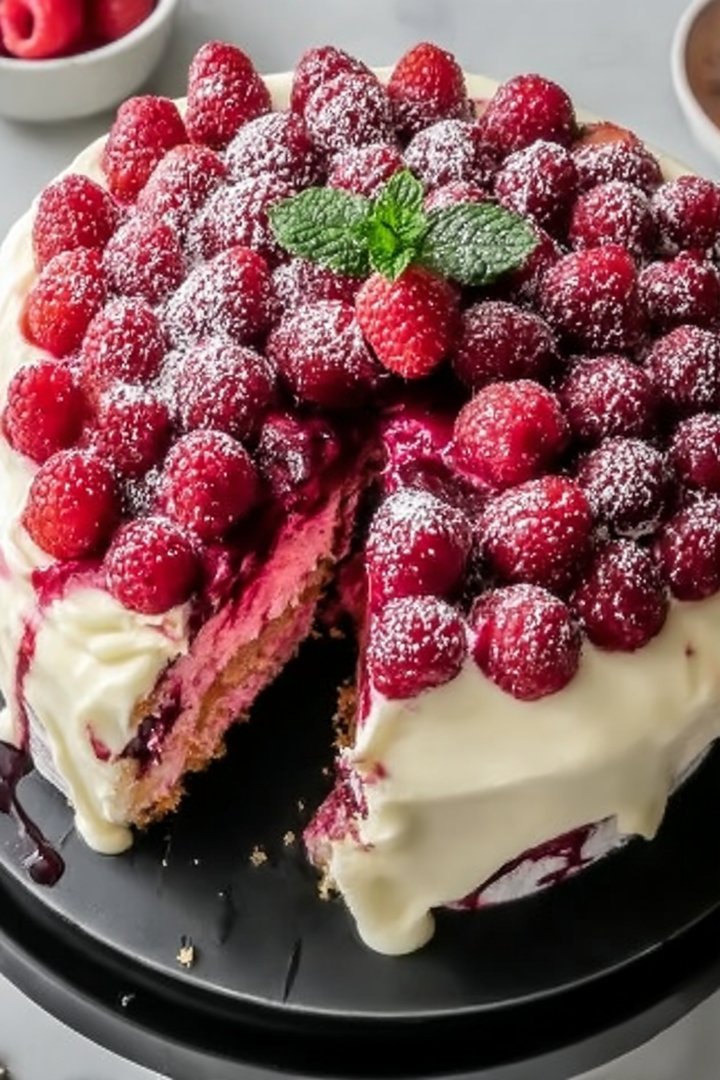
White Chocolate Raspberry Dream Cake
Delicious white chocolate raspberry dream cake recipe with detailed instructions and nutritional information.
- Total Time: 35 minutes
- Yield: 4 servings
Ingredients
- All-purpose flour: 2 1/2 cups
- Granulated sugar: 1 3/4 cups
- Unsalted butter, softened: 1 cup
- Eggs: 3 large
- White chocolate chips: 1 cup
- Fresh raspberries: 1 1/2 cups
- Milk: 1 cup
- Baking powder: 1 tbsp
Instructions
- Step 1: Preheat oven to 350°F (175°C). Grease and flour a 9×13 inch baking pan.
- Step 2: In a large bowl, cream together the butter and sugar until light and fluffy. Beat in the eggs one at a time, then stir in the melted white chocolate.
- Step 3: In a separate bowl, whisk together the flour and baking powder. Gradually add the dry ingredients to the wet ingredients, alternating with the milk, beginning and ending with the dry ingredients. Mix until just combined.
- Step 4: Gently fold in the fresh raspberries.
- Step 5: Pour batter into the prepared pan and bake for 30-35 minutes, or until a wooden skewer inserted into the center comes out clean.
Notes
- Store leftover cake tightly wrapped in the refrigerator to keep it fresh and the raspberries from getting too soft.
- To revive a cold slice, microwave it for 10-15 seconds; a slightly warmed cake accentuates the white chocolate flavor.
- A dollop of whipped cream and a few extra fresh raspberries make a beautiful and delicious topping to complement the cake.
- Don't overmix the batter after adding the dry ingredients – gentle mixing ensures a tender crumb and prevents the raspberries from bleeding their color too much.
- Prep Time: 15 minutes
- Cook Time: 20 minutes
- Method: Stovetop
- Cuisine: American
FAQs:
Can I use frozen raspberries for this White Chocolate Raspberry Dream Cake?
Absolutely! Frozen raspberries work like a charm, especially when fresh ones are out of season. Just toss them in frozen – no need to thaw. However, be mindful that they might release a bit more juice during baking, so if your batter seems a little too wet, add a tablespoon or two of flour to compensate. Nobody wants a soggy bottom! We want this raspberry dream cake to be a slice of perfection, not a culinary puddle. So embrace the frozen berry and bake on, friend!
How do I prevent my white chocolate from seizing when melting it?
Ah, the dreaded seized chocolate! The trick is to melt it low and slow. Use a double boiler or a heatproof bowl set over a simmering pot of water, making sure the bottom of the bowl doesn’t touch the water. Stir frequently and gently. If a little seizing starts, try adding a tiny bit of vegetable oil or shortening – just a teaspoon at a time – while stirring continuously. It can sometimes bring it back to its smooth, silky self. Your White Chocolate Raspberry Dream Cake deserves the best!
What’s the best way to get clean slices of my dream cake?
Patience, my friend, is key! First, let the White Chocolate Raspberry Dream Cake cool completely. Then, pop it into the fridge for at least an hour. Chilling firms up the frosting and cake, making it much easier to slice. Use a long, thin, serrated knife, and wipe it clean with a warm, damp cloth between each slice. This prevents the frosting from smearing and keeps your slices looking picture-perfect. After all, presentation is almost as important as taste, right?
Can I make this White Chocolate Raspberry Dream Cake ahead of time?
You bet! This cake is actually better the next day, as the flavors meld together beautifully. Bake the cake layers, let them cool completely, and wrap them tightly in plastic wrap. You can store them at room temperature for up to two days, or in the freezer for up to a month. Make the frosting and store it in the refrigerator. When you’re ready to assemble, bring the frosting to room temperature and whip it until it’s light and fluffy. Frost your raspberry dream cake and prepare for oohs and aahs!


Leave a Comment