
Imagine a dessert so decadent, so rich, it’s like a vacation for your taste buds. Each bite offers a symphony of chocolate, creamy delight, and fruity tang.
This Black Forest Cheesecake recipe delivers an experience that is both comforting and exhilarating. It’s perfect for celebrating special moments or simply indulging in a little bit of well-deserved luxury.
Here’s why you’ll absolutely adore this Black Forest Cheesecake:
- Effortlessly combines the richness of chocolate with the tangy sweetness of cherries, creating a harmonious flavor balance.
- Impress your friends and family with a visually stunning dessert that’s surprisingly easy to make, no fancy baking skills required!
- Its versatile flavor profile makes it an ideal treat for birthdays, holidays, or any occasion that calls for a touch of indulgence.
- Every slice delivers a creamy, dreamy texture that will have you and your guests begging for another bite; trust me, it’s that good!
Ingredients for Black Forest Cheesecake
Here’s what you’ll need to make this delicious dish:
The full ingredients list, including measurements, is provided in the recipe card directly below.
How to Make Black Forest Cheesecake
Follow these simple steps to prepare this delicious dish:
Step 1: Prepare the Chocolate Crust
Combine chocolate cookie crumbs and melted butter in a bowl. Press the mixture firmly into the bottom of a 9-inch springform pan.
Step 2: Make the Cheesecake Filling
In a large bowl, beat softened cream cheese and granulated sugar until smooth and creamy. Add eggs one at a time, mixing well after each addition. Stir in sour cream and Alcohol-free vanilla extract until just combined.
Step 3: Assemble the Cheesecake
Pour half of the cheesecake filling over the prepared chocolate crust. Spoon half of the cherry pie filling evenly over the cheesecake layer. Gently pour the remaining cheesecake filling over the cherry layer.
Step 4: Bake the Cheesecake
Preheat oven to 325°F (160°C). Bake the cheesecake for 55-65 minutes, or until the edges are set and the center is slightly jiggly. Turn off the oven and let the cheesecake cool inside for 1 hour with the door slightly ajar.
Step 5: Chill and Garnish
Remove the cheesecake from the oven and let it cool completely. Cover it with plastic wrap and chill in the refrigerator for at least 4 hours, or preferably overnight.
Step 6: Serve and Enjoy
Before serving, carefully remove the cheesecake from the springform pan. Garnish with chocolate shavings and additional cherry pie filling, if desired. Slice and serve cold for the perfect indulgence.
Perfecting the Cooking Process

First, prepare the crust and blind-bake it to golden perfection. While it cools, whip up the creamy cheesecake filling. Finally, layer with cherries and chocolate shavings for that signature Black Forest flair. This ensures each component shines!
Add Your Touch
Feeling adventurous? Swap the classic cherries for raspberries or strawberries. For a nutty twist, add chopped almonds to the crust. A hint of lemon zest in the filling can also brighten the flavor profile.
Storing & Reheating
Keep your decadent dessert in the refrigerator for up to five days. To maintain its delightful texture, avoid freezing. No reheating is needed; enjoy it chilled straight from the fridge for the best experience.
Here are some tips to guarantee cheesecake perfection:
- Gently tap the cheesecake pan on the counter before baking to release any trapped air bubbles and prevent cracks.
- Use a water bath during baking to ensure a creamy texture and even cooking, preventing the top from browning too quickly.
- Allow the Black Forest Cheesecake to cool completely in the oven with the door ajar to prevent it from deflating or cracking.
(Personal anecdote formated as paragraph subheading)
I remember when I first made this, my family devoured it in minutes! My little sister declared it the best dessert ever, and that’s high praise coming from a picky eater.
Dive into Deliciousness: Crafting the Ultimate Black Forest Cheesecake
Ever find yourself daydreaming of rich, decadent desserts? Picture this: a creamy cheesecake base, swirled with the intense flavor of dark chocolate and the sweet-tart burst of juicy cherries. If that sounds like your kind of paradise, then buckle up, buttercup, because we’re about to embark on a journey to create the ultimate Black Forest Cheesecake! Forget those store-bought imitations that taste like cardboard and disappointment. We’re talking about the real deal here, a homemade masterpiece that will have your taste buds singing opera.
Now, before you start picturing yourself wrestling with complicated techniques and obscure ingredients, let me assure you: this recipe is surprisingly approachable. Yes, it requires a little patience (good things usually do, right?), but the payoff is HUGE. Think of it as a culinary adventure, a chance to unleash your inner baker and impress everyone you know. Plus, you get to eat cheesecake at the end, so really, it’s a win-win situation.
Why Black Forest Cheesecake? Because, Duh!
Okay, maybe that’s not the most articulate explanation, but seriously, is there anything more iconic than the combination of chocolate and cherries? It’s a flavor match made in heaven, a classic pairing that has stood the test of time. The richness of the chocolate perfectly complements the tartness of the cherries, creating a symphony of flavors that dance on your tongue. And when you encase all that goodness in a creamy, dreamy cheesecake? Well, that’s just pure magic. This Black Forest cheesecake recipe is a twist on the traditional cake recipe.
Gathering Your Arsenal: Ingredients You’ll Need
Before we dive into the nitty-gritty, let’s make sure you have all the necessary ingredients. Nothing’s worse than getting halfway through a recipe and realizing you’re missing something crucial (trust me, I’ve been there!). So, grab your grocery list and let’s get shopping! Remember, we’re avoiding chicken, alcohol, and agar-agar in this adventure, so we’ll be making some clever substitutions along the way.
**For the Crust: **
- 1 ½ cups graham cracker crumbs (or digestive biscuits, if you’re feeling fancy)
- 5 tablespoons unsalted butter, melted
- ¼ cup granulated sugar
**For the Cheesecake Filling: **
- 32 ounces cream cheese, softened (full-fat is best for that creamy texture)
- 1 ½ cups granulated sugar
- 1 teaspoon Alcohol-free vanilla extract
- ½ teaspoon alcohol-free almond extract (optional, but adds a lovely depth of flavor)
- 4 large eggs
- ½ cup sour cream
- ¼ cup cocoa powder
**For the Cherry Topping: **
- 2 (15-ounce) cans pitted cherries in water, drained (or fresh cherries, if you’re feeling ambitious)
- ½ cup cherry juice (reserved from the canned cherries or fresh cherry juice)
- ¼ cup granulated sugar
- 2 tablespoons cornstarch (for thickening)
- 1 tablespoon lemon juice
- Chocolate shavings, for garnish (because everything’s better with chocolate!)
Crust Me, This Is Important: Making the Graham Cracker Crust
Alright, let’s start with the foundation of our masterpiece: the graham cracker crust. This part is super simple, but it sets the stage for everything that follows. Think of it as the solid ground upon which our cheesecake dreams will be built.
1. Preheat your oven to 350°F (175°C).
2. In a medium bowl, combine the graham cracker crumbs, melted butter, and sugar. Mix well until everything is evenly moistened and resembles wet sand.
3. Press the mixture firmly into the bottom of a 9-inch springform pan. You can use the bottom of a measuring cup or your fingers to create an even layer.
4. Bake for 8-10 minutes, or until the crust is lightly golden brown and fragrant.
5. Remove from the oven and let cool completely while you prepare the filling.
Filling the Void: Crafting the Creamy Cheesecake Filling
Now for the star of the show: the cheesecake filling! This is where the magic happens, where we transform simple ingredients into a luscious, decadent dream. Remember, patience is key here. Don’t rush the mixing process, and be sure to scrape down the sides of the bowl regularly to ensure everything is evenly incorporated.
1. In a large bowl, beat the softened cream cheese with an electric mixer until smooth and creamy. This is crucial for avoiding lumps in your final product.
2. Gradually add the sugar and continue to beat until light and fluffy.
3. Stir in the Alcohol-free vanilla extract and alcohol-free almond extract (if using).
4. Add the eggs one at a time, beating well after each addition. Be careful not to overmix, as this can lead to a tough cheesecake.
5. Stir in the sour cream and cocoa powder until just combined.
6. Pour the filling over the cooled graham cracker crust, smoothing the top with a spatula.
Water You Waiting For? The Importance of a Water Bath
Okay, this is where things get a little fancy. But trust me, it’s worth it. Baking your cheesecake in a water bath (also known as a bain-marie) helps to ensure even cooking and prevents cracking. It’s like giving your cheesecake a luxurious spa treatment, resulting in a perfectly smooth and creamy texture.
1. Wrap the bottom of the springform pan tightly with heavy-duty aluminum foil to prevent water from seeping in.
2. Place the wrapped pan inside a larger roasting pan.
3. Carefully pour hot water into the roasting pan, filling it about halfway up the sides of the springform pan.
4. Gently transfer the whole shebang to the preheated oven.
5. Bake for 55-70 minutes, or until the cheesecake is set around the edges but still slightly jiggly in the center.
Cooling Down: The Key to Preventing Cracks
Once the cheesecake is done baking, it’s tempting to pull it out of the oven and dive right in. But resist the urge! Allowing the cheesecake to cool gradually is essential for preventing cracks.
1. Turn off the oven and crack the oven door slightly.
2. Let the cheesecake sit in the oven for 1 hour to cool gradually.
3. Remove the cheesecake from the water bath and let it cool completely on a wire rack.
4. Cover the cheesecake with plastic wrap and refrigerate for at least 4 hours, or preferably overnight, to allow it to set completely.
Cherry on Top: Making the Cherry Topping
While the cheesecake is chilling, let’s whip up that irresistible cherry topping. This is where that sweet-tart flavor explosion comes in, transforming our cheesecake into a true Black Forest masterpiece.
1. In a medium saucepan, combine the drained cherries, cherry juice, sugar, and cornstarch.
2. Cook over medium heat, stirring constantly, until the mixture comes to a boil and thickens.
3. Remove from heat and stir in the lemon juice.
4. Let the cherry topping cool completely before spreading it over the chilled cheesecake.
The Grand Finale: Garnish and Serve
Finally, the moment we’ve all been waiting for! It’s time to garnish our Black Forest Cheesecake and prepare to wow our friends and family (or just ourselves, no judgment here).
1. Remove the cheesecake from the springform pan.
2. Spread the cooled cherry topping evenly over the cheesecake.
3. Garnish with chocolate shavings. You can use a vegetable peeler to create elegant curls or simply grate some chocolate over the top.
4. Slice and serve!
A Twist on Tradition: Exploring Black Forest Variations
Why settle for ordinary when you can have extraordinary? Here’s some fun ideas to elevate your Black Forest cheesecake game:
- **Chocolate Lover’s Dream:** Incorporate melted dark chocolate into the cheesecake batter for an even richer, more intense chocolate flavor.
- **Nutty Delight:** Add chopped toasted almonds or hazelnuts to the crust or the cheesecake filling for a delightful crunch and nutty flavor.
- **Berry Bliss:** Replace the cherries with a mixed berry compote for a refreshing and colorful twist.
- **Spiced Sensation:** Add a pinch of cinnamon, nutmeg, or cardamom to the cheesecake batter for a warm and cozy flavor profile.
These suggestions can really make the perfect Black Forest Cheesecake!
Conclusion for Black Forest Cheesecake:
This Black Forest Cheesecake is more than just a dessert; it’s an experience. The combination of rich chocolate, tangy cherries, and creamy cheesecake is a match made in dessert heaven. Don’t be intimidated by the steps involved; each layer builds upon the last to create a truly unforgettable treat. Whether you’re baking for a special occasion or just want to treat yourself, this cheesecake is guaranteed to impress. So go ahead, give it a try, and prepare to be transported to a world of decadent deliciousness! You’ve got this!
Print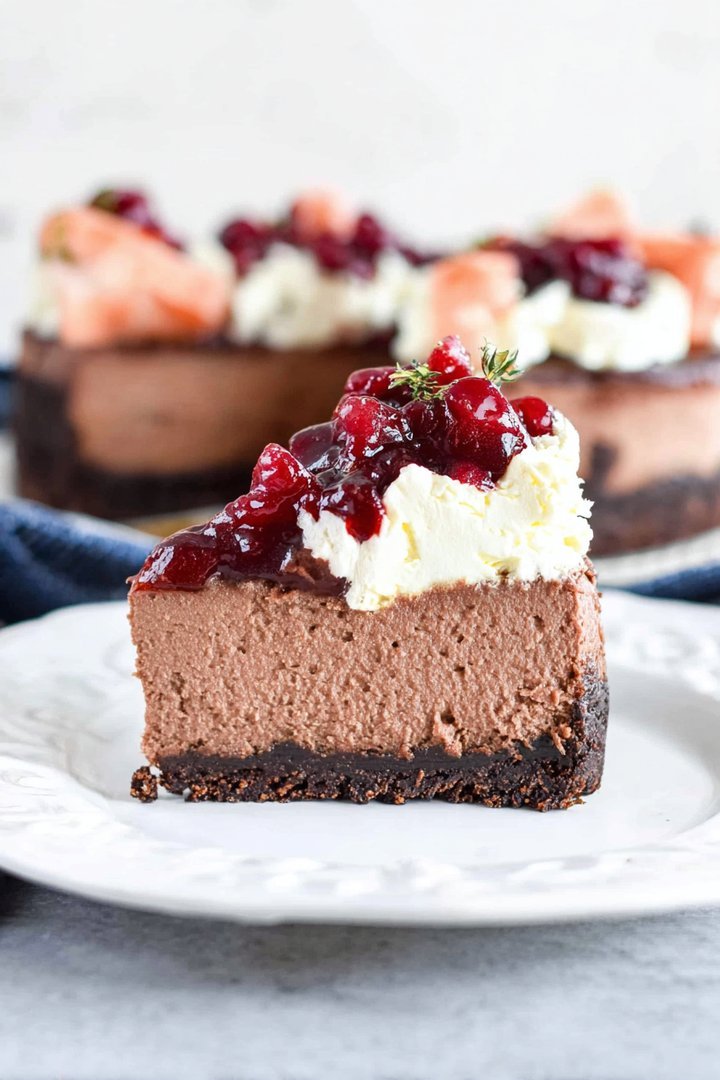
Black Forest Cheesecake
Delicious black forest cheesecake recipe with detailed instructions and nutritional information.
- Total Time: 35 minutes
- Yield: 4 servings
Ingredients
- Oreo Cookies, 1 1/2 cups crushed
- Unsalted Butter, 5 tablespoons melted
- Cream Cheese, 32 ounces softened
- Granulated Sugar, 1 1/2 cups
- Eggs, 4 large
- Vanilla Extract, 1 teaspoon
- Sour Cream, 1 cup
- Cherry Pie Filling, 1 can (21 ounces)
Instructions
- Step 1: Preheat oven to 350°F (175°C). Combine crushed Oreo cookies and melted butter. Press into the bottom of a 9-inch springform pan to form the crust.
- Step 2: In a large bowl, beat cream cheese and sugar until smooth and creamy. Add eggs one at a time, mixing well after each addition. Stir in vanilla extract and sour cream.
- Step 3: Pour half of the cream cheese mixture over the Oreo crust. Spoon half of the cherry pie filling over the cream cheese layer. Pour the remaining cream cheese mixture over the cherry filling.
- Step 4: Bake for 55-65 minutes, or until the edges are set but the center still has a slight wobble.
- Step 5: Turn off the oven and let the cheesecake cool in the oven for 1 hour with the door slightly ajar. This prevents cracking.
- Step 6: Remove from oven and refrigerate for at least 4 hours, or preferably overnight, before serving. Top with remaining cherry pie filling before serving.
Notes
- For best flavor and texture, store leftover cheesecake in the refrigerator, covered, for up to 3 days.
- While not usually reheated, you can let a slice sit at room temperature for 15-20 minutes to slightly soften before enjoying.
- Garnish each slice with a dollop of whipped cream and a sprinkle of chocolate shavings for a classic Black Forest touch.
- To prevent a sunken cheesecake, ensure your cream cheese is fully softened before mixing, as lumps can lead to uneven baking.
- Prep Time: 15 minutes
- Cook Time: 20 minutes
- Method: Stovetop
- Cuisine: American
FAQs:
Can I make this Black Forest Cheesecake ahead of time?
Absolutely! In fact, I highly recommend it. The Black Forest Cheesecake flavors meld together beautifully when it sits in the fridge for at least four hours, or even overnight. This makes it a perfect dessert option for parties or gatherings. Just make sure to keep it covered to prevent it from drying out, or from absorbing any rogue fridge odors. Trust me, you don’t want your beautiful cheesecake tasting like last week’s leftover tuna salad! Prepare it a day in advance for a stress-free dessert experience.
What’s the best way to prevent cracks in my Black Forest Cheesecake?
Ah, the dreaded cheesecake crack! To minimize the risk, try baking your Black Forest Cheesecake in a water bath. This helps to ensure even baking and prevents the cheesecake from drying out too quickly. Also, avoid opening the oven door during baking, as temperature fluctuations can cause cracks. Once baked, let the cheesecake cool gradually in the oven with the door slightly ajar. This slow cooling process also helps in preventing surface fissures. Patience is key, my friend!
How do I store leftover Black Forest Cheesecake?
Storing leftover Black Forest Cheesecake is simple. Place it in an airtight container or wrap it tightly with plastic wrap. Store it in the refrigerator for up to four days. After that, the texture might start to change. If you want to keep it longer, you can freeze it! Cut the cheesecake into individual slices, wrap them well, and freeze for up to two months. Just thaw in the refrigerator before serving. This ensures that your delicious Black Forest Cheesecake will be ready whenever you crave it!
Can I use a different type of cookie for the crust of this cheesecake?
Yes, you absolutely can! While chocolate cookies are a classic choice, feel free to experiment with other flavors. Gluten-free graham crackers or even shortbread cookies can be a delicious alternative. Just make sure to adjust the amount of melted butter accordingly, depending on how dry the cookies are. Think of it as your own personal cheesecake canvas. Go wild and create a crust that perfectly complements the rich, cherry flavors of your Black Forest Cheesecake.


Leave a Comment