
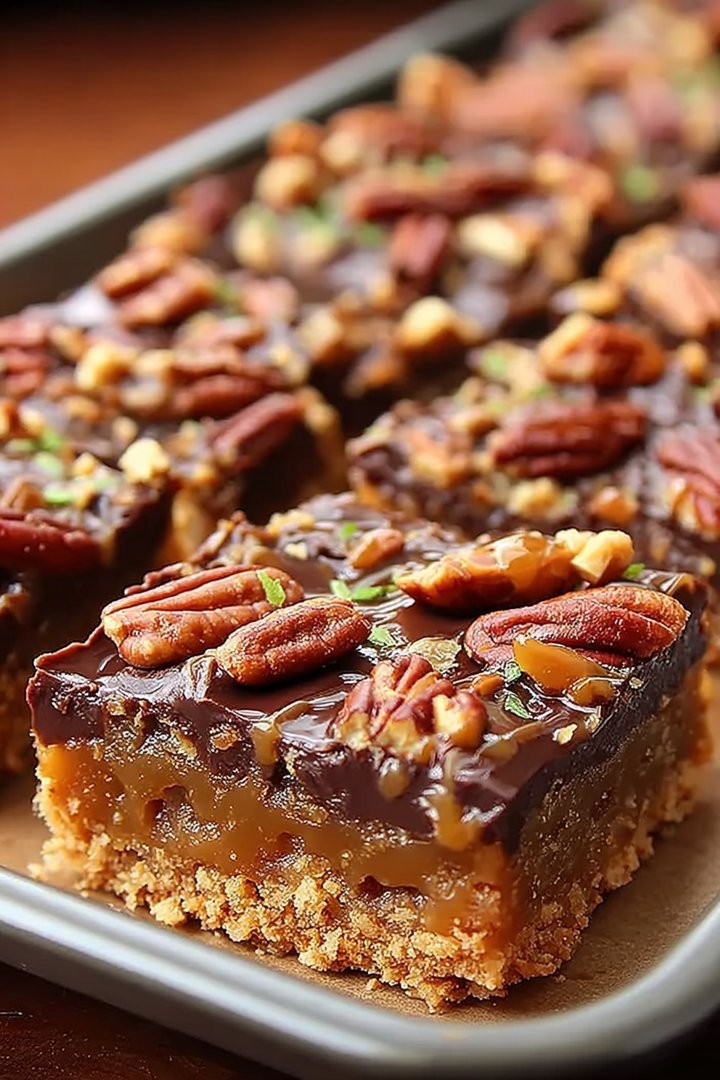
Imagine sinking your teeth into a symphony of sweet, salty, and crunchy perfection. Picture a buttery base, a layer of gooey caramel, toasted pecans dancing on top, and a generous drizzle of rich, decadent chocolate. These Easy Turtle Bars are the ultimate indulgence, a delightful treat that’s surprisingly simple to create.
These aren’t just any dessert; they’re a nostalgic hug in a square, evoking memories of cozy kitchens and shared laughter. They’re perfect for potlucks, holiday gatherings, or simply when you need a little pick-me-up on a Tuesday afternoon. Get ready to unleash your inner baker and experience a taste sensation that will leave you craving more.
- Effortless preparation with straightforward steps, perfect for beginner bakers and busy bees.
- A harmonious blend of buttery, caramel, pecan, and chocolate flavors creating an irresistible taste profile.
- Visually stunning with layers of textures and colors, making them a delightful centerpiece for any occasion.
- Highly versatile; customize with different nuts or chocolate variations to suit your personal preferences.
Ingredients for Easy Turtle Bars
Here’s what you’ll need to make this delicious dish:
The full ingredients list, including measurements, is provided in the recipe card directly below.
How to Make Easy Turtle Bars
Follow these simple steps to prepare this delicious dish:
Step 1: Prepare the Shortbread Base
Preheat your oven to 350°F (175°C). In a large bowl, mix together the flour, granulated sugar, and a pinch of salt. Cut in the cold butter using a pastry blender or your fingers until the mixture resembles coarse crumbs. Press the mixture evenly into the bottom of a 9×13 inch baking pan.
Step 2: Bake the Crust
Bake the shortbread crust for 18-20 minutes, or until lightly golden brown. Remove from the oven and let it cool slightly while you prepare the caramel layer. Leaving the oven on.
Step 3: Make the Caramel Layer
In a saucepan, combine the brown sugar, sweetened condensed milk, light corn syrup, and butter. Cook over medium heat, stirring constantly, until the butter is melted and the sugar is dissolved. Bring the mixture to a boil, then reduce heat to low and continue to cook, stirring constantly, for 5-7 minutes, or until the caramel is thickened and golden brown. Remove from heat and stir in the Alcohol-free vanilla extract.
Step 4: Assemble the Turtle Bars
Pour the caramel evenly over the baked shortbread crust. Sprinkle the toasted pecans evenly over the caramel layer.
Step 5: Bake Again
Return the pan to the oven and bake for another 15-18 minutes, or until the caramel is bubbly and golden brown. Remove from the oven and let it cool completely.
Step 6: Add the Chocolate
Melt the semi-sweet chocolate chips in a microwave-safe bowl in 30-second intervals, stirring in between, until smooth. Drizzle the melted chocolate evenly over the cooled caramel and pecan layer. Sprinkle with sea salt. Let the chocolate set completely before cutting into bars.
Step 7: Serve and Enjoy
Cut the Easy Turtle Bars into squares and serve. These bars are delicious served at room temperature or chilled. Enjoy!
Perfecting the Cooking Process
To achieve baking nirvana with these bars, prep all components before you begin. Toast the pecans while you create the base, then layer, bake, and cool completely. Patience is key, folks; rushing this process is a recipe for crumbly disaster!
Add Your Touch
Want to jazz things up? Swap pecans for walnuts or almonds. Throw in a handful of chocolate chips to the base. A sprinkle of sea salt on top elevates the sweet and salty factor. Make these Easy Turtle Bars your own masterpiece!
Storing & Reheating
Store your Easy Turtle Bars in an airtight container at room temperature for up to five days. While reheating isn’t really needed (they are delectable cold), you could warm them briefly in the microwave for a melty, gooey treat.
Here are some tips for becoming an Easy Turtle Bars pro:
- Measure your ingredients carefully; accurate measurements are crucial for the perfect base consistency.
- Don’t overbake the bars; they should be slightly soft in the center when you remove them from the oven.
- Allow the bars to cool completely before cutting; this will prevent them from crumbling and ensure clean slices.
(Personal anecdote formated as paragraph subheading)
My grandma always made these bars for our family gatherings. Her secret? A tiny dash of cinnamon in the caramel. Now, I do the same, and the aroma instantly brings back fond memories.
Let’s Talk About These Easy Turtle Bars
Let’s be honest, who doesn’t love a good dessert bar? I mean, come on! They’re the perfect combination of sweet, salty, crunchy, and chewy. And these Easy Turtle Bars? They’re next-level amazing. Forget those fancy patisseries, you can whip up something incredible right in your own kitchen. This isn’t just a recipe; it’s a journey. A delicious, gooey, pecan-filled journey that ends with you face-planting into a pan of pure bliss. We’re talking about a symphony of flavors and textures that dance harmoniously on your tongue. I promise, these will disappear faster than free samples at a chocolate factory.
Why These Easy Turtle Bars Will Rock Your World
Seriously, what’s not to love? These Easy Turtle Bars are ridiculously easy to make (hence the name!). You don’t need to be a master baker, or even know how to properly hold a whisk, to nail this recipe. They’re also incredibly versatile. You can customize them with your favorite nuts, chocolates, or even a sprinkle of sea salt for that perfect sweet-and-salty kick. They’re perfect for parties, potlucks, or just a cozy night in with a movie. Plus, they’re a great way to impress your friends and family without having to spend hours slaving away in the kitchen. Trust me; you’ll be the dessert hero of the day. Get ready for a tidal wave of compliments.
The Secret to the Perfect Turtle Bar Base
The base of these Easy Turtle Bars is a simple shortbread-like crust. It’s buttery, crumbly, and provides the perfect foundation for all that gooey goodness on top. The trick is to not overmix the dough. You want it to be just combined, so it stays nice and tender. Think of it as a gentle hug, not a wrestling match. A light touch goes a long way. Overmixing develops the gluten, and you’ll end up with a tough, chewy base, and nobody wants that. Also, make sure your butter is cold! This will help create those flaky layers that make the base so irresistible. We’re aiming for a texture that melts in your mouth, not fights back.
Crafting the Caramel: The Heart of the Matter
Ah, the caramel. The star of the show! This is where the magic happens. We’re not messing around with store-bought caramel sauce; we’re making our own, from scratch. It’s surprisingly easy, and the flavor is a million times better. The key is to watch it carefully and stir constantly. You don’t want it to burn, or you’ll end up with a bitter, unpleasant mess. Keep the heat on medium, and be patient. The sugar will melt, turn golden brown, and then transform into a luscious, bubbling caramel. Once it reaches that perfect amber hue, remove it from the heat and stir in the butter and salt. This will stop the cooking process and create a smooth, creamy caramel that’s begging to be devoured. The goal is a rich, decadent caramel that screams, “Eat me!”
The Nutty Factor: Pecans, Please!
Pecans are the classic choice for turtle bars, and for good reason. Their buttery, slightly sweet flavor pairs perfectly with the caramel and chocolate. Toasting the pecans before adding them to the bars is a must. It brings out their nutty flavor and adds a delightful crunch. Just spread them out on a baking sheet and toast them in the oven for a few minutes, until they’re fragrant and golden brown. Keep a close eye on them, as they can burn quickly. Nobody wants burnt nuts ruining their perfect Easy Turtle Bars. If you’re feeling adventurous, you can experiment with other nuts, like walnuts or almonds. But for me, pecans are the way to go. They’re the OG turtle bar nut, and they never disappoint.
Chocolate Drizzle: The Final Flourish
No turtle bar is complete without a generous drizzle of chocolate. I prefer to use semi-sweet chocolate, but you can use dark chocolate or milk chocolate, depending on your preference. Melt the chocolate in a double boiler or in the microwave, stirring frequently until it’s smooth and glossy. Then, drizzle it over the bars in a zig-zag pattern. Get creative! You can use a spoon, a fork, or even a piping bag to create different designs. The chocolate drizzle adds a touch of elegance and decadence to the bars, and it’s the perfect finishing touch. It’s like the cherry on top, but way better. Because, you know, it’s chocolate.
More Tips and Tricks for Easy Turtle Bar Success
Want to elevate your Easy Turtle Bar game even further? Here are a few extra tips and tricks to help you achieve baking perfection.
Use High-Quality Ingredients
This may seem obvious, but it makes a huge difference. Use real butter, good quality chocolate, and fresh pecans. Your Easy Turtle Bars will taste so much better.
Line Your Baking Pan
Lining your baking pan with parchment paper makes it easy to remove the bars once they’re cooled. It also prevents them from sticking to the pan.
Don’t Be Afraid to Experiment
This recipe is just a starting point. Feel free to experiment with different flavors and ingredients to create your own unique version of Easy Turtle Bars. Maybe some dried cranberries or peanut butter chips?
Serving Suggestions
These Easy Turtle Bars are delicious on their own, but they’re even better with a scoop of vanilla ice cream or a dollop of whipped cream. They’re also a great addition to a dessert platter or a cookie exchange. Serve them with a cup of coffee or tea for a cozy and satisfying treat.
Storing Your Creations
If you have any Easy Turtle Bars left over (which is unlikely), you can store them in an airtight container at room temperature for up to five days. They can also be frozen for up to three months. Just wrap them tightly in plastic wrap and place them in a freezer-safe bag.
Why You Need to Make These Easy Turtle Bars Today!
So, what are you waiting for? Get in the kitchen and whip up a batch of these Easy Turtle Bars! They’re easy to make, incredibly delicious, and perfect for any occasion. Trust me, you won’t regret it. These are a guaranteed crowd-pleaser. You’ll thank me later. Now go forth and bake!
Conclusion for Easy Turtle Bars :
In short, Easy Turtle Bars are a guaranteed crowd-pleaser. They’re easy to make, customizable to your liking, and absolutely irresistible. Remember to use a candy thermometer for perfect caramel, store them properly to maintain freshness, and don’t be afraid to experiment with different nuts. Now go forth and bake some turtle bar magic! Your taste buds (and everyone else’s) will thank you. Seriously, make these. Now. You won’t regret it. They’re *that* good.
Print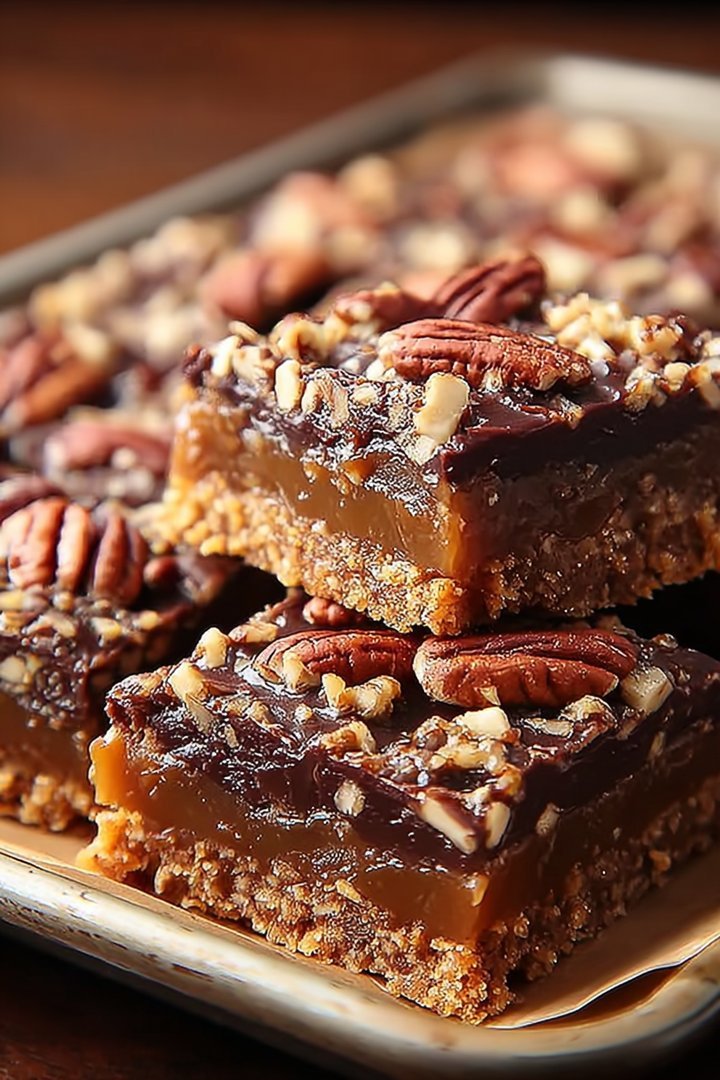
Easy Turtle Bars
Delicious easy turtle bars recipe with detailed instructions and nutritional information.
- Total Time: 35 minutes
- Yield: 4 servings 1x
Ingredients
- 1 box (14.3 oz) graham crackers
- 1 cup (2 sticks) butter, melted
- 1 cup packed brown sugar
- 1 (14 oz) can sweetened condensed milk
- 1 cup semi-sweet chocolate chips
- 1 cup chopped pecans or walnuts
- 1 teaspoon vanilla extract
Instructions
- Step 1: Preheat oven to 350°F (175°C). Line a 9×13 inch baking pan with parchment paper, leaving an overhang on the sides.
- Step 2: Crush graham crackers into fine crumbs using a food processor or by placing them in a zip-top bag and crushing with a rolling pin.
- Step 3: In a medium bowl, combine graham cracker crumbs and melted butter. Press the mixture evenly into the bottom of the prepared baking pan.
- Step 4: In a saucepan, combine brown sugar, sweetened condensed milk, and vanilla extract. Cook over medium heat, stirring constantly, until the mixture comes to a simmer and thickens slightly, about 3-5 minutes.
- Step 5: Pour the caramel mixture evenly over the graham cracker crust. Sprinkle the chocolate chips and chopped pecans/walnuts over the caramel layer.
- Step 6: Bake for 20-25 minutes, or until the caramel is bubbly and the nuts are lightly toasted. Let cool completely in the pan before lifting out using the parchment paper overhang and cutting into bars.
Notes
- Store leftover turtle bars in an airtight container at room temperature for up to 3 days, or in the refrigerator for up to a week.
- A quick zap in the microwave (5-10 seconds) will soften the caramel and chocolate for a gooey treat.
- Serve these bars with a scoop of vanilla ice cream and a drizzle of extra caramel sauce for an extra-indulgent dessert.
- For easier cutting, chill the cooled bars in the refrigerator for about 30 minutes before slicing – this will prevent the caramel from sticking to your knife.
- Prep Time: 15 minutes
- Cook Time: 20 minutes
- Method: Stovetop
- Cuisine: American
FAQs :
What makes these Easy Turtle Bars so darn irresistible?
Okay, picture this: a buttery, crumbly base, then a layer of gooey, luscious caramel studded with crunchy pecans, and finally, a generous drizzle of rich, decadent chocolate. Need I say more? These Easy Turtle Bars are the ultimate treat because they offer the perfect combination of textures and flavors. The salty-sweet dance between the caramel and nuts is just *chef’s kiss*. Plus, they’re surprisingly simple to make! They disappear faster than free pizza at a college party, trust me. Be prepared to become everyone’s favorite baker after whipping up a batch of these bad boys.
Can I substitute any of the nuts in these Easy Turtle Bars?
Absolutely! While pecans are traditionally used in turtle candies, feel free to get creative. Walnuts, almonds, or even macadamia nuts would work wonderfully in these Easy Turtle Bars. Just be sure to chop them into roughly the same size as the pecans for even distribution. If you’re feeling adventurous, you could even use a mix of different nuts. Just imagine the symphony of flavors and textures! Experiment and find your favorite combination. Just remember, the nuts are there for crunch and flavor, so don’t skimp!
How do I store these turtle bars to keep them fresh?
Storing these Easy Turtle Bars properly is key to maintaining their deliciousness. Once they’ve cooled completely, cut them into squares and store them in an airtight container at room temperature. They’ll stay fresh for up to three days (if they last that long!). For longer storage, you can also freeze them. Just wrap them individually in plastic wrap and place them in a freezer bag. Frozen turtle bars will keep for up to two months. When you’re ready to enjoy them, simply thaw them at room temperature for about 30 minutes.
How can I prevent the caramel from being too hard or too soft?
Ah, the caramel conundrum! The key is to cook the caramel mixture to the correct temperature. Use a candy thermometer to ensure accuracy. You’re aiming for the “firm-ball stage,” which is around 245°F (118°C). If you don’t have a candy thermometer, you can test it by dropping a small amount of the caramel into a bowl of cold water. If it forms a firm ball that you can roll between your fingers, it’s ready. Don’t overcook it, or the caramel will be too hard. Undercook it, and it’ll be too soft and runny.


Leave a Comment