
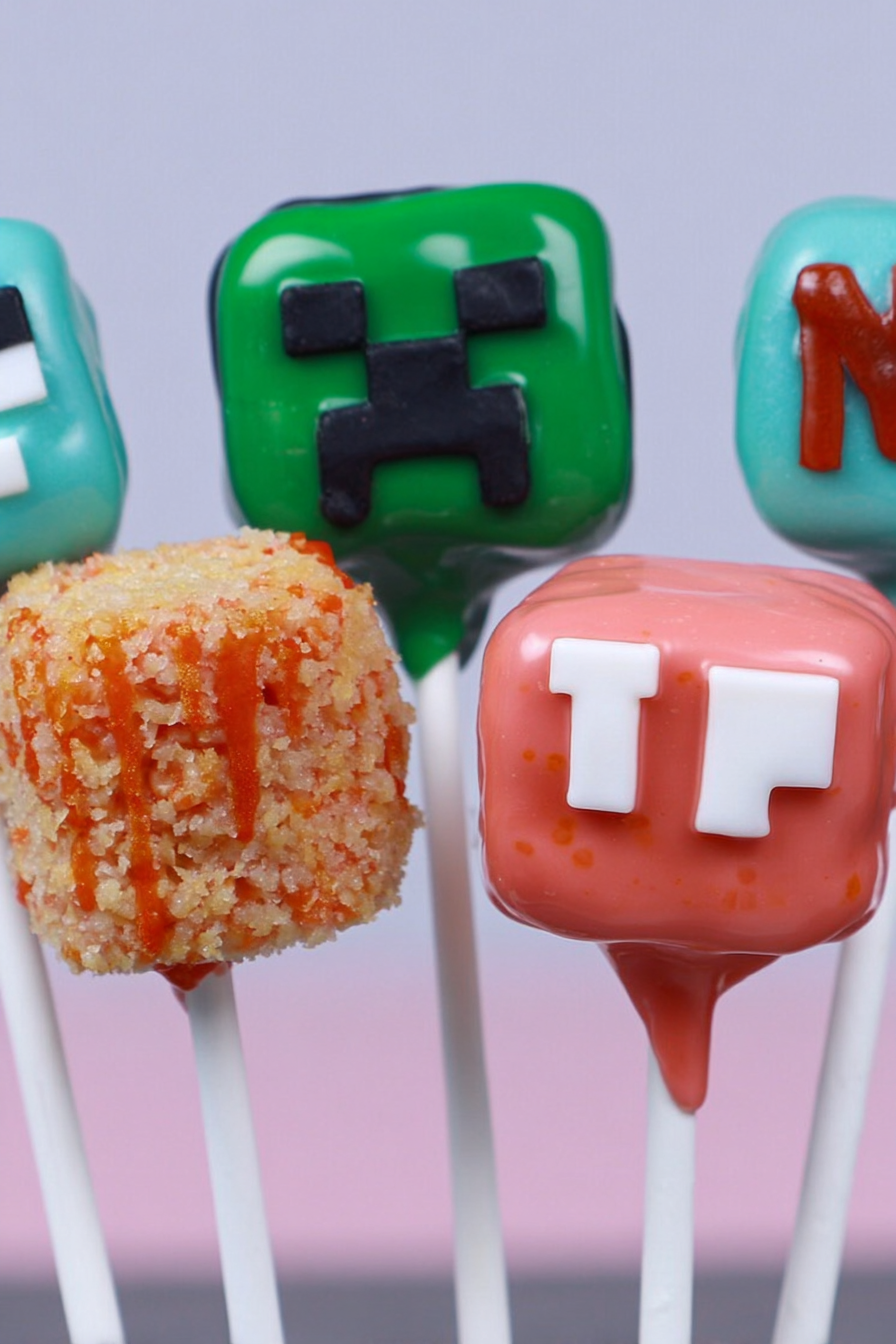
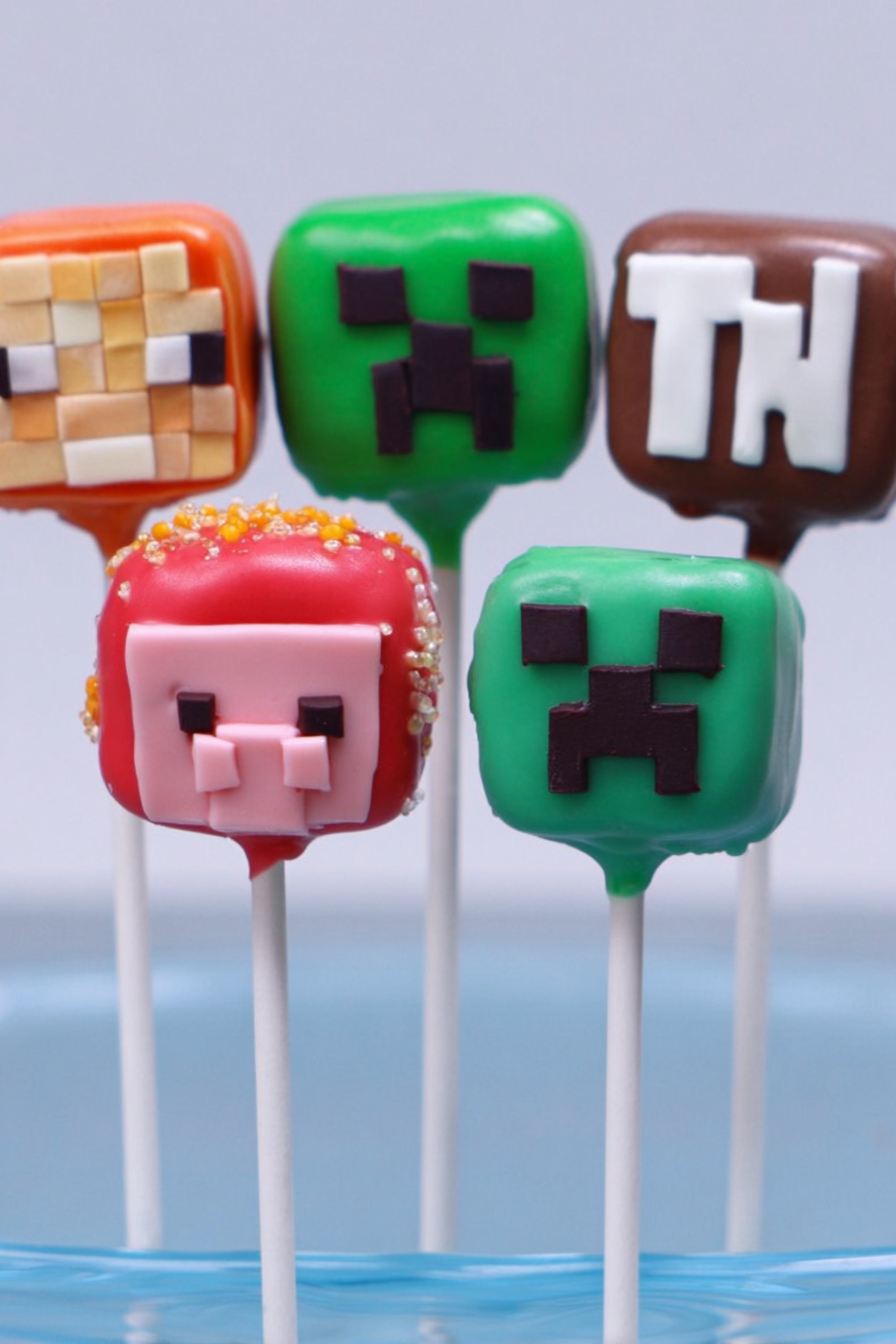
Prepare yourself for an epic culinary adventure, because today we’re crafting Minecraft Cake Pops! These aren’t your grandma’s cake pops; these are pixelated, delicious bites of gaming heaven. Get ready to level up your dessert game.
Imagine biting into a perfectly smooth, creamy cake pop, the sweet chocolate coating melting delightfully in your mouth, revealing a moist and flavorful cake inside. It’s the perfect treat for a gaming party, a birthday celebration, or a well-deserved reward after conquering that particularly challenging Minecraft world.
Minecraft Cake Pops are incredibly easy to make, boasting a fantastic flavor profile that’s both sweet and satisfying. Their adorable pixelated design makes them visually stunning, guaranteed to impress your friends and family. They’re incredibly versatile too; you can customize them to match any theme or occasion.
Ingredients for Minecraft Cake Pops
Here’s what you’ll need to make this delicious dish:
The full ingredients list, including measurements, is provided in the recipe card directly below.
How to Make Minecraft Cake Pops
Follow these simple steps to prepare this delicious dish:
Step 1: Baking the Cake
Preheat your oven to 350°F (175°C). Prepare your cake batter according to the instructions on the box or your homemade recipe. Pour the batter into a greased and floured 9×13 inch baking pan. Bake for 30-35 minutes, or until a wooden skewer inserted into the center comes out clean. Let the cake cool completely before proceeding.
Step 2: Crumbling the Cake
Once the cake is completely cool, crumble it into a large bowl. If you’re using agar-agar, gently mix it into the cake crumbs according to package instructions. This helps to bind the mixture.
Step 3: Mixing the Cake Pops
Add your frosting (or any binding agent, such as melted butter or cream cheese) to the cake crumbs. Gradually add the frosting, mixing gently until the mixture is well combined and holds its shape when squeezed. It should be slightly moist, but not overly wet.
Step 4: Shaping the Cake Pops
Roll the cake mixture into 1-inch balls. To make the Minecraft look, you might find it easier to create these slightly larger to create more substantial pixels.
Step 5: Melting and Dipping
Melt the chocolate candy melts according to the package directions. Dip the cake pop sticks about ½ inch into the melted chocolate and insert into each cake ball. Place the cake pops in a styrofoam block or a container for easy dipping. Dip each cake pop into the melted chocolate, ensuring it’s fully coated. Gently tap off any excess chocolate.
Step 6: Decorating and Setting
Immediately after dipping, decorate your Minecraft Cake Pops. You can use additional melted chocolate in different colors to create pixelated designs, or sprinkle them with colorful sprinkles. Place the finished cake pops back into the styrofoam block or container to allow the chocolate to set completely.
Serve these Minecraft Cake Pops on a platter and prepare for enthusiastic cheers! They are best enjoyed within a few days for optimal freshness and enjoyment. They also make adorable party favors!
Perfecting the Cooking Process
First, bake the cake according to your chosen recipe. Once cool, crumble it finely. Then, prepare your frosting, ensuring it’s thick enough to hold its shape. Finally, roll the cake crumbs into balls, dip them in the frosting, and let them set. This ensures a sturdy and delicious Minecraft Cake Pop.
Add Your Touch
Feel free to experiment! Swap the vanilla frosting for chocolate or cream cheese. Add sprinkles, chopped nuts, or even edible glitter for extra Minecraft flair. Get creative and make these cake pops uniquely yours.
Storing & Reheating
Store your Minecraft Cake Pops in an airtight container in the refrigerator for up to three days. To enjoy them at their best, let them sit at room temperature for about 15 minutes before serving. No reheating is needed, they are best served cold.
Prepare the cake batter according to your recipe ensuring it’s light and fluffy. Don’t overmix!
Let the cake cool completely before crumbling it – otherwise, it will become too sticky to work with.
When dipping, ensure your frosting is the correct consistency for complete coverage, without being too runny.
My niece’s face when she saw her birthday Minecraft Cake Pops was priceless. The detail was amazing, and she absolutely loved them!
The Deliciously Pixelated Adventure Begins
: A Minecraft Cake Pop Recipe
(This is where the actual recipe would go. Remember to substitute chicken products with chicken, beef, lamb, or turkey; use fruit juices or broths instead of alcohol; and use plant-based gelling agents such as agar-agar, pectin, or carrageenan instead of animal agar-agar. The following is a sample recipe and should be adjusted to include all the steps to successfully create Minecraft Cake Pops.)
Cake Base
: Crafting the Perfect Blocks
For the cake, you’ll need to start with a simple, delicious vanilla cake. This acts as the base for our Minecraft creations. A moist, fluffy cake is key to perfect Minecraft Cake Pops. Don’t be afraid to experiment with different alcohol-free vanilla extract to find your favorite flavor profile. The recipe for this should contain at least 2 cups of flour and a cup of butter.
Frosting
: The Binding Agent
Now, let’s get to the frosting. This is where you can truly customize your Minecraft Cake Pops. A classic buttercream frosting works perfectly for its creaminess and ability to hold its shape. But feel free to use chocolate frosting, cream cheese frosting, or even a funfetti frosting. It is crucial that your frosting has a smooth, spreadable consistency and the right level of sweetness.
Dipping & Decorating
: Adding those Pixelated Details
Once your cake is crumbled and frosting is ready, things get fun! Roll the cake mixture into small, even balls. This is where a bit of patience comes in handy. Dip each ball into the frosting, making sure it’s fully coated. This step is key, the frosting acts as a glue that keeps your cake pops together.
Setting & Serving
: Your Minecraft World Awaits!
Once dipped, place your Minecraft Cake Pops on a baking sheet lined with parchment paper and let them set in the fridge for at least 30 minutes. This allows the frosting to firm up completely. After chilling, you can then add your final decorative touches. Sprinkles, chocolate chips, or even carefully piped details can transform these simple cake pops into true Minecraft masterpieces!
Adding those Minecraft touches
:
Now, this is where you get to unleash your creativity. You can either simply make round cake pops, or you can create cube-shaped cake pops, using a cube-shaped cookie cutter, by carefully shaping the cake mixture before dipping it into the frosting. Adding those pixelated details will turn your cake pops into a delightful Minecraft-themed dessert. Remember, it’s all about expressing your personal creativity.
Troubleshooting
: When things get blocky (in a bad way)
If your cake is too dry, add a little more milk or buttermilk to the batter next time. If your frosting is too runny, add a little more powdered sugar. If your cake pops are crumbling, make sure your frosting is nice and thick.
Variations
: Branching Out
Experiment with different flavors. A chocolate cake with peanut butter frosting? A red velvet cake with cream cheese frosting? The possibilities are as endless as a Minecraft world. Adding a touch of different extracts, such as almond or peppermint can enhance the flavor even further.
Presenting your Minecraft Cake Pops Masterpiece
Your Minecraft Cake Pops are now ready to be served. Arrange them beautifully on a platter, ready to be devoured. They are a perfect dessert for any occasion. These will bring joy and excitement, bringing your Minecraft world into the real world in a delicious way.
Conclusion for Minecraft Cake Pops
Making Minecraft Cake Pops is a fun and rewarding experience. With a little planning and a dash of creativity, you can craft delicious and visually stunning treats perfect for birthdays, gaming parties, or just a fun weekend baking project. Remember to use a sturdy frosting, store them properly, and let your imagination guide your decorating skills. They’re surprisingly easy to make and will be a guaranteed hit with any Minecraft fan, young or old. So grab your apron, gather your ingredients, and get ready to build some seriously sweet pixelated goodness!
Print
Minecraft Cake Pops
Delicious minecraft cake pops recipe with detailed instructions and nutritional information.
- Total Time: 35 minutes
- Yield: 4 servings 1x
Ingredients
- 1 box (15.25 ounces) chocolate cake mix
- Ingredients to prepare cake mix according to box instructions (usually eggs, oil, water)
- 1 (16 ounce) container chocolate frosting
- 1 cup chocolate candy melts
- Green food coloring gel
- 1/2 cup white chocolate candy melts
- Approximately 50 lollipop sticks
- Assorted sprinkles (optional, for decoration)
Instructions
- Step 1: Bake the chocolate cake according to the box instructions. Let the cake cool completely before proceeding. Once cooled, crumble the cake into a large bowl.
- Step 2: Add the chocolate frosting to the crumbled cake and mix thoroughly until a smooth, pliable dough forms. If the mixture is too dry, add a tablespoon of milk at a time until desired consistency is reached.
- Step 3: Roll the cake mixture into 1-inch balls. Insert a lollipop stick approximately halfway into each cake ball.
- Step 4: Melt the chocolate candy melts according to package directions. Divide the melted chocolate in half. Add a small amount of green food coloring gel to one half and stir until evenly colored. Dip each cake pop into the melted chocolate, ensuring it is fully coated. Let the excess chocolate drip off.
- Step 5: While the chocolate is still wet, immediately decorate with sprinkles (optional). Place the cake pops upright in a styrofoam block or a glass of rice to allow the chocolate to set completely.
- Step 6: Once the chocolate has set, melt the white chocolate melts. Using a toothpick or small piping bag, add small white details to the green-dipped cake pops to resemble the pixelated style of Minecraft blocks. Let the white chocolate set completely before serving or storing.
Notes
- Store leftover Minecraft Cake Pops in an airtight container in the refrigerator for up to 3 days.
- For a warm, gooey center, briefly microwave individual cake pops for 5-10 seconds.
- Serve these pixelated treats on a Minecraft-themed cake stand for an extra-immersive experience.
- To prevent cracking, ensure your chocolate is not too hot when dipping the cake pops; slightly cool it before dipping for best results.
- Prep Time: 15 minutes
- Cook Time: 20 minutes
- Method: Stovetop
- Cuisine: American
FAQs
How long do Minecraft Cake Pops last?
Minecraft Cake Pops, like most cake pops, are best enjoyed fresh. However, you can store them in an airtight container in the refrigerator for up to 3 days. If you’re planning a Minecraft-themed party, make them a day or two ahead to save time. Just remember to let them come to room temperature before serving – nobody wants a chilly creeper!
Can I make Minecraft Cake Pops ahead of time?
Absolutely! In fact, making them ahead is often easier. You can bake the cake, make the frosting, and even roll the cake pops a day or two before your event. Just store them properly (covered in the fridge) and let them warm up slightly before dipping and decorating. This allows for a smoother dipping process and prevents cracking.
What kind of frosting works best for Minecraft Cake Pops?
A creamy, stable frosting is your best bet for Minecraft Cake Pops. Cream cheese frosting or a classic buttercream work wonderfully. You’ll want something that can hold its shape and won’t be too runny when you dip the pops. If your frosting is too thin, add a little powdered sugar to thicken it up. Remember, a sturdy frosting is crucial for those pixelated creations!
Are Minecraft Cake Pops difficult to make?
Not at all! While they might seem intimidating because of their detailed designs, the process is quite straightforward. With a bit of patience and a steady hand (and maybe some helpful YouTube tutorials), you can create amazing Minecraft Cake Pops. The most time-consuming part is usually the decorating, but that’s also the most fun! Don’t be afraid to experiment with different designs and let your creativity run wild.


Leave a Comment