

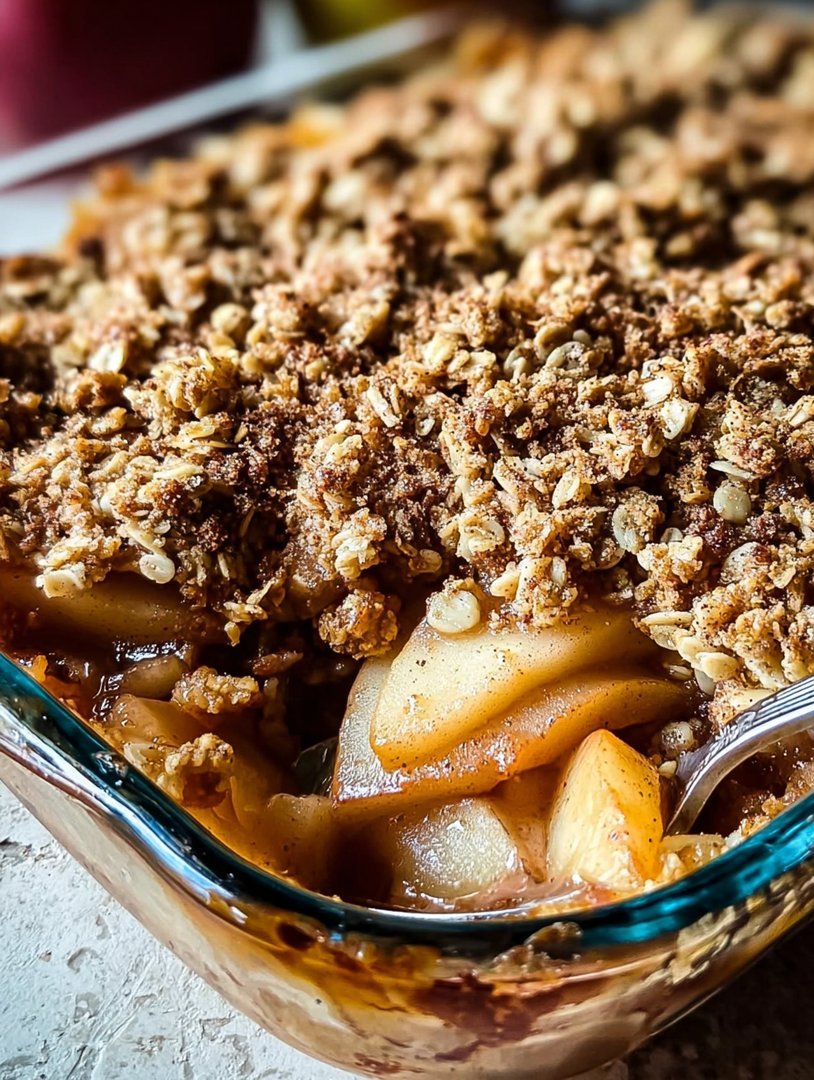
Oh, the sheer delight of warm, bubbling fruit, cloaked in a blanket of golden, crunchy crumble! Apple Pear Crisp, a symphony of sweet and tart, is like a hug from your grandma, if your grandma was also a pastry chef.
Imagine sinking your spoon into a dessert where the soft, yielding fruit contrasts perfectly with the buttery, oaty topping. This Apple Pear Crisp is perfect for cozy evenings, celebratory brunches, or those “just because” moments when you need a little something special.
- Effortless to whip up, using simple ingredients and minimal prep time.
- A delightful balance of sweet apples and pears, complemented by a warm spice blend.
- Beautifully golden and bubbly, making it a show-stopping dessert for any occasion.
- Wonderfully adaptable; customize with your favorite nuts, spices, or a scoop of vanilla ice cream.
Ingredients for Apple Pear Crisp
Here’s what you’ll need to make this delicious dish:
The full ingredients list, including measurements, is provided in the recipe card directly below.
How to Make Apple Pear Crisp
Follow these simple steps to prepare this delicious dish:
Step 1: Prepare the Fruit
Preheat your oven to 375°F (190°C). In a large bowl, combine the sliced apples and pears. Add granulated sugar, lemon juice, cinnamon, and nutmeg. Toss gently to ensure the fruit is evenly coated with the spices and sugar.
Step 2: Make the Crisp Topping
In a separate bowl, whisk together the all-purpose flour, rolled oats, and brown sugar. Add the cold, cubed butter to the dry ingredients. Use a pastry blender or your fingers to cut the butter into the mixture until it resembles coarse crumbs. Ensure the butter is evenly distributed throughout the mixture.
Step 3: Assemble the Crisp
Pour the fruit mixture into a greased 9×13 inch baking dish. Sprinkle the crisp topping evenly over the fruit. Gently press the topping down to ensure it adheres to the fruit. This helps create a cohesive and crispy layer.
Step 4: Bake to Golden Perfection
Bake in the preheated oven for 30-35 minutes, or until the topping is golden brown and the fruit is bubbling. Keep an eye on it to prevent the topping from burning; you may need to cover it loosely with foil if it starts to brown too quickly.
Step 5: Cool and Serve
Let the crisp cool for at least 15 minutes before serving. This allows the filling to thicken slightly and prevents burning your tongue with molten fruit.
Transfer to bowls and top with a scoop of vanilla ice cream or a dollop of whipped cream for the perfect finishing touch. A drizzle of caramel sauce also adds a touch of indulgence.
Perfecting the Cooking Process
For a seamless experience, begin by preparing the fruit filling. While it simmers and melds, focus on crafting the crumbly topping. As the oven preheats, assemble the dessert, ensuring even distribution for that golden-brown, bubbly perfection.
Add Your Touch
Swap out pecans for walnuts, or sprinkle in some dried cranberries for a festive twist. A hint of cinnamon or nutmeg can deepen the warm, comforting flavors. A drizzle of maple syrup before baking adds a caramelly sweetness.
Storing & Reheating
Store any leftover crisp in an airtight container in the refrigerator for up to three days. Reheat individual portions in the microwave or bake in a preheated oven at 350°F (175°C) until warmed through.
Tips for the Perfect Apple Pear Crisp:
- For extra flavor, toss the apples and pears with a squeeze of lemon juice before adding them to the baking dish; this will brighten their natural sweetness.
- Don’t overmix the topping; you want distinct crumbles, not a paste, so use your fingers or a pastry blender for the best texture.
- Let the crisp cool slightly before serving to allow the filling to thicken and prevent burning your tongue on molten fruit lava.
(Personal anecdote formated as paragraph subheading)
I remember when I first made this, my family devoured it in minutes! My son declared it the “best dessert ever,” and that’s a compliment I cherish more than any blue ribbon.
The Story Behind My Apple Pear Crisp Obsession
Listen, folks, I’m not just some recipe regurgitator. I’m a dessert devotee, a crumble connoisseur, and a crisp crusader. I believe that every bite of an **apple pear crisp** should be a tiny vacation for your taste buds, a little “oomph” of comfort that says, “Hey, everything’s gonna be okay.” And this recipe? This is *the* one.
My love affair with this dessert started on a crisp autumn afternoon. The leaves were turning, the air was getting that delightful chill, and I had a serious craving for something warm, fruity, and ridiculously easy to make. I rummaged through my fridge, found a few forlorn apples and pears, and the rest, as they say, is history. But not just *any* history. We’re talking flavor history, my friends. This isn’t your grandma’s **apple pear crisp**, unless your grandma is a culinary genius with a penchant for perfectly balanced sweetness and a killer crumble topping.
I have tweaked it, tested it, and maybe even dreamt about it (don’t judge!), all in the pursuit of the ultimate **apple pear crisp** experience. Because life’s too short for mediocre desserts, am I right?
What Makes This Apple Pear Crisp the BEST?
Okay, okay, I know everyone claims their recipe is “the best.” But hear me out. This **apple pear crisp** boasts a few secret weapons that elevate it from good to glorious:
- **The Fruit Ratio:** We’re not playing favorites here. It’s a harmonious blend of tart apples and sweet pears, creating a symphony of flavor that dances on your tongue.
- **The Topping Texture:** Forget sad, soggy oat toppings. This one’s all about buttery, crumbly perfection. We’re talking golden-brown, slightly crunchy, and so addictive you’ll want to eat it straight from the bowl (I may or may not have done this).
- **The Spice Blend:** Just a whisper of cinnamon and nutmeg. Not too much, not too little, but *just right*. It’s the secret ingredient that ties everything together and makes this **apple pear crisp** irresistibly cozy.
And the best part? It’s ridiculously easy to make. Even if you’re the kind of person who burns water (no judgment, we all have our talents), you can nail this recipe.
Let’s Talk Ingredients: The Apple and Pear Power Couple
Before we dive into the nitty-gritty, let’s talk about our star players: the apples and the pears. I know, I know, it sounds obvious, but trust me, the *type* of apples and pears you use makes a HUGE difference.
- **Apples:** I like a mix of tart and sweet apples. Granny Smiths provide that delightful zing, while Honeycrisp or Fuji add a touch of honeyed sweetness. It’s all about balance, baby! Other excellent choices include Braeburn or Pink Lady. The texture and flavor profiles of these apples will meld together to form the perfect fruit base.
- **Pears:** Bosc or Anjou pears are your best bet. They hold their shape well during baking and have a subtle sweetness that complements the apples perfectly. Avoid overly ripe pears, as they can turn to mush in the oven. You’ll want to ensure that your pears are firm to the touch, but not rock hard.
Now, you might be thinking, “Can I use all apples or all pears?” And the answer is: technically, yes. But you’d be missing out on the magic that happens when these two fruits unite. It’s like peanut butter and jelly, salt and pepper, Bert and Ernie – they’re just better together!
Crafting the Crumble Topping: The Key to Crisp Perfection
Alright, let’s talk about the *real* star of the show: the crumble topping. This is where the magic happens, folks. This is what separates a good crisp from a *great* crisp. We are aiming for a perfect ratio of buttery, oaty, and crumbly, the kind of topping that deserves its own fan club.
For this recipe, we’re skipping the nuts (because, you know, allergies). Instead, we’re relying on a simple yet effective combination of:
- **All-Purpose Flour:** The foundation of our crumble.
- **Rolled Oats:** For that delightful chewy texture.
- **Brown Sugar:** Adds moisture, sweetness, and a hint of molasses.
- **Granulated Sugar:** For extra sweetness and a touch of crispness.
- **Salt:** To balance the sweetness and enhance the other flavors.
- **Cold Butter:** The *key* to achieving that crumbly texture. Make sure it’s cold, cold, cold! I even like to cube it and pop it in the freezer for a few minutes before using it.
- **Cinnamon and Nutmeg:** These provide that comforting warmth.
Now, here’s the secret: don’t overmix the topping! You want to work the butter into the dry ingredients just until it resembles coarse crumbs. This will create those beautiful, distinct crumbles that we all crave. Use a pastry blender or your fingers (yes, your fingers!) to achieve the perfect texture.
Assembling Your Masterpiece: The Final Flourish
Okay, you’ve prepped your fruit, you’ve crafted your crumble, now it’s time to bring it all together. This is where the magic truly happens, folks.
1. **Preheat your oven to 375°F (190°C).** This is crucial for achieving that golden-brown, bubbly perfection.
2. **Grease your baking dish.** I like to use a square 8×8 inch baking dish, but a round one will work just as well.
3. **Arrange the fruit mixture in the baking dish.** Make sure it’s evenly distributed.
4. **Sprinkle the crumble topping over the fruit.** Again, make sure it’s evenly distributed. You want every bite to have the perfect fruit-to-crumble ratio.
5. **Bake for 35-40 minutes, or until the topping is golden brown and the fruit is bubbly.** Keep an eye on it, as ovens vary. If the topping starts to brown too quickly, you can loosely tent it with foil.
6. **Let it cool slightly before serving.** This is the hardest part, I know. But trust me, it’s worth the wait. The filling will thicken as it cools, and you won’t burn your tongue on molten fruit lava.
Serving Suggestions: Elevate Your Crisp Game
Okay, you’ve baked your **apple pear crisp**, you’ve let it cool (somewhat), now it’s time to devour it. But before you dig in, let’s talk about some ways to elevate your crisp game:
- **Vanilla Ice Cream:** A classic pairing for a reason. The cold, creamy ice cream perfectly complements the warm, fruity crisp.
- **Whipped Cream:** Another delicious option. Add a sprinkle of cinnamon or nutmeg to the whipped cream for extra flavor.
- **Caramel Sauce:** Drizzle a little caramel sauce over the top for an extra dose of decadence.
- **A dollop of Greek yogurt:** For a healthier, tangy twist.
But honestly, this **apple pear crisp** is so good, it’s perfectly delicious all on its own. Grab a spoon, find a cozy spot, and prepare to enter dessert heaven.
Variations and Substitutions: Make It Your Own!
One of the best things about this recipe is how easily it can be customized. Feel free to experiment with different fruits, spices, and toppings to create your own signature **apple pear crisp**.
- **Other Fruits:** Try adding berries, peaches, or plums. Just adjust the baking time accordingly.
- **Different Spices:** Experiment with ginger, cardamom, or allspice.
- **Gluten-Free:** Use a gluten-free flour blend for the topping.
- **Vegan:** Use vegan butter and ensure your sugar is vegan-friendly.
The possibilities are endless! So go ahead, get creative, and make this **apple pear crisp** your own.
Troubleshooting: Common Crisp Conundrums and How to Solve Them
Sometimes, even with the best recipe, things can go awry. Here are some common **apple pear crisp** conundrums and how to solve them:
- **Topping is too dry:** Add a tablespoon or two of melted butter.
- **Topping is too wet:** Add a tablespoon or two of flour.
- **Fruit is too tart:** Add a little extra sugar to the fruit mixture.
- **Topping is browning too quickly:** Tent the baking dish with foil.
- **Fruit is not cooked through:** Bake for a few more minutes.
Don’t be afraid to experiment and adjust the recipe to your liking. After all, cooking is all about having fun!
Why This Apple Pear Crisp Is More Than Just a Dessert
This **apple pear crisp** is more than just a dessert; it’s a symbol of comfort, warmth, and good times. It’s the perfect treat to share with friends and family, or to enjoy all by yourself on a cozy night in. It’s a reminder that even the simplest things in life can be incredibly delicious. And for me, it is a memory of making something my family loved. So, preheat your oven, gather your ingredients, and prepare to create some delicious memories of your own. Happy baking!
Conclusion for Apple Pear Crisp :
This Apple Pear Crisp recipe is a surefire way to create a comforting and delicious dessert that everyone will adore. The combination of sweet apples and pears, topped with a buttery, crispy crumble, is simply irresistible. Feel free to customize it with different fruits or add-ins to suit your taste. This dessert is perfect for any occasion, from casual weeknight dinners to festive gatherings. Enjoy the warm, comforting flavors of this classic treat! Don’t forget a dollop of vanilla ice cream!
Print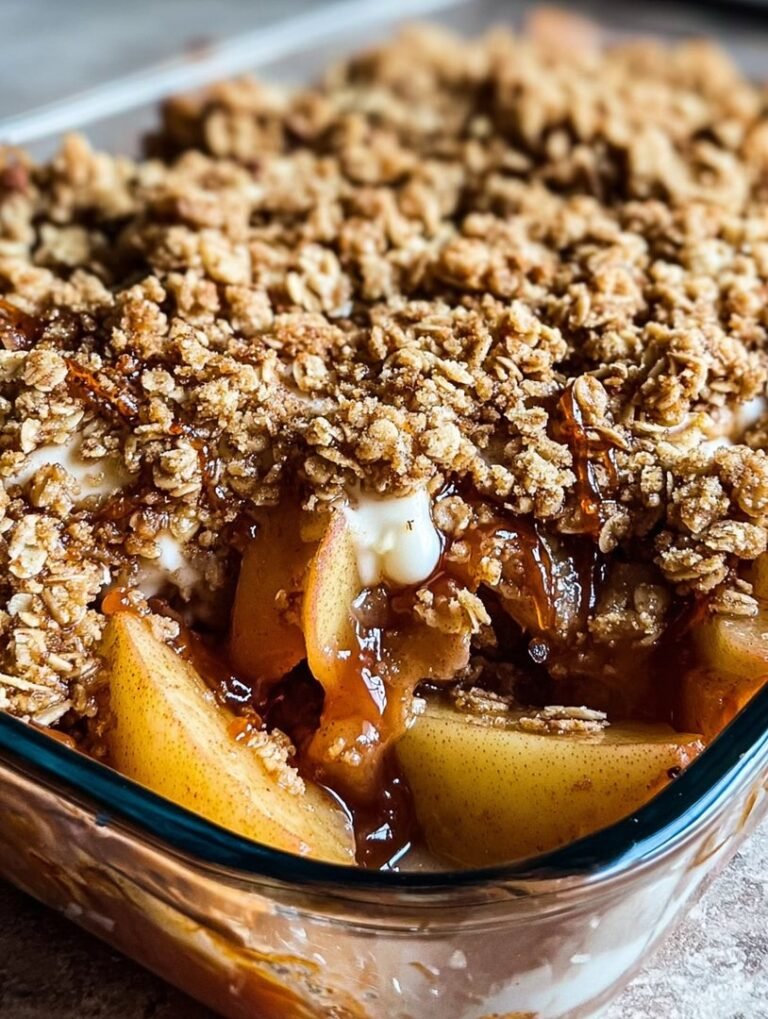
Apple Pear Crisp
Delicious apple pear crisp recipe with detailed instructions and nutritional information.
- Total Time: 35 minutes
- Yield: 4 servings
Ingredients
- Apples (Granny Smith or Honeycrisp) – 4 medium, peeled and sliced
- Pears (Bosc or Anjou) – 2 medium, peeled and sliced
- All-purpose flour – 1 cup
- Rolled oats – 3/4 cup
- Brown sugar – 3/4 cup, packed
- Unsalted butter – 1/2 cup (1 stick), cold and cubed
- Ground cinnamon – 1 teaspoon
- Lemon juice – 1 tablespoon
Instructions
- Step 1: Preheat oven to 375°F (190°C). In a large bowl, combine the sliced apples and pears with the lemon juice and toss gently to coat.
- Step 2: In a separate bowl, whisk together the flour, rolled oats, brown sugar, and cinnamon.
- Step 3: Cut in the cold butter using a pastry blender or your fingers until the mixture resembles coarse crumbs.
- Step 4: Spread the apple and pear mixture evenly in a 9-inch baking dish. Sprinkle the oat mixture evenly over the fruit.
- Step 5: Bake for 30-35 minutes, or until the topping is golden brown and the fruit is tender and bubbling.
- Step 6: Let cool slightly before serving. Serve warm, optionally with vanilla ice cream or whipped cream.
Notes
- Store leftover apple pear crisp in the refrigerator, covered, for up to 3 days.
- For warm, melty goodness, reheat individual portions in the microwave for 30-60 seconds.
- A scoop of salted caramel ice cream elevates this crisp to a truly decadent dessert.
- To avoid a soggy bottom, be sure your fruit is well-coated with lemon juice and not overly juicy before topping.
- Prep Time: 15 minutes
- Cook Time: 20 minutes
- Method: Stovetop
- Cuisine: American
FAQs :
Can I use other fruits in my Apple Pear Crisp?
Absolutely! Feel free to get creative. While this recipe highlights the delightful combination of apples and pears, you can certainly substitute or add other fruits like berries, peaches, plums, or even cranberries for a festive twist. Just ensure that the total amount of fruit remains roughly the same to maintain the proper ratio with the topping. Adjusting the sweetness might be needed depending on the tartness of your chosen fruits. Don’t be afraid to experiment and create your unique fruit crisp masterpiece! This recipe is very forgiving and accommodating to different tastes.
How do I make the Apple Pear Crisp topping extra crispy?
Ah, the quest for the ultimate crispy topping! A few tricks will elevate your crisp game. First, use cold butter and cut it into the flour mixture quickly to prevent it from melting. This creates pockets of butter that steam during baking, resulting in flaky layers. Second, avoid overmixing the topping; a slightly crumbly mixture is ideal. Finally, sprinkle a bit of coarse sugar, like turbinado sugar, on top before baking for added crunch and sparkle. These tips guarantee a satisfyingly crispy topping that complements the soft, sweet fruit filling perfectly.
What’s the best way to store leftover Apple Pear Crisp?
Storing leftover crisp is a breeze. Once completely cooled, cover the dish tightly with foil or plastic wrap and store it in the refrigerator for up to 3-4 days. Alternatively, you can transfer individual portions to airtight containers. When you’re ready to enjoy it again, you can reheat it in the oven at 350°F (175°C) for about 10-15 minutes, or until warmed through. For a quicker option, microwave individual servings for 30-60 seconds. A scoop of vanilla ice cream on top makes the reheated crisp even better!
Can I prepare the Apple Pear Crisp ahead of time?
Yes, you can definitely get a head start! You can prepare the fruit filling and the topping separately up to a day in advance. Store the filling in an airtight container in the refrigerator. Keep the topping in a separate container or zip-top bag, also in the refrigerator. When you’re ready to bake, simply combine the filling and topping in the baking dish and bake as directed. This is a great option when you’re entertaining or want to have dessert ready to go with minimal effort. Freshly baked crisp is a delight, but pre-prep makes it a snap.

Leave a Comment