

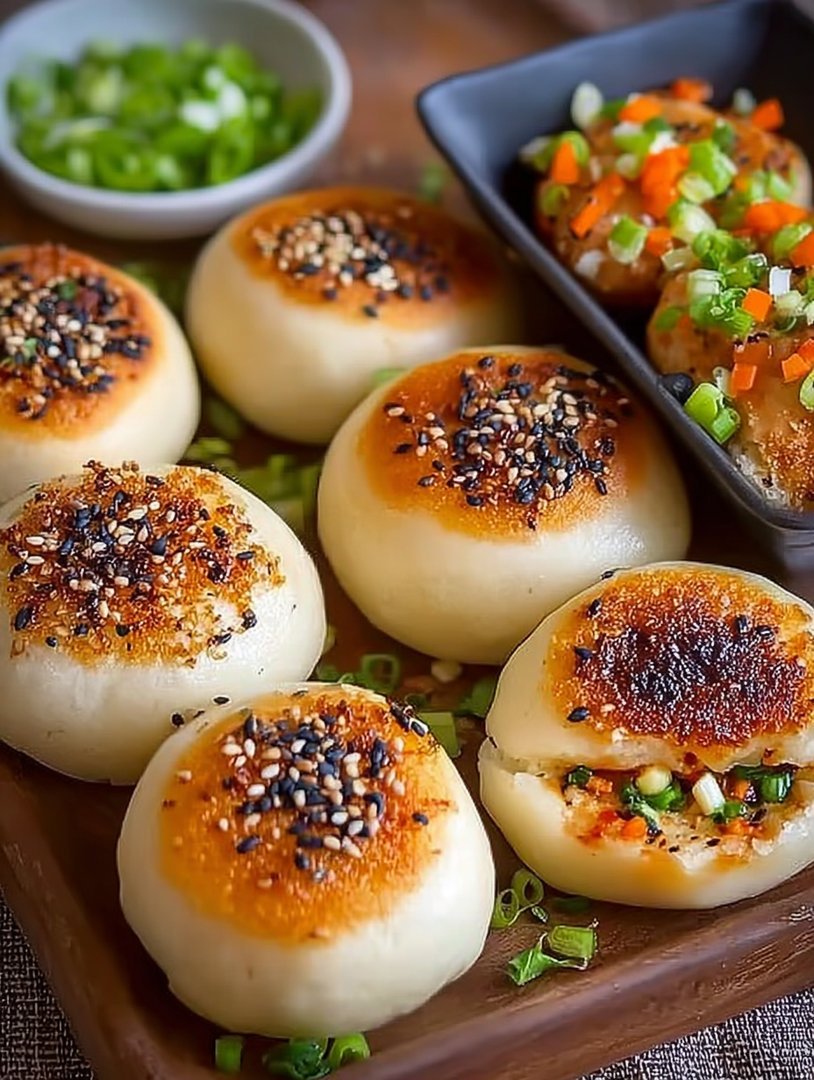
Get ready to dive into a world where savory meets comfort food in the most delightful way! Imagine biting into a warm, fluffy bun with a satisfyingly crisp bottom, bursting with a medley of vibrant, flavorful vegetables.
These Vegan Crispy Bottom Veggie Buns are not just food; they are an experience, a delightful dance of textures and tastes that will leave you craving more.
I remember once trying a similar veggie bun at a local farmer’s market, and it was so surprisingly delicious. However, I found myself wanting to create a version that was entirely plant-based. After several experiments, I finally perfected the recipe, ready to share with you. Prepare to be amazed by the incredible symphony of flavors! These buns are perfect for a cozy weekend brunch or a fun picnic in the park.
- Effortlessly prepare a delectable vegan treat with easy-to-follow instructions.
- Experience a delightful fusion of textures, from the crispy base to the soft, veggie-filled interior.
- These vibrant buns are as visually appealing as they are delicious, making them perfect for any occasion.
- Adapt the recipe to your liking by incorporating your favorite seasonal vegetables for a personalized culinary adventure.
Ingredients for Vegan Crispy Bottom Veggie Buns: An Incredible Ultimate Recipe
Here’s what you’ll need to make this delicious dish:
The full ingredients list, including measurements, is provided in the recipe card directly below.
How to Make Vegan Crispy Bottom Veggie Buns: An Incredible Ultimate Recipe
Follow these simple steps to prepare this delicious dish:
Step 1: Prepare the Dough
In a large bowl, combine the flour, instant yeast, sugar, and salt. Add warm water and olive oil. Mix until a shaggy dough forms. Knead the dough on a lightly floured surface for 5-7 minutes until it becomes smooth and elastic. Place the dough in a lightly oiled bowl, cover, and let it rise in a warm place for about 1 hour, or until doubled in size.
Step 2: Make the Veggie Filling
While the dough is rising, prepare the vegetable filling. Press the firm tofu to remove excess water, then dice it into small cubes. Heat sesame oil in a large skillet or wok over medium-high heat. Add the diced tofu and cook until golden brown and slightly crispy. Remove the tofu from the skillet and set aside.
Step 3: Sauté the Vegetables
In the same skillet, add a little more sesame oil. Add the chopped onions and garlic and sauté until fragrant and translucent, about 2-3 minutes. Add the carrots, bell peppers, and zucchini. Cook until the vegetables are tender-crisp, about 5-7 minutes.
Step 4: Combine and Simmer
Return the cooked tofu to the skillet with the vegetables. In a small bowl, whisk together the soy sauce, rice vinegar, cornstarch, and vegetable broth. Pour the sauce over the tofu and vegetables. Bring to a simmer and cook until the sauce has thickened, about 2-3 minutes. Remove from heat and let cool slightly.
Step 5: Assemble the Buns
Preheat your oven to 375°F (190°C). Line a baking sheet with parchment paper. Punch down the risen dough and divide it into 8-10 equal pieces. Roll each piece into a ball. On a lightly floured surface, flatten each ball into a small disc. Spoon a generous amount of the veggie filling into the center of each disc. Bring the edges of the dough up and pinch them together to seal the filling inside, forming a bun.
Step 6: Bake and Serve
Place the assembled buns, seam-side down, on the prepared baking sheet. Lightly brush the tops of the buns with olive oil or a plant-based milk for a golden finish. Sprinkle with sesame seeds. Bake for 20-25 minutes, or until the buns are golden brown and the bottoms are crispy. Remove from the oven and let cool slightly before serving. Garnish with chopped scallions. Transfer to plates and serve warm for the perfect finishing touch.
Perfecting the Cooking Process
To achieve culinary nirvana with your veggie buns, a strategic cooking sequence is key. First, sauté your heartier veggies like carrots and broccoli to soften them. While they’re cooking, get your dough ready for ultimate efficiency and delicious results.
Add Your Touch
Feeling adventurous? Swap out the mushrooms for some finely chopped zucchini or bell peppers. A dash of smoked paprika or a sprinkle of toasted sesame seeds can also add a unique twist to your Vegan Crispy Bottom Veggie Buns: An Incredible Ultimate Recipe.
Storing & Reheating
These buns are best enjoyed fresh, but leftovers can be stored in an airtight container in the refrigerator for up to three days. Reheat them in a skillet or microwave for a quick and tasty treat. A little spritz of water before reheating helps retain moisture.
Here are some pro tips for making the absolute best Vegan Crispy Bottom Veggie Buns: An Incredible Ultimate Recipe, that will make all your friends jealous and your taste buds sing:
- Don’t overcrowd the pan when searing the vegetables, as this will steam them instead of creating that beautiful, caramelized flavor.
- For an extra crispy bottom, lightly brush the skillet with oil before placing the buns and let them sizzle undisturbed over medium heat.
- Experiment with different dipping sauces like a sriracha mayo or a tangy vinaigrette to complement the savory filling of the buns.
(Personal anecdote formated as paragraph subheading)
The first time I made these buns, my nephew declared them “the best thing you’ve ever made!” His little face was covered in veggie goodness, and it made all the recipe testing worthwhile.
Conclusion for Vegan Crispy Bottom Veggie Buns: An Incredible Ultimate Recipe :
These Vegan Crispy Bottom Veggie Buns are more than just a recipe; they’re an experience! With their delightful crunch and flavorful vegetable filling, they’re a guaranteed crowd-pleaser. Remember the secrets: don’t overcrowd the pan, use your favorite veggies, and don’t be afraid of a little oil. Customizing the filling to your taste and making them ahead for meal prep makes this the ultimate recipe! Prepare to be amazed by how these buns vanish, leaving you craving more.
Print
Vegan Crispy Bottom Veggie Buns: An Incredible Ultimate Recipe
Delicious vegan crispy bottom veggie buns: an incredible ultimate recipe recipe with detailed instructions and nutritional information.
- Total Time: 35 minutes
- Yield: 4 servings
Ingredients
- All-purpose flour: 3 cups
- Active dry yeast: 2 1/4 teaspoons
- Warm water: 1 cup
- Sugar: 2 tablespoons
- Salt: 1 teaspoon
- Olive oil: 3 tablespoons
- Assorted vegetables (such as cabbage, carrots, mushrooms, onions): 4 cups, chopped
- Soy sauce: 2 tablespoons
Instructions
- Step 1: In a large bowl, dissolve yeast and sugar in warm water. Let stand for 5 minutes until foamy. Add olive oil and salt. Gradually add flour, mixing until a soft dough forms.
- Step 2: Knead the dough on a lightly floured surface for 5-7 minutes until smooth and elastic. Place in a lightly oiled bowl, turning to coat. Cover and let rise in a warm place for 1-1.5 hours, or until doubled in size.
- Step 3: While the dough is rising, prepare the vegetable filling. In a large pan or wok, stir-fry the chopped vegetables over medium-high heat until softened. Add soy sauce and cook for another 2-3 minutes. Remove from heat and let cool.
- Step 4: Punch down the risen dough and divide it into 12 equal pieces. Roll each piece into a circle, about 4 inches in diameter. Place a generous spoonful of vegetable filling in the center of each circle.
- Step 5: Bring the edges of the dough up and pinch to seal, forming a bun. Place the buns seam-side down in a lightly oiled skillet. Add about 1/4 inch of water to the skillet. Cover and cook over medium heat for about 15-20 minutes, or until the bottoms are golden brown and crispy, and the buns are cooked through. Let cool slightly before serving.
Notes
- Store cooled buns in an airtight container at room temperature for up to 2 days, or in the refrigerator for up to 4 days.
- For best results, reheat the buns in a dry skillet over medium heat to re-crisp the bottoms.
- Serve these savory buns as a satisfying snack, a light lunch, or even as a unique side dish to your favorite Asian-inspired meal.
- Don't overcrowd the skillet; cooking in batches ensures even browning and the crispiest bottoms for each bun.
- Prep Time: 15 minutes
- Cook Time: 20 minutes
- Method: Stovetop
- Cuisine: American
FAQs :
What’s the secret to a truly crispy bottom on these Vegan Crispy Bottom Veggie Buns?
Ah, the million-dollar question! The secret lies in two things: a hot pan and a bit of patience. Don’t overcrowd the pan; give those buns some breathing room. We want them to sizzle and crisp up beautifully. Also, resist the urge to peek! Let them cook undisturbed for a good few minutes until that golden-brown crust forms. Trust me, the anticipation is worth it. The satisfying crunch you get is pure veggie bun bliss. You’ll be amazed at how easy it is once you get the hang of this incredible ultimate recipe.
Can I customize the vegetable filling for these Vegan Crispy Bottom Veggie Buns?
Absolutely! That’s the beauty of these buns, they are incredibly versatile. Feel free to swap out any veggies you don’t like or add in your favorites. Bell peppers, zucchini, mushrooms, even some finely chopped broccoli – the possibilities are endless. Get creative and use what you have on hand. Think of it as a veggie adventure in every bite! Just ensure you chop everything finely so it cooks evenly. A rainbow of veggies makes for the most visually stunning and delicious vegan crispy bottom veggie buns.
How do I prevent the bottoms from sticking to the pan?
Sticking is a common issue, but easily avoidable. First, use a non-stick pan or a well-seasoned cast iron skillet. Second, make sure your pan is properly heated before adding the buns. A medium-high heat is usually perfect. And finally, don’t be shy with the oil! A generous drizzle of oil in the pan will create a barrier and prevent sticking. If you are still having issues, try adding a tablespoon of water to the pan towards the end of cooking and covering it with a lid for a minute. The steam helps loosen any stuck bits.
Can I make these Vegan Crispy Bottom Veggie Buns ahead of time?
You sure can! These buns are great for meal prepping. You can assemble the buns and keep them in the fridge. When you’re ready to eat, just cook them up in a pan. The cooked buns can also be stored in the refrigerator for up to three days. To reheat, pan-fry them again until heated through and the bottoms are crispy. They might not be quite as crispy as freshly made, but they’ll still be delicious. Alternatively, you can freeze them for longer storage. Just make sure to wrap them well to prevent freezer burn.


Leave a Comment