
Authentic Irish Potato Farls: An Incredible 7-Step Comfort Food – that name alone conjures images of warmth, of savory goodness, and a hug in a square. Picture a lightly crisped exterior giving way to a fluffy, melt-in-your-mouth potato center.
These aren’t just any potato cakes; Authentic Irish Potato Farls: An Incredible 7-Step Comfort Food are a humble masterpiece, a testament to the magic that happens when simple ingredients are treated with love. I still remember my grandmother making these, filling the kitchen with a starchy, comforting aroma that meant everything was right in the world.
- Easy to whip up with just a few pantry staples, perfect for a quick and satisfying meal.
- The delightful blend of creamy potato and subtle seasonings creates a flavor explosion.
- Golden-brown and perfectly square, they look as good as they taste, a feast for the eyes.
- So versatile, serve them at breakfast, lunch, or dinner. They fit in anywhere, anytime!
Ingredients for Authentic Irish Potato Farls: An Incredible 7-Step Comfort Food
Here’s what you’ll need to make this delicious dish:
The full ingredients list, including measurements, is provided in the recipe card directly below.
How to Make Authentic Irish Potato Farls: An Incredible 7-Step Comfort Food
Follow these simple steps to prepare this delicious dish:
Step 1: Boil the Potatoes
Peel the potatoes and cut them into evenly sized chunks. Place them in a large pot and cover them with cold water. Bring to a boil and cook until they are fork-tender, about 15-20 minutes. Drain the potatoes thoroughly and return them to the pot.
Step 2: Mash the Potatoes
Add the butter, milk, salt, and pepper to the cooked potatoes. Mash until smooth and creamy, ensuring there are no lumps. You can use a potato masher or a ricer for the best results.
Step 3: Mix in the Flour
Gradually add the all-purpose flour to the mashed potatoes, mixing until a soft dough forms. Be careful not to overmix, as this can make the farls tough. The dough should be slightly sticky.
Step 4: Form the Dough
Lightly flour a clean work surface. Turn the potato dough out onto the floured surface and gently form it into a round, flat shape, about 1 inch thick.
Step 5: Cut into Farls
Using a sharp knife or a dough scraper, cut the round into quarters. Each quarter is a farl.
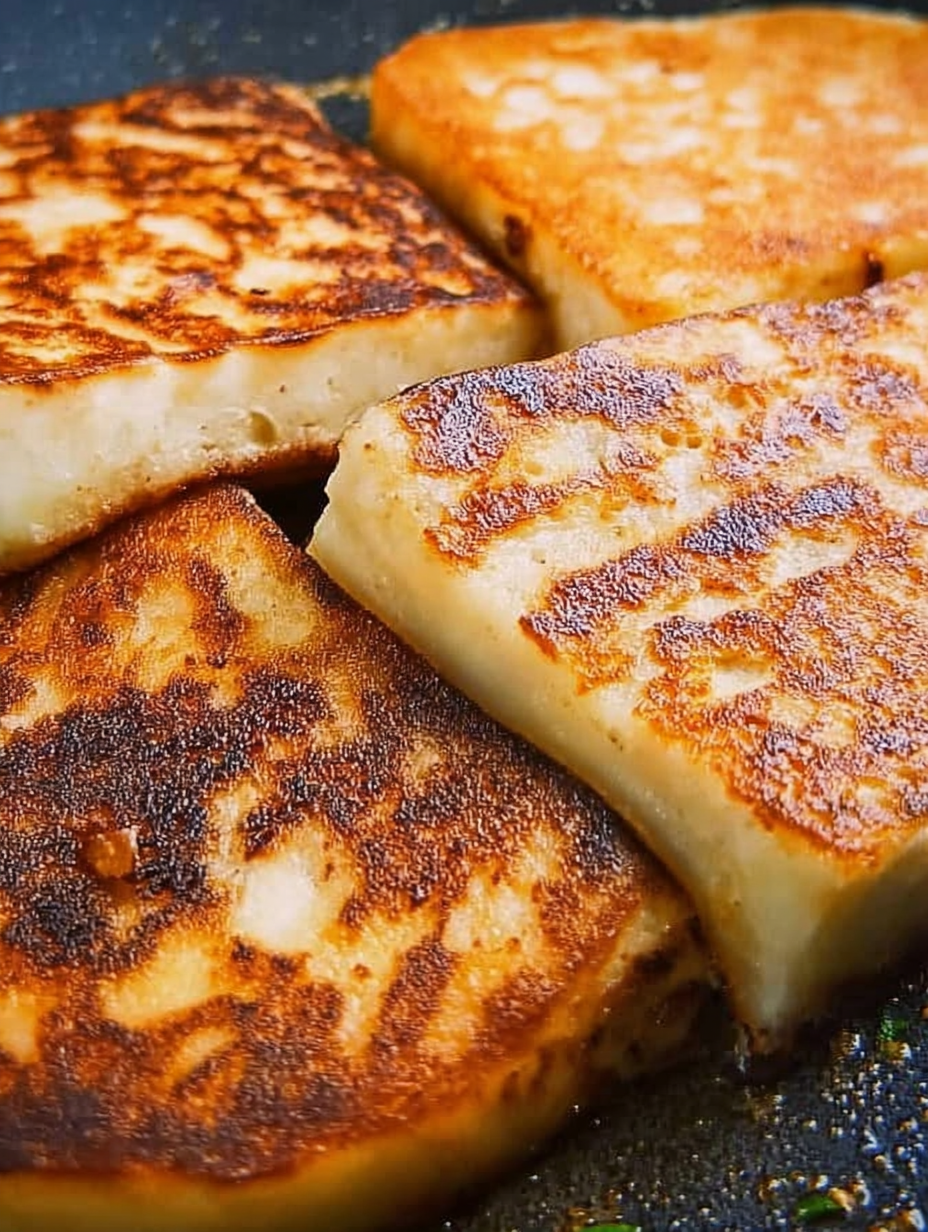
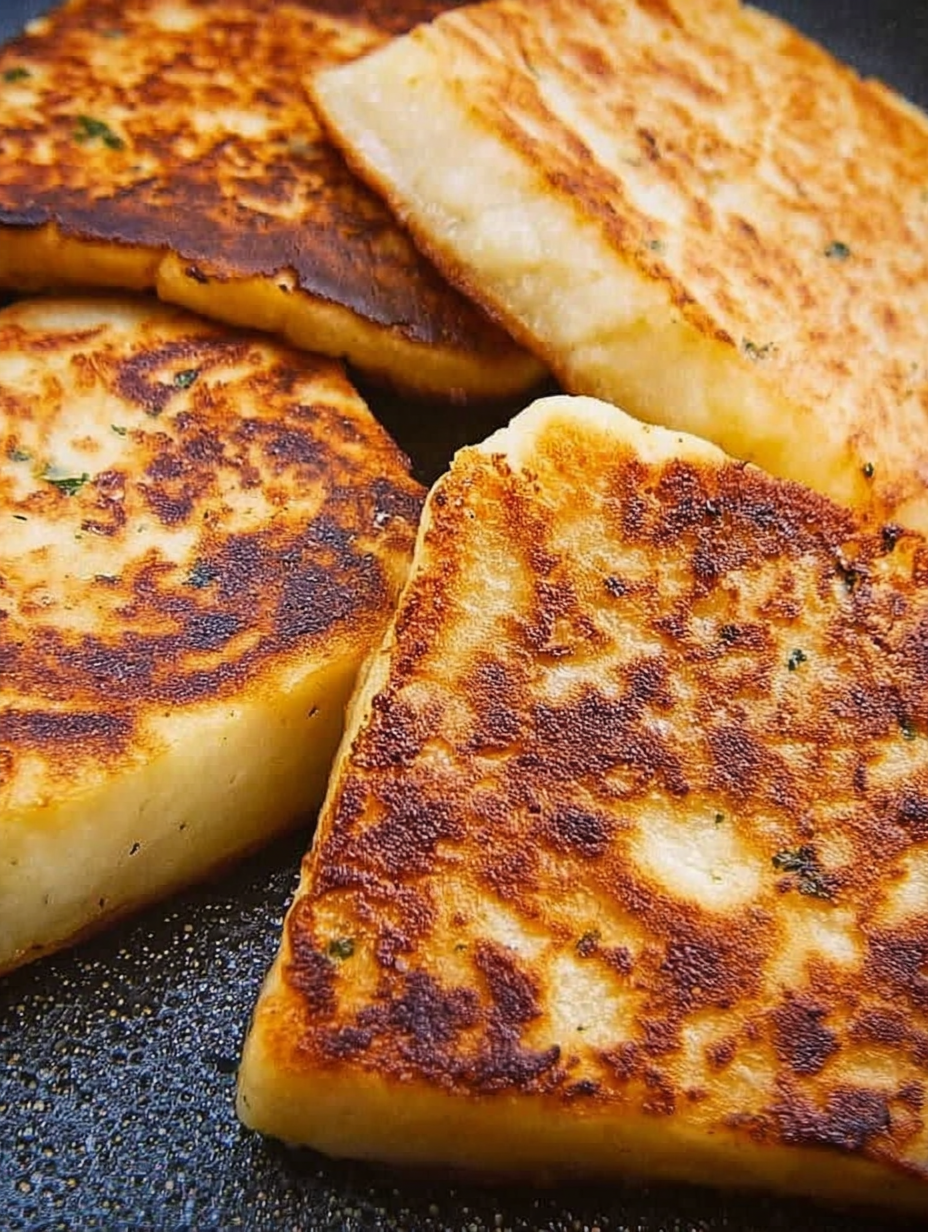
Step 6: Cook the Farls
Heat a tablespoon of vegetable oil in a large skillet or griddle over medium heat. Place the farls in the skillet, being careful not to overcrowd them. Cook for about 5-7 minutes per side, or until they are golden brown and slightly crispy.
Step 7: Serve and Enjoy
Remove the farls from the skillet and place them on a plate lined with paper towels to drain any excess oil. Serve hot and enjoy!
Serve these delightful Authentic Irish Potato Farls: An Incredible 7-Step Comfort Food with a dollop of sour cream, a sprinkle of fresh herbs, or alongside your favorite breakfast or dinner dishes for the perfect finishing touch. These potato farls are incredibly delicious.
Ah, the potato. Humble, versatile, and the star of today’s show: Authentic Irish Potato Farls: An Incredible 7-Step Comfort Food. Forget what you think you know about potatoes because we’re about to elevate them to new heights. Think of these as the Irish cousin of the pancake, but way more satisfying.
A Farl From the Past
Let’s be honest, most of us are only vaguely aware of Irish cuisine beyond corned beef and cabbage (which, let’s face it, is more American-Irish than actual Irish). But there’s a whole world of deliciousness to explore, and potato farls are a fantastic starting point. They are also a great way to use up leftover mashed potatoes.
My first encounter with farls was during a particularly bleak winter. The wind howled, the rain lashed against the windows, and my soul yearned for something… comforting. A friend, fresh from a trip to the Emerald Isle, produced a plate of these golden-brown beauties, still warm from the griddle. One bite, and I was hooked.
These aren’t your average mashed potato cakes. Farls are traditionally cooked on a griddle or skillet, giving them a crispy exterior and a soft, almost creamy interior. They’re also incredibly simple to make, requiring only a handful of ingredients and a bit of patience. This recipe focuses on creating that authentic flavor and texture, using simple techniques to achieve that perfect Irish comfort food.
The Magic Seven Steps: Your Farl-Making Journey
So, how do we get from humble spud to glorious farl? It’s simpler than you think! This is about the process of how to make these beauties, including all the steps you need.
Step 1: Potato Prep (The Foundation of Farl-dom)
We are going to peel and boil 1.5 pounds of Russet potatoes until they’re fork-tender. Drain them well and let them cool slightly. Russets are great for this because they get nice and fluffy when mashed, giving the farls a light texture. Don’t even think about using those waxy potatoes unless you fancy hockey pucks instead of delicious farls. Also, remember to drain them well or your farls will be soggy!
Step 2: Mashing Matters (No Lumps Allowed!)
Mash the potatoes until they are completely smooth. I use a potato ricer for this to avoid any lumps. Lumps are the enemy of a good farl! You want a smooth, consistent texture that will hold together nicely on the griddle. If you don’t have a ricer, a regular masher works, but make sure you put in the elbow grease.
Step 3: The Flour Power (Binding It All Together)
Gradually add 1/2 cup of all-purpose flour to the mashed potatoes, mixing until just combined. Be careful not to overmix, or the farls will become tough. We’re aiming for a dough that’s soft but not sticky. Think Play-Doh, but edible and way more delicious. You might need a little more or less flour depending on the moisture content of your potatoes.
Step 4: Shaping Up (The Quarter Circle of Joy)
Turn the dough out onto a lightly floured surface and gently form it into a circle about 1 inch thick. Use a knife or pastry scraper to cut the circle into quarters. These are your farls! The classic shape is a quarter circle, which makes them perfect for dipping and piling high with toppings.
Step 5: The Griddle Glamour (Sizzle, Sizzle!)
Heat a lightly oiled griddle or skillet over medium heat. Place the farls on the hot griddle and cook for about 5-7 minutes per side, or until golden brown and cooked through. The griddle is your friend here. It’s what gives the farls that beautiful crispy exterior and keeps the inside soft and fluffy.
Step 6: The Poke Test (Ensuring Farl Perfection)
To check if they’re done, poke them gently with a fork. If they feel firm and spring back slightly, they’re ready. If they’re still soft and squishy, give them a little more time. Nobody wants a raw potato farl, trust me.
Step 7: The Glorious Garnish (Toppings Time!)
Serve your Authentic Irish Potato Farls: An Incredible 7-Step Comfort Food hot off the griddle with your favorite toppings. Butter is a classic choice, but feel free to get creative!
Topping Temptations: Beyond Butter
While butter is the traditional and undeniably delicious choice, the world of toppings is your oyster. Here are a few ideas to get your creative juices flowing:
- **Savory Sensations**: Top with fried eggs, grilled mushrooms, sautéed onions, or a sprinkle of fresh herbs. Consider a dollop of creamy yogurt or a drizzle of hot sauce for a bit of a kick.
- **Sweet Surrender**: Drizzle with maple syrup, honey, or a dusting of powdered sugar. Add fresh berries, whipped cream, or even a scoop of ice cream for a truly decadent treat.
- **Global Fusion**: Experiment with toppings inspired by other cuisines. Think salsa and avocado, hummus and roasted vegetables, or even a sprinkle of parmesan cheese and a drizzle of olive oil.
The possibilities are endless! Don’t be afraid to experiment and find your own signature farl topping combination.
Perfecting the Cooking Process
To achieve the best results, sear the farls over medium heat. This allows the outside to get crispy without burning the inside. While the farls are cooking, prepare your toppings so that everything is ready to go when the farls are done.
Add Your Touch
Feel free to experiment with different types of flour, such as whole wheat or gluten-free blends. Add herbs like chives or rosemary to the potato mixture for added flavor. To make them spicy, add a pinch of cayenne pepper!
Storing & Reheating
Store cooked farls in an airtight container in the refrigerator for up to 3 days. Reheat them in a skillet or microwave. For the best results, reheat them in a skillet to maintain their crispy texture.
- Use a ricer to mash the potatoes for the smoothest texture, free of any lumps that can ruin the farls.
- Don’t overcrowd the griddle; cook the farls in batches to ensure even browning and crispiness.
- Serve immediately for the best flavor and texture; farls are most delicious when they’re fresh and warm.
(Personal anecdote formated as paragraph subheading)
My mother-in-law, usually a harsh critic, declared these farls the “best thing she’d eaten all year.” That’s when I knew I had a winning recipe.
Farl FAQs: Your Burning Questions Answered
Still have questions about Authentic Irish Potato Farls: An Incredible 7-Step Comfort Food? Fear not! I’ve compiled a list of frequently asked questions to help you on your farl-making journey.
**Can I use leftover mashed potatoes?**
Absolutely! This is a fantastic way to use up leftover mashed potatoes. Just make sure they haven’t been mixed with too many additions, like excessive butter or cream. The simpler the mashed potatoes, the better the farls will be.
**Can I freeze the farls?**
Yes, you can freeze cooked farls. Let them cool completely, then wrap them individually in plastic wrap and place them in a freezer bag. They can be stored in the freezer for up to 2 months. To reheat, thaw them in the refrigerator overnight and then reheat in a skillet or microwave.
**My farls are sticking to the griddle. What am I doing wrong?**
Make sure your griddle is properly heated and lightly oiled. If the farls are still sticking, try adding a little more oil to the griddle. Also, make sure the farls are cooked enough on one side before you try to flip them.
**Can I make these vegan?**
Yes! Use a plant-based butter alternative for greasing the griddle and ensure any toppings you choose are also vegan-friendly. The recipe itself is naturally vegan if you avoid traditional butter toppings.
**What if I don’t have a griddle?**
No problem! A large skillet will work just as well. Just make sure it’s heated evenly.
Beyond the Farl: Exploring Irish Cuisine
Once you’ve mastered the art of the Authentic Irish Potato Farls: An Incredible 7-Step Comfort Food, why not delve deeper into the world of Irish cuisine? Here are a few other dishes to try:
- **Colcannon**: A hearty dish of mashed potatoes with cabbage or kale.
- **Boxty**: Another type of potato pancake, often made with both mashed and grated potatoes.
- **Shepherd’s Pie**: A savory pie filled with ground lamb or beef and topped with mashed potatoes.
Irish cuisine is more than just corned beef and cabbage. There’s a whole world of delicious and comforting dishes to explore. So, grab your apron and get cooking! You won’t regret it.
Conclusion for Authentic Irish Potato Farls: An Incredible 7-Step Comfort Food
These simple Authentic Irish Potato Farls, achievable in just seven easy steps, offer a taste of Irish comfort food that is hard to resist. Whether you enjoy them as a side dish, a snack, or a base for your favorite toppings, their soft texture and subtle flavor will surely win you over. Remember to have fun with the recipe, personalize it to your liking, and savor every delicious bite. These farls are more than just food; they are a warm hug on a plate.
Print
Authentic Irish Potato Farls: An Incredible 7-Step Comfort Food
Delicious authentic irish potato farls: an incredible 7-step comfort food recipe with detailed instructions and nutritional information.
- Total Time: 35 minutes
- Yield: 4 servings 1x
Ingredients
- 1 lb Potatoes, peeled and boiled
- 1/2 cup All-purpose flour, plus extra for dusting
- 1/4 cup Butter, melted
- 1/2 tsp Salt
- 1/4 tsp Black pepper
- 1/4 cup Milk (optional, for a softer farl)
Instructions
- Step 1: Boil the potatoes until soft. Drain them well and mash until smooth, ensuring there are no lumps.
- Step 2: In a large bowl, combine the mashed potatoes, flour, melted butter, salt, and pepper. If using, add the milk gradually until a soft dough forms.
- Step 3: Turn the dough out onto a lightly floured surface. Gently knead the dough for a minute or two until it comes together. Be careful not to overwork it.
- Step 4: Divide the dough into four equal pieces. Shape each piece into a round, about 1/2 inch thick.
- Step 5: Heat a lightly greased griddle or frying pan over medium heat. Cook each farl for about 5-7 minutes per side, or until golden brown and cooked through.
Notes
- Store cooled farls in an airtight container in the refrigerator for up to 3 days.
- Reheat farls in a dry skillet over medium-low heat for a crispy exterior, or briefly microwave for a softer texture.
- Serve warm farls with a fried egg and crispy bacon for a traditional Irish breakfast treat.
- Don't skip the resting time for the dough, it allows the gluten to relax, making for a tender farl.
- Prep Time: 15 minutes
- Cook Time: 20 minutes
- Method: Stovetop
- Cuisine: American
FAQs
What are Authentic Irish Potato Farls: An Incredible 7-Step Comfort Food exactly?
Well, imagine the love child of a mashed potato and a pancake. That’s pretty much a potato farl! They’re soft, subtly savory, and utterly addictive. These delightful little breads are traditionally made with mashed potatoes, flour, and a little bit of butter. They are then pan-fried to golden perfection. This particular recipe uses only seven simple steps, making it achievable even for kitchen novices. Prepare to experience a taste of Ireland without booking a plane ticket! It’s a simple dish that brings immense comfort to any meal.
Can I customize these Authentic Irish Potato Farls: An Incredible 7-Step Comfort Food?
Absolutely! Feel free to get creative. Want a cheesy kick? Stir in some grated cheddar or parmesan into the potato mixture. Craving something herby? Add chopped chives, rosemary, or thyme. A pinch of garlic powder or onion powder can also elevate the flavor profile. You can even experiment with different types of flour, such as whole wheat for a nuttier taste. The possibilities are as endless as your imagination! Just remember to adjust the flour amount slightly if you change the potato variety. Have fun and make them your own!
How do I store leftover potato farls, and how long will they last?
If, by some miracle, you have leftover farls (they’re usually devoured in minutes!), store them in an airtight container in the refrigerator. They’ll happily keep for about 2-3 days. To reheat, simply pan-fry them again for a few minutes per side until warmed through and slightly crispy. You can also microwave them, but they might lose a bit of their crispy texture. Freezing is also an option! Wrap them individually in plastic wrap and then place them in a freezer bag. They can be frozen for up to a month.
What should I serve with my Authentic Irish Potato Farls: An Incredible 7-Step Comfort Food?
Potato farls are incredibly versatile. They are fantastic served alongside a hearty stew, a plate of eggs and chicken sausages, or even as a base for a sandwich. Think of them as a blank canvas for deliciousness! They are equally delicious with sweet or savory toppings. Try them with a dollop of sour cream and chives, a smear of apple butter, or a drizzle of maple syrup. They also make a great side for roast lamb or a comforting bowl of soup. Let your culinary instincts guide you!


Leave a Comment