
Content generation failed due to API limits. Please try again later. Original prompt:
IMPORTANT: Write the entire article in English.
You are tasked with writi…
Perfecting the Cooking Process
For the best results with this delightful dessert, first prepare the crust and let it chill. Next, create the luscious caramel. While that cools, slice the bananas. Finally, whip the cream and assemble everything for a show-stopping Banoffee Pie!
Add Your Touch
Feel free to experiment! Try using ginger snaps for the crust for a spicy kick. A sprinkle of sea salt on the caramel adds a delightful contrast. For a chocolatey twist, incorporate cocoa powder into the whipped cream or dust the finished pie with chocolate shavings.
Storing & Reheating
Store leftover Banoffee Pie in the refrigerator, covered, for up to two days. Be warned, the bananas may soften over time! This pie is best enjoyed cold, so no reheating is required. Just grab a slice and enjoy!
Here are some expert tips to make your Banoffee Pie a surefire success:
- Use ripe, but firm, bananas to prevent the pie from becoming soggy. Nobody wants a mushy mess!
- Don’t overcook the caramel. A candy thermometer is your best friend here; aim for that sweet spot of golden perfection.
- For an extra stable whipped cream, add a touch of powdered sugar while whipping. This will help it hold its shape longer.
(Personal anecdote)
The first time I made this, my nephew declared it was “better than cake!” His enthusiasm was so genuine, it made all the effort worthwhile. Now, it’s his birthday dessert request every year.
\
Let’s Talk Banoffee Pie: The Sweet Symphony of Flavors
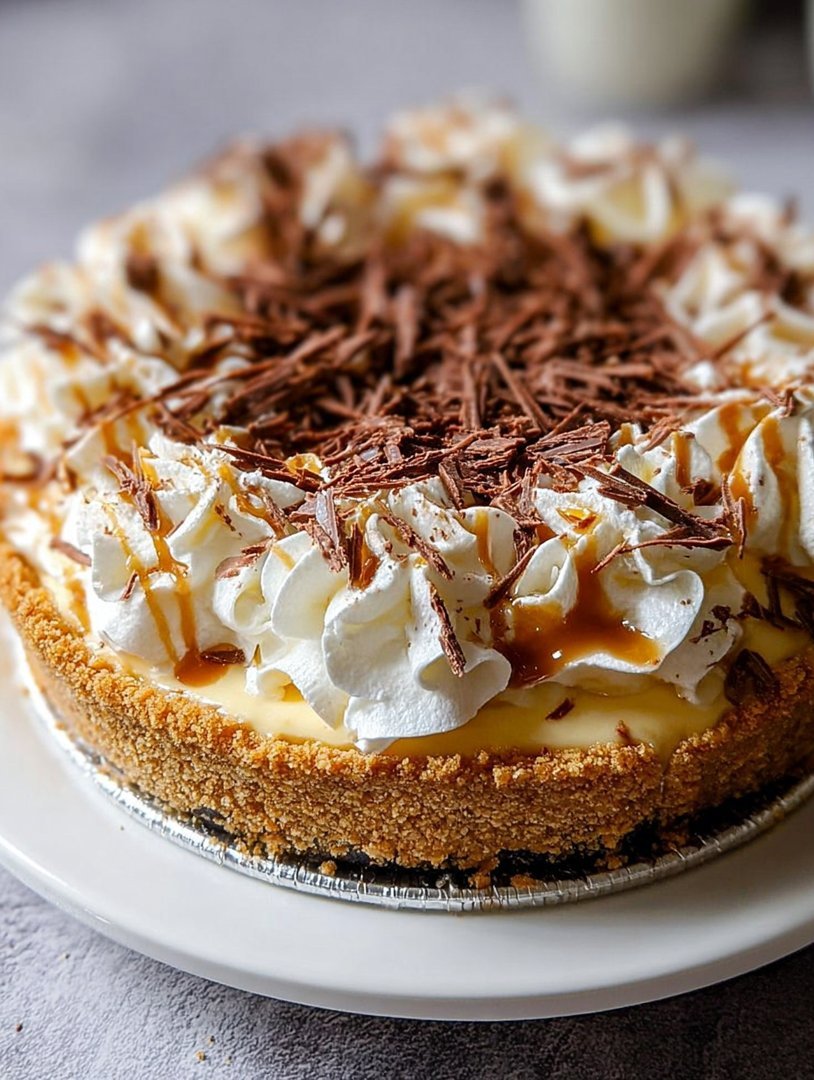
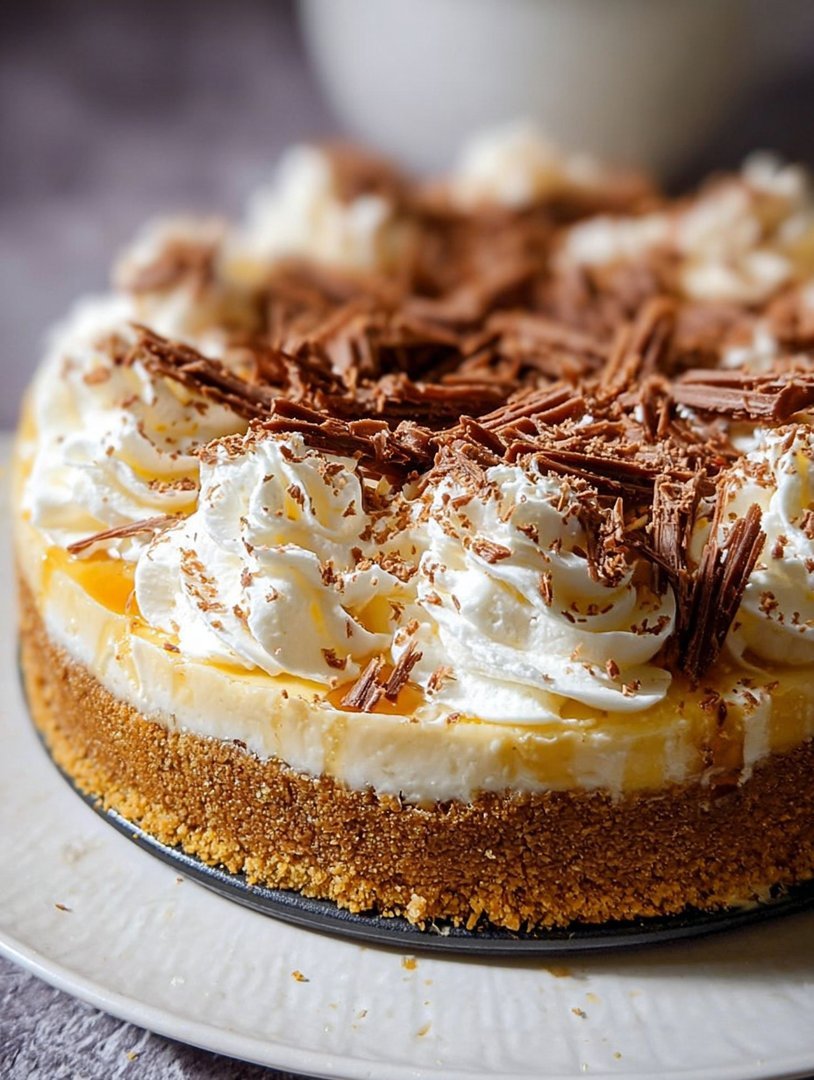
Ah, Banoffee Pie! Just the name rolls off the tongue like a sweet melody, doesn’t it? It conjures up images of golden caramel, creamy bananas, and a buttery biscuit base. This isn’t just dessert; it’s an experience, a hug in pie form, a little slice of happiness that can turn any frown upside down. And trust me, I’ve seen it happen!
But what exactly *is* Banoffee Pie? For the uninitiated (bless your hearts!), it’s a British dessert sensation that combines a crunchy biscuit base, a thick layer of luscious caramel (often made with condensed milk), slices of ripe bananas, and a generous topping of whipped cream, often dusted with cocoa or chocolate shavings. It’s rich, it’s decadent, it’s utterly irresistible.
Now, before you start picturing yourself slaving away in the kitchen for hours, let me reassure you: Banoffee Pie is surprisingly easy to make. Yes, even *you* can create this masterpiece. The key is to break it down into manageable steps and, most importantly, to have fun with it! After all, baking should be a joy, not a chore. So put on some music, grab your apron, and let’s get started!
The Crust: Laying the Foundation for Deliciousness
Every great pie starts with a great crust, and Banoffee Pie is no exception. While you *could* buy a pre-made graham cracker crust from the store (no judgment!), making your own is surprisingly simple and adds that extra touch of homemade goodness. Plus, it gives you bragging rights, which are always a bonus.
For the crust, you’ll need some digestive biscuits (or graham crackers if you’re in the US), melted butter, and a little bit of sugar. Crush the biscuits into fine crumbs, mix them with the melted butter and sugar, and press the mixture into the bottom of a pie dish. Voila! Your crust is ready to go.
Now, here’s a little tip from yours truly: Don’t skip the chilling step! Popping the crust into the fridge or freezer for a bit helps it set properly, preventing it from crumbling when you add the filling. Trust me, a stable crust is crucial for Banoffee Pie success. We want a slice of heaven, not a crumbly catastrophe.
Crust Ingredients:
- 250g digestive biscuits (or graham crackers)
- 100g unsalted butter, melted
- 2 tablespoons granulated sugar
Crust Instructions:
1. Crush the biscuits into fine crumbs using a food processor or by placing them in a ziplock bag and crushing them with a rolling pin.
2. In a bowl, mix the biscuit crumbs, melted butter, and sugar until well combined.
3. Press the mixture firmly into the bottom of a 9-inch pie dish.
4. Chill in the refrigerator for at least 30 minutes or in the freezer for 15 minutes.
The Caramel: Liquid Gold That Will Make You Swoon
Ah, the caramel! This is where the magic really happens. The rich, golden, gooey caramel is what takes Banoffee Pie from good to utterly divine. There are a few different ways to make caramel, but for this recipe, we’re going to use the easy and foolproof method of boiling a can of sweetened condensed milk.
Yes, you read that right. Boiling a can of sweetened condensed milk. It sounds a little crazy, I know, but trust me on this one. When you boil the can (unopened, of course!), the sweetened condensed milk slowly transforms into a thick, luscious caramel that is absolutely heavenly.
Just be sure to follow the instructions carefully and never, ever open the can while it’s hot. Seriously, it’s like a caramel volcano waiting to erupt. Safety first, friends!
Caramel Ingredients:
- 1 (13.5 oz) can sweetened condensed milk
Caramel Instructions:
1. Remove the label from the can of sweetened condensed milk.
2. Place the can in a large pot and cover it completely with water. Make sure the water level stays above the can at all times during cooking.
3. Bring the water to a boil, then reduce the heat to a simmer and cook for 2-3 hours, depending on how dark you want your caramel. For a lighter caramel, cook for 2 hours; for a darker caramel, cook for 3 hours.
4. Carefully remove the can from the pot and let it cool completely before opening. *Do not* attempt to open the can while it is still hot.
5. Once the can is completely cool, open it and scoop out the caramel.
The Bananas: The Fruit That Brings It All Together
What’s Banoffee Pie without bananas? Just “offee” pie, which sounds a little sad, doesn’t it? The bananas add a creamy, fruity sweetness that perfectly complements the rich caramel and buttery crust.
When choosing bananas for your Banoffee Pie, look for ones that are ripe but still firm. You want them to be sweet and flavorful, but not so mushy that they turn to banana pudding in the pie. Nobody wants that!
Slice the bananas just before assembling the pie to prevent them from browning. A little lemon juice can also help keep them looking fresh and vibrant.
Banana Ingredients:
- 3-4 ripe but firm bananas
Banana Instructions:
1. Peel and slice the bananas into about 1/4-inch thick rounds.
2. If desired, toss the banana slices with a little lemon juice to prevent browning.
The Whipped Cream: The Crowning Glory
No Banoffee Pie is complete without a generous dollop of whipped cream. It’s the light and airy counterpoint to the rich caramel and bananas, adding a touch of elegance to this decadent dessert.
You can use store-bought whipped cream if you’re short on time, but homemade whipped cream is so much better. It’s light, fluffy, and you can control the sweetness. Plus, it’s surprisingly easy to make.
Just be sure to use cold heavy cream and a cold bowl and beaters. This will help the cream whip up quickly and easily. And don’t over-whip it, or you’ll end up with butter. Unless you’re going for a butter-cream pie, in which case, go for it!
Whipped Cream Ingredients:
- 1 cup heavy cream, cold
- 2 tablespoons powdered sugar
- 1/2 teaspoon vanilla extract (optional)
Whipped Cream Instructions:
1. In a cold bowl, beat the heavy cream with an electric mixer until soft peaks form.
2. Add the powdered sugar and vanilla extract (if using) and continue beating until stiff peaks form. Be careful not to over-whip.
Assembling Your Masterpiece: Putting It All Together
Now for the fun part! It’s time to assemble your Banoffee Pie. This is where you get to unleash your inner artist and create a dessert masterpiece.
First, spread the cooled caramel evenly over the chilled biscuit crust. Then, arrange the banana slices on top of the caramel. Finally, top with the whipped cream and dust with cocoa powder or chocolate shavings.
And there you have it! Your very own homemade Banoffee Pie. Now, go ahead and take a bow. You deserve it!
Assembly Instructions:
1. Spread the cooled caramel evenly over the chilled biscuit crust.
2. Arrange the sliced bananas on top of the caramel.
3. Top with the whipped cream.
4. Dust with cocoa powder or chocolate shavings, if desired.
5. Chill for at least 30 minutes before serving to allow the flavors to meld.
FAQs
What’s the best way to prevent the bananas from browning in my Banoffee Pie?
Ah, the eternal banana conundrum! Nobody wants a brown, sad-looking banana topping. The trick is to slice the bananas just before you assemble the pie. A light brushing with lemon juice can also slow down the browning process. This adds a subtle tang that complements the sweetness of the caramel and whipped cream. Think of it as a banana spa day – a little lemon massage to keep them looking fresh and fabulous! You can also use slightly under-ripe bananas, which tend to brown slower than riper ones.
Can I make Banoffee Pie ahead of time?
Absolutely! In fact, I often think it tastes better after chilling in the fridge. You can make the crust, caramel, and even whip the cream a day ahead. Keep everything separate and assemble it a few hours before serving to prevent the crust from getting soggy. The only part you want to hold off on is adding the bananas, as they’re best sliced fresh. Think of it as a delicious, multi-stage operation, prepped and ready for final assembly.
How do I get the perfect dulce de leche for my Banoffee Pie filling?
Patience, my friend, patience! You can either buy pre-made dulce de leche, which is a perfectly acceptable shortcut. Or, you can make your own by simmering a can of sweetened condensed milk in water for a few hours. Just make sure the can is fully submerged and allow it to cool completely before opening. Because, trust me, hot caramel and a surprise explosion are not the memories you want to make in the kitchen.
What’s the secret to a firm but not-too-hard biscuit base?
The key to a great biscuit base is to find that sweet spot between crumbly and rock solid. Make sure you crush the biscuits finely, and don’t overdo the melted butter. Press the mixture firmly but gently into the pie dish. Chill the base in the fridge for at least 30 minutes before adding the caramel. This will help it set and prevent it from crumbling when you slice the pie. Remember, we’re aiming for a sliceable dream, not a geological formation!
Conclusion for Banoffee Pie
This Banoffee Pie recipe is a guaranteed crowd-pleaser. With a crumbly biscuit base, a luscious caramel layer, fresh bananas, and a cloud of whipped cream, it’s a symphony of flavors and textures. The flexibility to prep components in advance makes it perfect for any occasion. The key to success lies in using fresh ingredients, paying attention to the details, and a little bit of banana-browning prevention. Go forth and create this dessert, and prepare for the applause!


Leave a Comment