
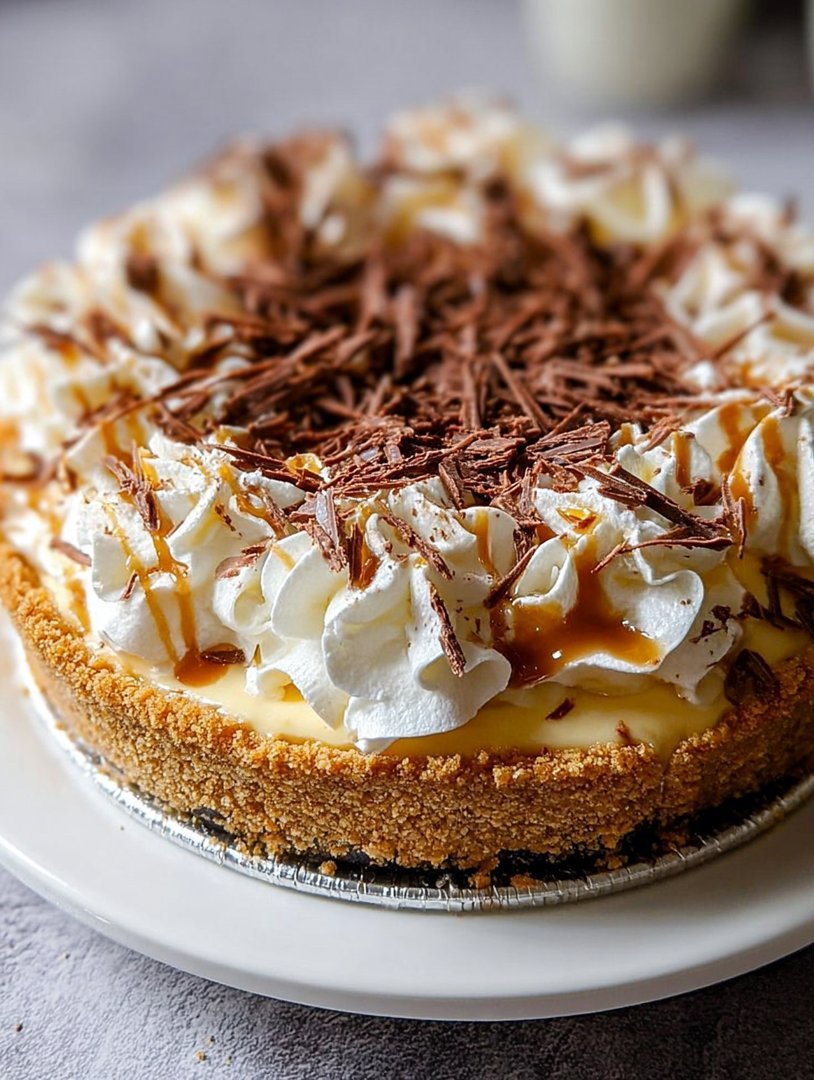
Oh, Banoffee Pie! Just the name conjures images of sweet, sticky caramel, creamy bananas, and a buttery biscuit base, all melding together in perfect harmony. It’s a flavor explosion that dances on your tongue and leaves you wanting more.
This isn’t just dessert; it’s a hug in a pie tin, a comforting treat that’s perfect for a gloomy day or a celebratory gathering. Imagine the first bite: the satisfying crunch of the crust, the smooth caramel, and the burst of banana – pure bliss!
- Effortless to make, impressive to serve: banoffee pie is a crowd-pleaser without the kitchen stress.
- The rich caramel and sweet banana filling delivers an irresistible flavor combination.
- Beautiful presentation with sliced bananas and a dusting of cocoa makes it visually stunning.
- Customize with different toppings like chocolate shavings or chopped nuts for extra flair.
Ingredients for Banoffee Pie
Here’s what you’ll need to make this delicious dish:
The full ingredients list, including measurements, is provided in the recipe card directly below.
How to Make Banoffee Pie
Follow these simple steps to prepare this delicious dish:
Step 1: Prepare the Biscuit Base
Crush the digestive biscuits into fine crumbs using a food processor or by placing them in a zip-lock bag and crushing with a rolling pin. Melt the butter in a saucepan or microwave. Combine the biscuit crumbs and melted butter in a bowl and mix well until evenly coated.
Step 2: Press the Base into the Tin
Press the biscuit mixture into the base of a 9-inch pie tin or springform pan. Ensure it’s evenly distributed and firmly packed down. You can use the bottom of a measuring cup to help with this. Chill in the refrigerator for at least 30 minutes to firm up.
Step 3: Make the Caramel (The Fun Part!)
Pour the condensed milk into a saucepan. Add the brown sugar and sea salt. Cook over low heat, stirring constantly, until the sugar is dissolved and the mixture thickens and turns a deep golden brown color. This will take approximately 20-25 minutes. Be patient and don’t stop stirring to prevent burning! Alternatively, you can make the caramel in a slow cooker for several hours if you have the time.
Step 4: Assemble the Pie
Remove the biscuit base from the refrigerator. Pour the cooled caramel over the base and spread it evenly. Slice the bananas and arrange them on top of the caramel. You can create a neat pattern or simply scatter them randomly.
Step 5: Whip the Cream
In a large bowl, whip the heavy cream with powdered sugar and vanilla extract until stiff peaks form. Be careful not to overwhip.
Step 6: Finish and Chill
Spoon or pipe the whipped cream over the bananas, covering the entire pie. Dust generously with cocoa powder. Chill in the refrigerator for at least 2 hours before serving, allowing the flavors to meld together.
Slice and serve this delightful Banoffee Pie. Enjoy every bite!
Perfecting the Cooking Process

For a truly sublime experience, start by crafting the toffee layer, ensuring it’s lusciously smooth. Next, prepare your crust, letting it cool completely. Finally, assemble with fresh bananas and whipped cream just before serving to prevent sogginess.
Add Your Touch
Want to jazz things up? Consider a hint of sea salt in the toffee for a salted caramel vibe. You could also sprinkle chopped nuts or chocolate shavings on top. For a citrusy twist, a bit of orange zest in the whipped cream works wonders!
Storing & Reheating
The assembled banoffee pie is best enjoyed fresh. If you must store it, keep it in the refrigerator for up to 24 hours. Be warned: the bananas may brown slightly, but the flavor will still be divine. Reheating is not recommended.
Here are some essential tips for the perfect Banoffee Pie:
- Ensure your toffee is cooked to a deep golden color but watch carefully to prevent burning; a candy thermometer is your best friend.
- Use perfectly ripe bananas for the filling, but avoid overripe ones as they’ll turn mushy and detract from the overall texture.
- Whip your cream to stiff peaks, but don’t overwhip it! Overwhipped cream can turn grainy, ruining that luxurious mouthfeel.
(Personal anecdote formated as paragraph subheading)
I once brought a Banoffee Pie to a potluck, and it vanished in minutes! My friend declared it “dangerously delicious,” and I knew I had a winning recipe on my hands.
Let’s Talk Banoffee Pie: A Delicious Dive into Dessert Heaven
Okay, folks, gather ’round! Today, we’re embarking on a culinary journey to create something truly magnificent, something that will make your taste buds sing and your friends beg for more. We’re talking about Banoffee Pie! Yes, that glorious concoction of creamy toffee, sweet bananas, and fluffy whipped cream, all nestled in a buttery biscuit base. Are you drooling yet? Because I definitely am.
Now, some people might be intimidated by the idea of making a pie from scratch. But fear not, my friends! This recipe is surprisingly simple, even for those of you who consider boiling water a culinary triumph. We’re going to break it down step-by-step, with plenty of humor and helpful tips along the way. Think of me as your personal Banoffee Pie guru, guiding you through the delicious darkness of dessert creation.
So, let’s get started! First, a little backstory. Banoffee Pie was born in England in the 1970s, and it quickly became a national treasure. It’s the kind of dessert that makes you feel all warm and fuzzy inside, like a hug from your grandma (if your grandma was a pastry chef).
Understanding the Magic: What is Banoffee Pie?
Before we dive into the recipe, let’s make sure we’re all on the same page. “Banoffee” is a portmanteau of “banana” and “toffee,” which pretty much sums up the pie. But it’s so much more than just the sum of its parts. It’s a symphony of textures and flavors, a sweet and salty dance in your mouth, a… okay, I’ll stop with the flowery language. You get the picture. It’s good. Really good.
The basic components of a Banoffee Pie are:
1. **The Crust: ** Typically made from crushed digestive biscuits (or graham crackers, if you’re in the US) mixed with melted butter. It’s the foundation of our masterpiece.
2. **The Toffee: ** This is where the magic happens. We’re talking about a rich, buttery caramel that will make you want to lick the spoon (and the bowl, and maybe even the countertop).
3. **The Bananas: ** Sliced and layered on top of the toffee, adding a burst of sweetness and fruity flavor.
4. **The Whipped Cream: ** A cloud of fluffy goodness that perfectly complements the other layers.
Gather Your Arsenal: Ingredients You’ll Need
Alright, let’s get down to business. Here’s what you’ll need to create your own Banoffee Pie masterpiece:
**For the Crust: **
- 1 ½ cups crushed graham crackers
- 6 tablespoons unsalted butter, melted
**For the Toffee: **
- 1 (14 ounce) can sweetened condensed milk
- 4 tablespoons unsalted butter
- Pinch of sea salt
**For the Filling: **
- 3 ripe bananas, sliced
- 1 ½ cups heavy cream
- 2 tablespoons powdered sugar
- ½ teaspoon vanilla extract
**Optional Toppings: **
- Chocolate shavings
- Chopped nuts (walnuts, pecans, or almonds)
- A dusting of cocoa powder
The Step-by-Step Saga: Making Your Banoffee Pie
Now for the fun part! Let’s walk through the process of making this decadent dessert, step by glorious step.
**Step 1: Crafting the Crusader Crust**
1. In a medium bowl, combine the crushed graham crackers and melted butter. Mix well until the crumbs are evenly moistened.
2. Press the mixture into the bottom of a 9-inch pie plate. Use the bottom of a measuring cup to firmly pack the crust.
3. Bake in a preheated oven at 350°F (175°C) for 8-10 minutes, or until lightly golden brown.
4. Let the crust cool completely before moving on to the next step. This is crucial! A warm crust will melt the toffee.
**Step 2: Taming the Toffee Temptation**
1. Pour the sweetened condensed milk into a saucepan. Add the butter and a pinch of sea salt.
2. Cook over medium heat, stirring constantly, until the mixture thickens and turns a deep golden brown color. This usually takes about 20-25 minutes. Be patient! And don’t stop stirring!
3. Once the toffee is ready, pour it over the cooled crust. Spread it evenly with a spatula.
4. Let the toffee cool completely and set before adding the bananas. Again, patience is key!
**Step 3: Banana Bonanza**
1. Slice the bananas into even rounds.
2. Arrange the banana slices over the cooled toffee in a single layer. Don’t be shy! Use plenty of bananas.
**Step 4: Whipped Cream Wonders**
1. In a large bowl, combine the heavy cream, powdered sugar, and vanilla extract.
2. Whip with an electric mixer until stiff peaks form. Be careful not to overwhip!
3. Spread the whipped cream evenly over the banana layer.
**Step 5: Garnish and Glory**
1. Sprinkle chocolate shavings, chopped nuts, or a dusting of cocoa powder over the whipped cream.
2. Refrigerate the pie for at least 30 minutes before serving. This allows the flavors to meld together and the whipped cream to set.
Troubleshooting Tips: Avoiding Banoffee Blunders
Even the best chefs encounter mishaps in the kitchen. Here are a few common Banoffee Pie problems and how to solve them:
- **Soggy Crust:** Make sure to pack the crust firmly and bake it until lightly golden brown. Also, let the crust cool completely before adding the toffee.
- **Runny Toffee:** Don’t rush the toffee-making process. It needs to cook long enough to thicken and caramelize. Keep stirring and be patient.
- **Brown Bananas:** To prevent the bananas from browning, you can brush them with a little lemon juice before arranging them on the toffee. However, it does change the flavour slightly.
- **Grainy Whipped Cream:** Avoid overwhipping the cream. Stop when stiff peaks form.
Variations and Twists: Banoffee Pie Remix
Want to get creative with your Banoffee Pie? Here are a few ideas:
- **Chocolate Banoffee Pie:** Add cocoa powder to the crust and the whipped cream for a chocolatey twist.
- **Coffee Banoffee Pie:** Add a teaspoon of instant coffee powder to the toffee for a hint of coffee flavor.
- **Nutty Banoffee Pie:** Add chopped nuts to the crust and the toffee for extra crunch.
- **Individual Banoffee Pies:** Make mini Banoffee Pies in ramekins or small glasses for a cute and portable dessert.
Serving Suggestions: Making it a Moment
Banoffee Pie is delicious on its own, but here are a few ways to elevate the experience:
- Serve it with a scoop of vanilla ice cream or a dollop of Greek yogurt.
- Pair it with a cup of hot coffee or tea.
- Garnish with fresh berries or a drizzle of chocolate sauce.
No matter how you serve it, Banoffee Pie is sure to be a crowd-pleaser. So go ahead, give it a try! You might just discover your new favorite dessert. And remember, don’t be afraid to experiment and have fun in the kitchen. After all, cooking should be an enjoyable experience, not a stressful chore. Now, go forth and bake! And may your Banoffee Pie be forever delicious.
Conclusion for Banoffee Pie
This Banoffee Pie is a symphony of textures and flavors, from the crunchy biscuit base to the smooth caramel, soft bananas, and cloud-like cream. With simple substitutions to cater to dietary needs, everyone can indulge in this classic dessert. Remember to prevent banana browning with a touch of fruit juice and to make it ahead for optimal flavor melding. Enjoy every sweet, comforting bite of your homemade Banoffee creation, and share the joy!
Print
Banoffee Pie
Delicious banoffee pie recipe with detailed instructions and nutritional information.
- Total Time: 35 minutes
- Yield: 4 servings
Ingredients
- Digestive Biscuits: 250g
- Unsalted Butter: 100g, melted
- Sweetened Condensed Milk: 397g can
- Golden Syrup: 2 tablespoons
- Bananas: 2-3, depending on size
- Double Cream: 300ml
- Icing Sugar: 1 tablespoon
- Chocolate Shavings: For decoration
Instructions
- Step 1: Crush the digestive biscuits into fine crumbs, either using a food processor or by placing them in a ziplock bag and crushing them with a rolling pin. Mix the biscuit crumbs with the melted butter until well combined.
- Step 2: Press the biscuit mixture into the base of a 23cm pie dish or springform tin, ensuring it is evenly distributed and compacted. Chill in the refrigerator for at least 30 minutes to firm up.
- Step 3: For the caramel, gently heat the sweetened condensed milk and golden syrup in a saucepan over low heat, stirring constantly. Continue to cook and stir for 10-15 minutes until the mixture thickens and turns a rich golden brown colour. Pour the caramel over the chilled biscuit base, spreading evenly. Allow to cool completely.
- Step 4: Slice the bananas and arrange them over the cooled caramel.
- Step 5: In a large bowl, whip the double cream with the icing sugar until soft peaks form. Spoon or pipe the whipped cream over the bananas, covering them completely.
- Step 6: Sprinkle with chocolate shavings and chill in the refrigerator for at least 30 minutes before serving.
Notes
- Keep leftover Banoffee Pie refrigerated for up to 2 days, but be aware the bananas may brown slightly.
- Avoid reheating Banoffee Pie as the cream will melt; enjoy it chilled straight from the fridge.
- A dusting of cocoa powder alongside the chocolate shavings adds a lovely depth of flavour.
- For a richer caramel, cook the condensed milk and golden syrup until it reaches a deeper amber colour, being careful not to burn it.
- Prep Time: 15 minutes
- Cook Time: 20 minutes
- Method: Stovetop
- Cuisine: American
FAQs
What is the best way to prevent the banana slices from browning in my Banoffee Pie?
Ah, the dreaded banana browning! Fear not, for I have a solution. A light brush of lemon juice or even pineapple juice over the sliced bananas acts as a shield against oxidation. This keeps those beautiful yellow slices looking as radiant as the day they were peeled. Alternatively, you can add the bananas just before serving, ensuring their pristine appearance. Nobody wants a sad, brown banana on their dessert. Think of it as giving your banana a little spa treatment before its grand debut.
Can I make Banoffee Pie ahead of time?
You absolutely can! In fact, chilling it for a few hours (or even overnight) enhances the flavors. The biscuit base softens slightly, the caramel becomes even more luscious, and the banana melds beautifully with the creamy topping. Assemble the pie completely, then cover it loosely with plastic wrap and refrigerate. However, I recommend adding the banana slices just before serving to prevent browning. A well-rested banoffee pie is a happy banoffee pie, ready to delight at a moment’s notice.
What can I use instead of digestive biscuits for the base of my Banoffee Pie?
Digestive biscuits can be tricky to find sometimes, depending on where you live! Don’t despair. You can easily substitute them with graham crackers, shortbread cookies, or even vanilla wafers. Just make sure to adjust the amount of melted butter accordingly to achieve that perfect, sandy texture for your pie base. The goal is a sturdy foundation that can hold all that caramel-banana goodness, so choose your substitute wisely. It’s like building a house, but tastier.
How do I get the perfect caramel for my homemade Banoffee Pie?
The secret to dreamy caramel lies in patience and low heat. Use a heavy-bottomed saucepan to prevent scorching, and stir constantly while the sugar melts. Once it reaches a beautiful amber color, add your butter and cream gradually, stirring until smooth and glossy. If you’re using a shortcut with pre-made caramel, make sure it’s a high-quality one! A good caramel should be rich, buttery, and have a deep, complex flavor. Nobody wants a bland caramel experience.


Leave a Comment