
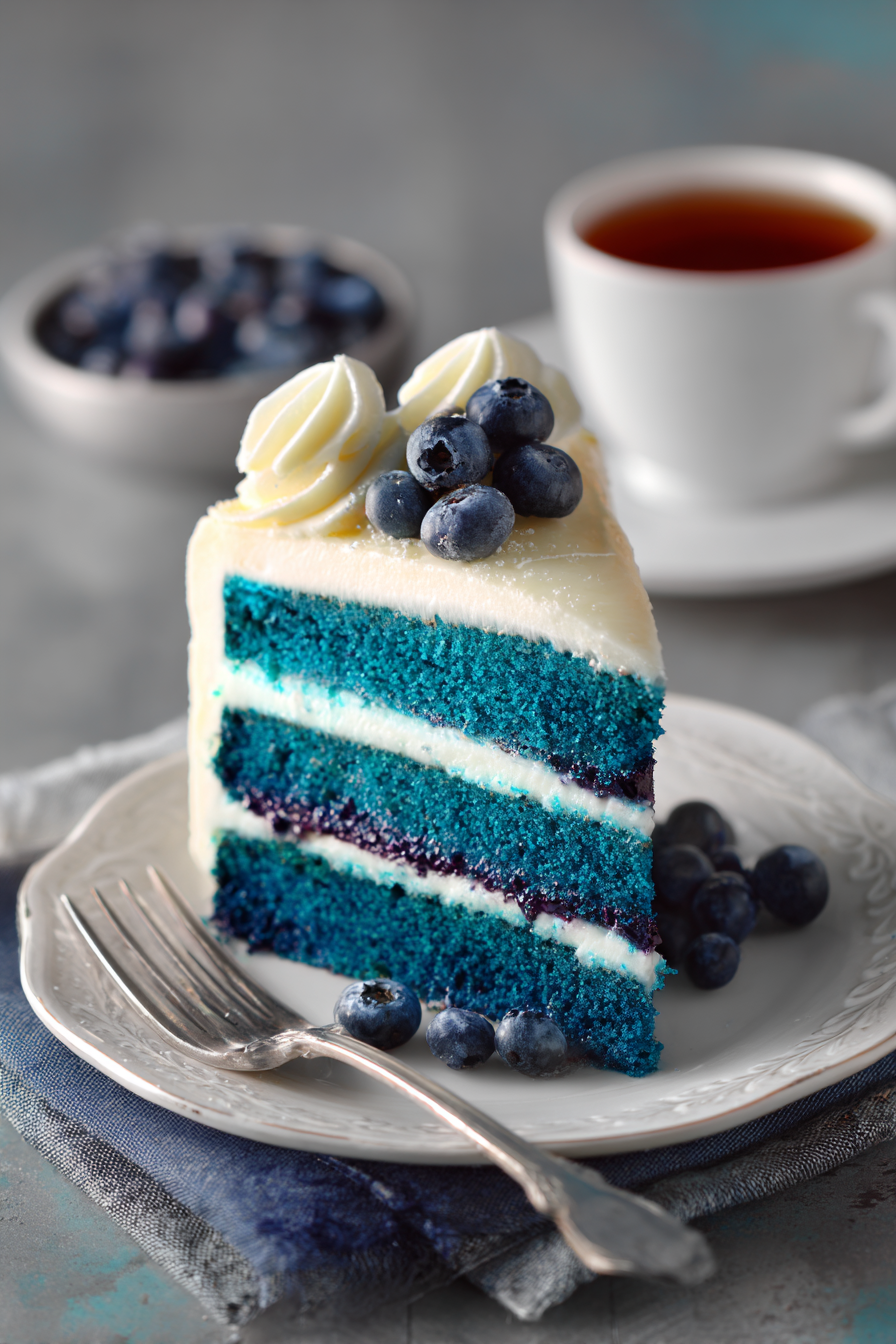
Imagine biting into a cloud that’s been kissed by the sky – that’s our Blue Velvet Cake. Its dreamy color and velvety texture make every slice a whimsical escape.
This isn’t just any cake; it’s a nostalgic hug, perfect for birthdays, celebrations, or those “just because” moments when you need a little magic in your life. Get ready to bake a masterpiece that will leave everyone spellbound!
- Effortlessly create a show-stopping dessert that’s surprisingly simple to make, even for beginner bakers.
- Indulge in a moist, tender cake with a delicate crumb and a subtly sweet flavor that’s simply irresistible.
- Achieve a stunning, vibrant blue hue that turns heads and adds a touch of whimsy to any occasion.
- Customize this recipe with various frostings and decorations to create your own unique and unforgettable cake creation.
Ingredients for Blue Velvet Cake Recipe
Here’s what you’ll need to make this delicious dish:
The full ingredients list, including measurements, is provided in the recipe card directly below.
How to Make Blue Velvet Cake Recipe
Follow these simple steps to prepare this delicious dish:
Step 1: Prepare the Pans
Preheat the oven to 350°F (175°C). Grease and flour two 9-inch round cake pans. This will prevent the cakes from sticking and ensure easy removal.
Step 2: Cream Butter and Sugar
In a large bowl, cream together the softened butter and granulated sugar until light and fluffy. This incorporates air into the batter, resulting in a tender cake.
Step 3: Add Wet Ingredients
Beat in the vegetable oil, eggs, and Alcohol-free vanilla extract until well combined. Mix in the blue food coloring until you achieve your desired shade of blue. Be careful not to overmix at this stage.
Step 4: Combine Dry and Wet Ingredients
In a separate bowl, whisk together the flour, baking powder, baking soda, and salt. Gradually add the dry ingredients to the wet ingredients, alternating with the buttermilk, beginning and ending with the dry ingredients. Mix until just combined.
Step 5: Add Vinegar
In a small bowl, combine the white vinegar and baking soda. It will fizz. Quickly fold this mixture into the cake batter. This creates a light and airy texture.
Step 6: Bake the Cakes
Pour the batter evenly into the prepared cake pans. Bake for 25-30 minutes, or until a toothpick inserted into the center comes out clean. Let the cakes cool in the pans for 10 minutes before inverting them onto a wire rack to cool completely.
Step 7: Make the Cream Cheese Frosting
While the cakes are cooling, prepare the cream cheese frosting. In a large bowl, beat the softened cream cheese and butter until smooth and creamy. Gradually add the powdered sugar, beating until light and fluffy.
Step 8: Frost the Cake
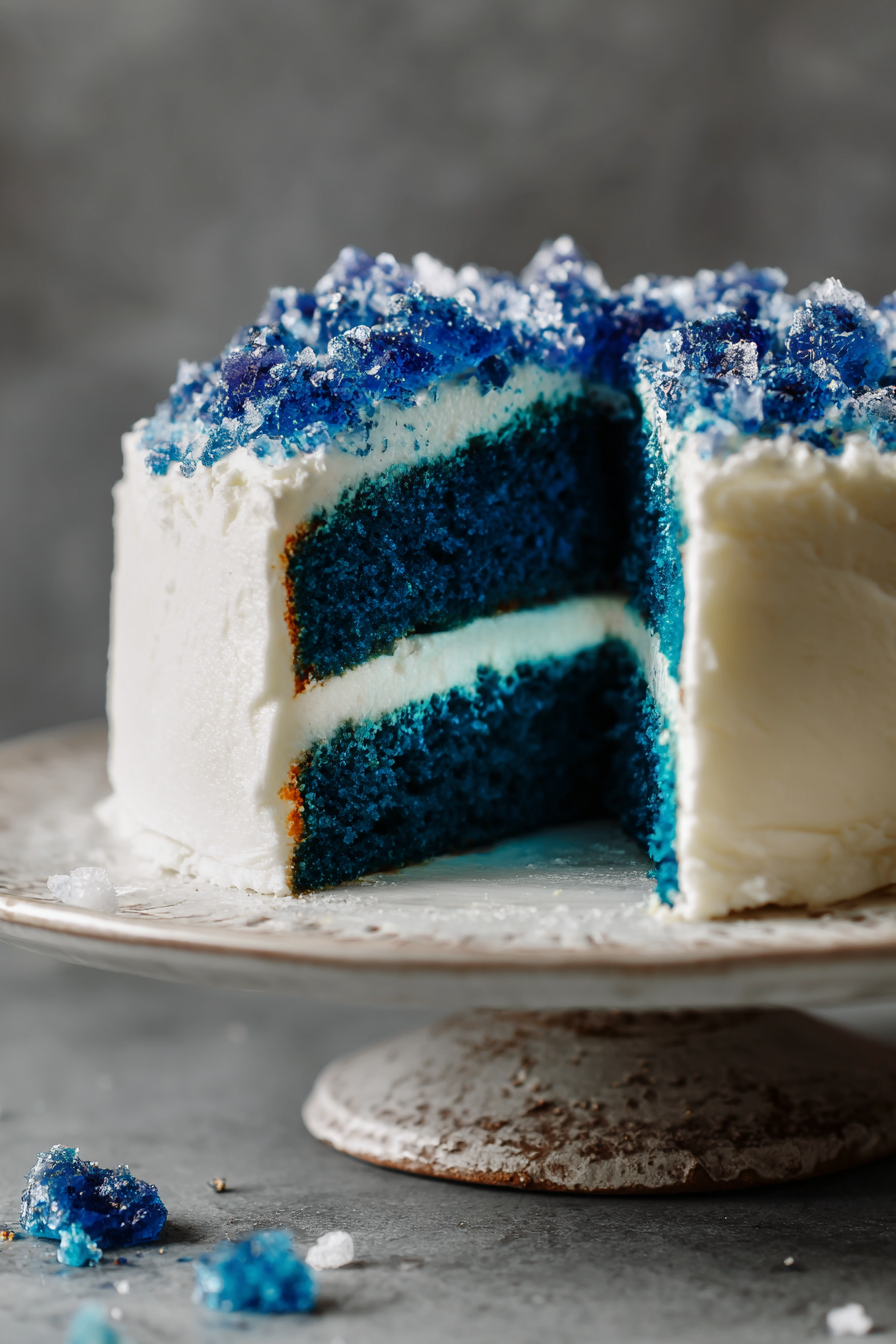
Once the cakes are completely cool, frost the top of one layer with cream cheese frosting. Place the second layer on top and frost the entire cake. Get creative with your decorating!
Step 9: Chill and Serve
Refrigerate the frosted cake for at least 30 minutes before serving. This allows the frosting to set and makes it easier to slice.
Step 10: Enjoy!
Slice the Blue Velvet Cake and serve. This cake is perfect for birthdays, celebrations, or any occasion that calls for a special treat.
Perfecting the Cooking Process
For the ultimate cake experience, measure all ingredients before you begin. Cream your butter and sugar well. Don’t overmix the batter once you add the dry ingredients. Let the cake cool completely before frosting.
Add Your Touch
Feel free to experiment! Add a teaspoon of citrus zest for brightness. You could also incorporate chopped pecans or walnuts for texture. For a richer flavor, consider using brown butter in the cake.
Storing & Reheating
Store leftover cake in an airtight container in the refrigerator for up to five days. Let the cake come to room temperature before serving for the best flavor and texture. You can also freeze slices individually for longer storage.
Here are some pro tips to make your baking journey smoother:
- Always use room temperature ingredients for better emulsification and a smoother batter.
- Avoid opening the oven door frequently during baking to prevent temperature fluctuations that could cause the cake to sink.
- Test the cake’s doneness by inserting a toothpick into the center; it should come out clean or with a few moist crumbs.
(Personal anecdote formated as paragraph subheading (very important! don’t write any title for this paragraph))
My grandma always said a dash of vanilla makes everything better, and she was right. Her secret ingredient made her cake the hit of every family gathering.
Conclusion for Blue Velvet Cake Recipe :
This Blue Velvet Cake Recipe offers a delightful twist on a classic dessert. Its vibrant color and moist, tangy flavor make it a standout choice for any occasion. Remember the tips for achieving the perfect blue hue and using buttermilk substitutes to ensure success. Whether you bake the layers ahead of time or whip up a quick frosting, this cake is sure to impress. So go ahead, unleash your inner baker and create a show-stopping blue velvet masterpiece that will leave everyone wanting more!
Print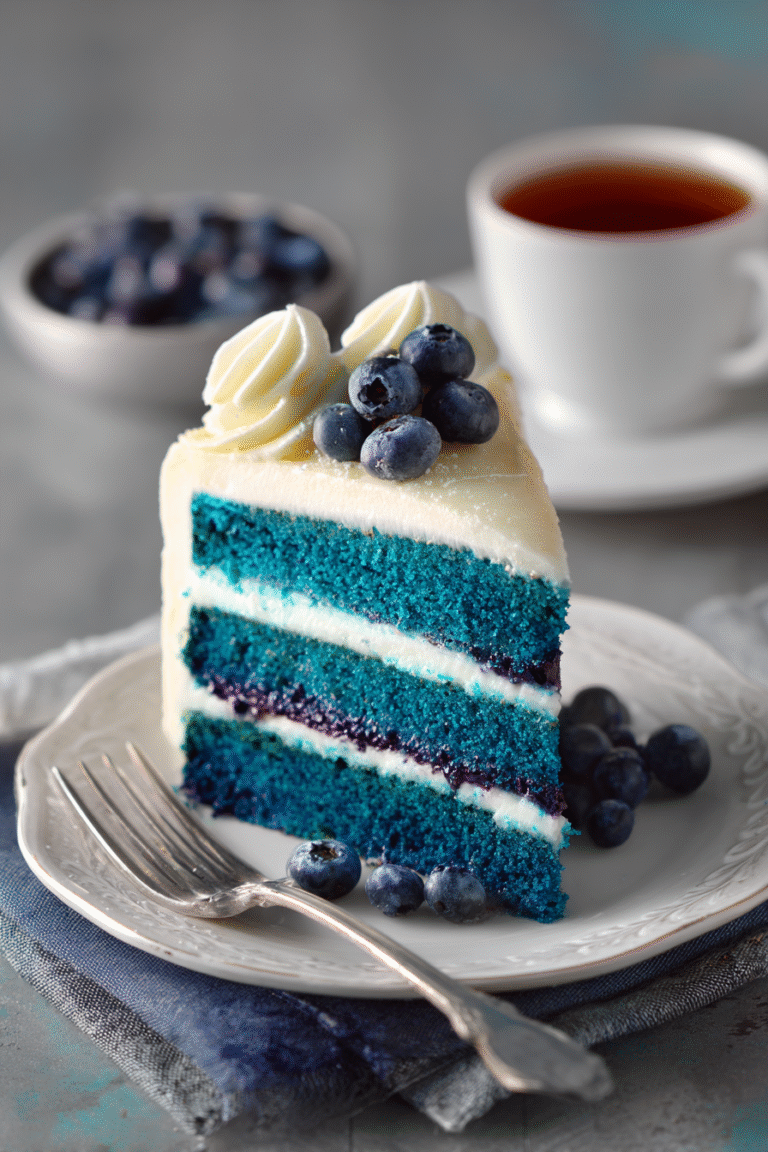
Blue Velvet Cake Recipe
Delicious blue velvet cake recipe recipe with detailed instructions and nutritional information.
- Total Time: 35 minutes
- Yield: 4 servings
Ingredients
- All-purpose flour: 2 1/2 cups
- Granulated sugar: 1 3/4 cups
- Unsweetened cocoa powder: 2 tablespoons
- Baking soda: 1 teaspoon
- Salt: 1 teaspoon
- Buttermilk: 1 cup
- Vegetable oil: 1/2 cup
- Eggs: 2 large
- Blue food coloring: 1-2 tablespoons (gel preferred)
Instructions
- Step 1: Preheat oven to 350°F (175°C). Grease and flour two 9-inch round cake pans.
- Step 2: In a large bowl, whisk together the flour, sugar, cocoa powder, baking soda, and salt.
- Step 3: In a separate bowl, combine the buttermilk, oil, eggs, and blue food coloring. Mix well until the color is evenly distributed.
- Step 4: Gradually add the wet ingredients to the dry ingredients, mixing on low speed until just combined. Do not overmix.
- Step 5: Pour the batter evenly into the prepared cake pans.
- Step 6: Bake for 25-30 minutes, or until a wooden skewer inserted into the center comes out clean. Let the cakes cool in the pans for 10 minutes before inverting them onto a wire rack to cool completely.
Notes
- To keep your Blue Velvet Cake moist, store it in an airtight container at room temperature for up to 3 days, or in the refrigerator for up to a week.
- A quick zap in the microwave (15-20 seconds) can revive a slice of refrigerated cake, making it extra soft and delicious.
- Serve with a tangy cream cheese frosting and a sprinkle of edible glitter for an extra-special presentation.
- For the most vibrant blue hue, start with 1 tablespoon of gel food coloring and gradually add more until you reach your desired shade, being mindful not to add too much liquid.
- Prep Time: 15 minutes
- Cook Time: 20 minutes
- Method: Stovetop
- Cuisine: American
FAQs :
What makes this Blue Velvet Cake Recipe so special?
Okay, picture this: you’re at a party, and everyone’s eyeing the dessert table. They see the usual suspects: chocolate chip cookies, maybe a sad-looking fruit platter. But then, BAM! They spot this vibrant blue cake, practically glowing with deliciousness. That’s the magic of this recipe! It’s not just about the taste (though, trust me, it’s incredible). It’s about the visual impact, the “wow” factor, and the sheer novelty of a perfectly moist, tangy, and surprisingly easy-to-make blue velvet creation. It’s a conversation starter, a memory maker, and a guaranteed crowd-pleaser. You’ll be the star baker of the century!
Can I make this Blue Velvet Cake Recipe ahead of time?
Absolutely! In fact, I highly recommend it. The cake layers actually benefit from chilling out in the fridge for a bit. Wrap them tightly in plastic wrap after they’ve cooled completely, and they’ll stay fresh for up to two days. The frosting can also be made a day in advance and stored in an airtight container in the refrigerator. Just be sure to let it come to room temperature before whipping it up again to get that perfect, fluffy consistency. This way, you’re not scrambling to bake and frost right before your guests arrive. More time to relax and enjoy the party!
Is there a substitute for buttermilk in this Blue Velvet Cake Recipe?
Don’t have buttermilk on hand? No sweat! You can easily whip up a quick substitute. Just measure one tablespoon of white vinegar or lemon juice into a liquid measuring cup, then add enough milk (any kind will do!) to reach the one-cup mark. Stir it up and let it sit for about five minutes. The milk will curdle slightly, mimicking the tanginess of buttermilk. This simple trick saves the day when you’re in a pinch and craving that distinctive velvet cake flavor. You won’t even notice the difference! It’s baking magic at its finest.
How do I get that perfect blue color in my Blue Velvet Cake Recipe?
The key to achieving that striking blue hue is using a good quality gel food coloring. Liquid food coloring tends to water down the batter and can result in a less vibrant color. Start with a small amount of gel coloring and gradually add more until you reach your desired shade of blue. Remember, the color will deepen slightly as the cake bakes. Also, keep in mind that different brands of food coloring can produce slightly different shades, so experiment to find your favorite. And don’t be afraid to get creative! You can even mix different shades of blue to create a unique and mesmerizing effect.


Leave a Comment