

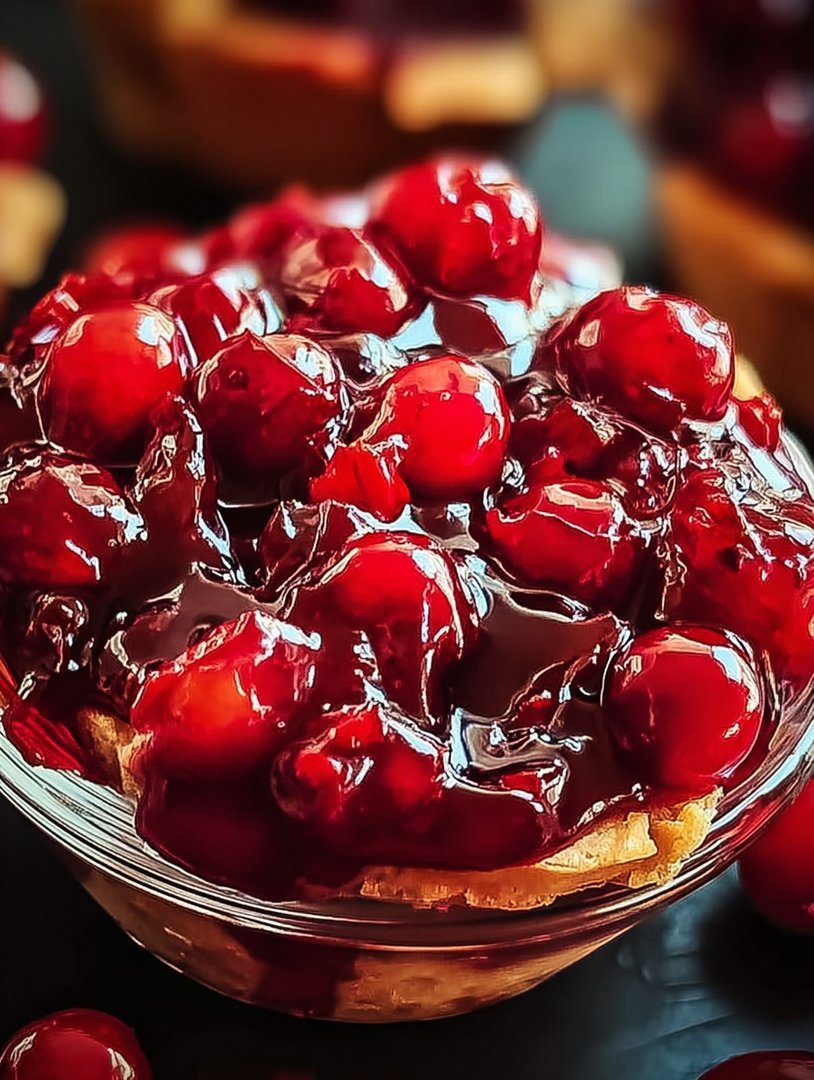
Imagine biting into a slice of heaven, the tartness of cherries dancing on your tongue, all nestled in a perfectly flaky crust. This **Cherry Pie Filling Recipe** will transport you to your grandma’s kitchen, filling your home with the comforting aroma of homemade goodness.
This isn’t just a recipe; it’s a journey back to simpler times, a celebration of fruit, and a testament to the fact that some things are just better when made from scratch. Prepare for a burst of flavor that will leave you craving more, bite after delicious bite.
- Effortless preparation transforms fresh or frozen cherries into a delectable filling in minutes.
- The perfectly balanced sweet and tart flavor profile elevates any pie, cobbler, or dessert.
- Its vibrant, glossy appearance will make your baked goods look as good as they taste.
- Enjoy its incredible versatility as a topping for ice cream, pancakes, or even yogurt.
Ingredients for Cherry Pie Filling Recipe
Here’s what you’ll need to make this delicious dish:
The full ingredients list, including measurements, is provided in the recipe card directly below.
How to Make Cherry Pie Filling Recipe
Follow these simple steps to prepare this delicious dish:
Step 1: Prepare the Cherries
Pit the fresh cherries, or if using frozen, thaw them slightly. In a large saucepan, combine the cherries, sugar, cornstarch, lemon juice, Alcohol-free almond extract, and water.
Step 2: Cook the Filling
Place the saucepan over medium heat and bring the mixture to a simmer, stirring constantly. Continue to cook, stirring frequently, until the filling has thickened and the cherries are tender, about 5-7 minutes. The mixture should be glossy and coat the back of a spoon.
Step 3: Cool the Filling
Remove the saucepan from the heat and let the filling cool slightly before using. This allows the filling to thicken further.
Step 4: Assemble Your Pie (or other Dessert)
Pour the cooled filling into your prepared pie crust or use it as a topping for your favorite dessert.
Step 5: Bake (if making a pie)
If making a pie, bake according to your pie crust recipe’s instructions, usually around 375°F (190°C) for 45-55 minutes, or until the crust is golden brown and the filling is bubbling.
Step 6: Enjoy!
Let the pie cool completely before slicing and serving. Serve warm with a scoop of vanilla ice cream for the ultimate treat. You can also use the filling as a topping for pancakes, waffles, or yogurt.
Diving Deeper into Cherry Pie Perfection
Let’s face it, making a **Cherry Pie Filling Recipe** isn’t exactly rocket science. However, there are nuances that can elevate your cherry creation from “meh” to “magnificent!” Think of this as your personal cherry pie guru, guiding you through the sometimes-treacherous, always-delicious world of homemade fruit fillings. We’re not just making pie filling; we’re crafting an experience!
Choosing Your Cherries: A Fruitful Decision
The first step to pie-filling nirvana is selecting your cherries. Sweet cherries, like Bing or Rainier, will give you a sweeter, milder flavor, perfect if you prefer a less tart pie. Tart cherries, like Montmorency, pack a punch of sourness that balances beautifully with the sugar. Can’t decide? Why not mix them? A blend of sweet and tart offers a complex flavor profile that will have your taste buds singing. Remember to adjust the sugar based on the tartness of your cherries; you might need less sugar for sweet cherries and more for tart ones.
Fresh vs. Frozen: A Chilling Debate
Fresh cherries are fantastic when they’re in season, plump, and bursting with flavor. But let’s be honest, cherry season is fleeting. Frozen cherries are a fantastic alternative, allowing you to enjoy **Cherry Pie Filling Recipe** year-round. The key is to thaw them slightly before using, but not completely. You want them to still be a little firm so they don’t turn to mush during cooking. Also, frozen cherries tend to release more juice, so you might need to add a bit more cornstarch to achieve the desired thickness.
The Thickening Enigma: Cornstarch vs. Other Options
Cornstarch is the classic choice for thickening fruit fillings, and for good reason. It’s readily available, inexpensive, and does a great job. However, it can sometimes leave a slightly cloudy appearance. If you’re looking for a clearer filling, try using tapioca starch or arrowroot powder. These alternatives provide a similar thickening power but result in a more translucent finish. Remember to whisk the starch with a little cold water before adding it to the hot filling to prevent lumps.
The Flavor Boosters: Secret Ingredients for Extra Oomph
While cherries, sugar, and cornstarch are the basic building blocks of a great **Cherry Pie Filling Recipe**, a few extra ingredients can take it to the next level. A splash of lemon juice brightens the flavor and enhances the cherry taste. Alcohol-free almond extract adds a subtle, nutty aroma that complements the cherries beautifully. A pinch of salt balances the sweetness and brings out the other flavors. And for a touch of warmth, try adding a dash of cinnamon or nutmeg. These small additions can make a big difference in the overall flavor of your filling.
Preventing a Soggy Bottom: Tips for a Crisp Crust
Nobody wants a soggy pie crust. To prevent this culinary catastrophe, there are a few tricks you can try. First, blind-bake your pie crust before adding the filling. This involves baking the crust partially before adding the filling, which helps to set the bottom crust and prevent it from becoming soggy. You can also brush the bottom crust with a beaten egg white before adding the filling; this creates a barrier that helps to keep the moisture from seeping into the crust. Finally, make sure your filling isn’t too watery. If it is, cook it down a bit longer to reduce the liquid.
Beyond Pie: Creative Uses for Your Cherry Creation
While **Cherry Pie Filling Recipe** is undeniably delicious in a pie, it’s also incredibly versatile. Use it as a topping for ice cream, pancakes, or waffles. Stir it into yogurt or oatmeal for a fruity breakfast. Spread it on toast or bagels with cream cheese for a sweet treat. Or get creative and use it as a filling for hand pies, turnovers, or even danishes. The possibilities are endless!
Storage Secrets: Keeping Your Filling Fresh
If you have leftover filling, store it in an airtight container in the refrigerator for up to 3-4 days. You can also freeze the filling for longer storage. To freeze, let the filling cool completely, then transfer it to a freezer-safe container. It can be stored in the freezer for up to 2-3 months. When you’re ready to use it, thaw it in the refrigerator overnight.
Troubleshooting Your Cherry Filling: Common Problems and Solutions
Even the most experienced bakers can encounter problems when making **Cherry Pie Filling Recipe**. If your filling is too thin, cook it down a bit longer to reduce the liquid, or add a little more cornstarch. If it’s too thick, add a splash of water or cherry juice to thin it out. If it’s too tart, add more sugar. And if it’s too sweet, add a squeeze of lemon juice. Don’t be afraid to adjust the recipe to your liking. Baking is all about experimentation and finding what works best for you.
The Ultimate Cherry Pie Experience: Pairing Suggestions
A slice of warm cherry pie is delicious on its own, but it’s even better when paired with the right accompaniments. A scoop of vanilla ice cream is a classic choice, providing a cool and creamy contrast to the warm and fruity pie. Whipped cream is another great option, adding a light and airy sweetness. For a more sophisticated pairing, try serving your pie with a dollop of crème fraîche or a drizzle of balsamic glaze. And of course, a cup of coffee or tea is the perfect way to round out the experience.
Enjoying Your Homemade Cherry Pie Filling Recipe
Making your own **Cherry Pie Filling Recipe** is a labor of love, but it’s a labor that’s well worth it. The taste of homemade pie filling is simply incomparable to anything you can buy in a store. So gather your ingredients, put on your apron, and get ready to create a cherry masterpiece that will impress your family and friends. And most importantly, have fun! Baking should be a joyful experience, so relax, experiment, and enjoy the process. After all, the best ingredient in any recipe is love. Now, go forth and bake!
Perfecting the Cooking Process
First, simmer the cherries to soften them and release their juices. Next, gently mix in the thickening agents to prevent clumps. Finally, bake the pie until the crust is golden brown and the filling is bubbly. This ensures a beautifully textured and flavorful pie.
Add Your Touch
Consider adding a hint of Alcohol-free almond extract for a nutty depth. A squeeze of lemon juice can brighten the cherry flavor. For a spiced twist, try a dash of cinnamon or nutmeg. Experiment and make it your own signature cherry pie!
Storing & Reheating
Store leftover cherry pie in the refrigerator, covered, for up to three days. Reheat individual slices in the microwave or oven until warmed through. Enjoy it with a scoop of vanilla ice cream for an extra treat!
Here are some helpful tips to elevate your cherry pie filling recipe:
- Always pit your cherries carefully to avoid any lingering pits that could ruin a delightful bite; this is a step worth taking your time with!
- When mixing your thickening agent, ensure you use a whisk to incorporate it, preventing any unsightly lumps from forming in the filling.
- Allow your cherry pie to cool completely after baking to allow the filling to set properly, otherwise you might end up with a runny mess.
(Personal anecdote formated as paragraph subheading)
My grandma always added a secret ingredient – a tiny pinch of salt – that amplified the cherry’s sweetness. Everyone raved about her pies; it’s a family secret I happily share now.
Alright, let’s dive into the delicious world of cherry pie filling! Ever wonder what makes a cherry pie go from “meh” to “WOW”? It’s all about the filling, my friends. And today, we’re going to unlock the secrets to a truly spectacular **cherry pie filling recipe**.
Why This Cherry Pie Filling Recipe Rocks
Forget those bland, store-bought fillings that taste suspiciously like cough syrup. This recipe is all about fresh, vibrant cherry flavor that bursts in your mouth with every bite. We’re talking about a **cherry pie filling recipe** so good, you’ll want to eat it straight from the spoon (and who am I to judge if you do?). I wanted to make the best cherry pie, and believe me, this recipe does the trick! It’s not just tasty; it’s simple.
Now, you might be thinking, “Another cherry pie filling recipe? What’s so special about this one?” Well, buckle up buttercup, because this ain’t your grandma’s (unless your grandma is a total rockstar in the kitchen, in which case, high five to your grandma!). This **cherry pie filling recipe** is about maximizing flavor and simplicity. It’s about creating a filling that’s perfectly sweet, slightly tart, and has that irresistible, homemade touch. It’s also a great recipe for canning.
This recipe uses simple ingredients that you probably already have in your pantry. No weird chemicals or artificial flavors here, just pure cherry goodness. Plus, it’s super customizable! Want a little extra spice? Throw in a pinch of cinnamon or nutmeg. Craving a deeper flavor? Add a splash of balsamic vinegar (trust me on this one!). The possibilities are endless, which makes this **cherry pie filling recipe** incredibly versatile!
The Cherry on Top: A No-Fail Recipe
So, are you ready to ditch the canned stuff and create a cherry pie that will make your taste buds sing? Let’s get started! This recipe guarantees a delicious outcome, whether you’re a seasoned baker or just starting out. Baking can be intimidating, but this is not one of those times!
Gathering Your Cherry Arsenal (Ingredients)
Before we embark on this cherry adventure, let’s make sure we have all our ingredients ready. Nothing is worse than starting a recipe and realizing you are missing that one crucial component! This **cherry pie filling recipe** is forgiving, but don’t push it! Here’s what you’ll need:
- **Fresh or Frozen Cherries (6 cups, pitted):** Fresh cherries are amazing when they’re in season, but frozen cherries work just as well and are available year-round. Make sure they’re pitted, unless you want to spend the next hour spitting out pits. No one wants that!
- **Granulated Sugar (3/4 cup):** For sweetness, of course! You can adjust the amount depending on how sweet your cherries are and how sweet you like your pie.
- **Cornstarch (1/4 cup):** This is our thickening agent. It helps create that perfect, gooey cherry filling that we all crave.
- **Lemon Juice (2 tablespoons):** Adds a touch of brightness and acidity to balance out the sweetness.
- **Alcohol-free almond extract (1/2 teaspoon):** This is optional, but I highly recommend it! It adds a subtle, nutty flavor that complements the cherries beautifully.
- **Pinch of Salt:** Because salt enhances sweetness. Don’t skip it!
- **Water (1/4 cup):** Helps to dissolve the cornstarch.
That’s it! Simple, right? Now, let’s get to the fun part: making the **cherry pie filling recipe** itself!
Navigating the Cherry Maze: Ingredient Choices
Don’t be afraid to experiment with different types of cherries! Sweet cherries like Bing or Rainier will give you a sweeter filling, while tart cherries like Montmorency will add a delightful tang. You can even mix and match for a more complex flavor.
Also, when using frozen cherries, there is no need to thaw them before using them. Just toss them in frozen! They will release their juices as they cook, which will contribute to the overall liquid in the filling. This is also an adaptable **cherry pie filling recipe**!
Let’s Get Cooking: Step-by-Step Instructions
Alright, put on your aprons and get ready to make some magic! Here’s how to bring this **cherry pie filling recipe** to life:
1. **Combine the Ingredients: ** In a large saucepan, combine the cherries, sugar, cornstarch, lemon juice, Alcohol-free almond extract (if using), and salt. Stir everything together until well combined. Make sure that the cornstarch is evenly distributed to prevent clumping.
2. **Cook the Filling: ** Place the saucepan over medium heat and bring the mixture to a simmer. Cook, stirring occasionally, until the filling has thickened and the cherries are tender, about 10-15 minutes. The filling should be thick enough to coat the back of a spoon.
3. **Cool the Filling: ** Remove the saucepan from the heat and let the filling cool completely. As it cools, it will thicken even more. I recommend popping it in the fridge to speed up the process.
4. **Assemble Your Pie: ** Once the filling is cool, pour it into your prepared pie crust. Top with a second crust or a streusel topping, if desired.
5. **Bake the Pie: ** Bake in a preheated oven at 375°F (190°C) for 45-50 minutes, or until the crust is golden brown and the filling is bubbly.
6. **Cool and Enjoy: ** Let the pie cool completely before slicing and serving. This is crucial! If you cut into it too soon, the filling will be runny.
And there you have it! A beautiful, homemade cherry pie filling that is sure to impress. This **cherry pie filling recipe** is so easy and delicious, you’ll never go back to the canned stuff again!
Troubleshooting Your Cherry Journey
If your filling is too thick, add a tablespoon or two of water until it reaches the desired consistency. If it’s too thin, simmer it for a few more minutes to allow it to thicken further. Baking is all about patience and observation!
Remember to adjust cooking times based on your oven and the type of crust you use. Keep an eye on the pie and adjust the baking time as needed.
Beyond the Pie: Creative Uses for Your Cherry Filling
This **cherry pie filling recipe** isn’t just for pies! Get creative and use it in other delicious desserts:
- **Cherry Crisp or Crumble:** Top the filling with a buttery oat topping and bake until golden brown.
- **Cherry Hand Pies:** Spoon the filling into small circles of pie dough, fold over, and bake until golden brown.
- **Cherry Cheesecake Bars:** Swirl the filling into a cheesecake batter and bake until set.
- **Cherry Parfaits:** Layer the filling with yogurt or whipped cream and granola for a delicious and easy dessert.
- **Cherry Sauce for Ice Cream:** Warm the filling and drizzle it over your favorite ice cream.
The possibilities are endless! Don’t be afraid to experiment and find new ways to enjoy your homemade cherry filling. This **cherry pie filling recipe** is a gift that keeps on giving!
Now go forth and bake! And remember, the most important ingredient in any recipe is love. So put on some music, pour yourself a drink (non-alcoholic, of course!), and have fun in the kitchen. You got this!
Conclusion for Cherry Pie Filling Recipe
This Cherry Pie Filling Recipe is a surefire way to bring a burst of summery sweetness to your table, any time of year. Remember to thaw frozen cherries properly to avoid a watery mess, and don’t be afraid to get creative with your sweetener choices. With a little bit of patience and a dash of love, you’ll be whipping up the perfect filling that’s sure to impress. So go ahead, bake that pie, and prepare for a cherry-filled symphony of deliciousness!
Print
Cherry Pie Filling Recipe
Delicious cherry pie filling recipe recipe with detailed instructions and nutritional information.
- Total Time: 35 minutes
- Yield: 4 servings 1x
Ingredients
- 6 cups fresh or frozen pitted cherries
- 3/4 cup granulated sugar
- 1/4 cup cornstarch
- 1/4 teaspoon almond extract
- 1/4 teaspoon salt
- 2 tablespoons lemon juice
- 1/4 cup water
- 1 tablespoon butter, cut into small pieces
Instructions
- Step 1: In a large saucepan, combine the cherries, sugar, cornstarch, almond extract, and salt.
- Step 2: Add the water and lemon juice to the saucepan. Stir to combine all ingredients.
- Step 3: Cook over medium heat, stirring constantly, until the mixture comes to a simmer and thickens. This will take approximately 5-7 minutes.
- Step 4: Once thickened, remove from the heat and stir in the butter until melted and incorporated.
- Step 5: Allow the filling to cool slightly before using in your pie. The filling will continue to thicken as it cools.
Notes
- For longer storage, transfer cooled filling to an airtight container and freeze for up to 3 months.
- Gently reheat leftover filling in a saucepan over low heat, adding a splash of water if needed, until warmed through.
- Serve warm cherry pie filling over vanilla ice cream or with a dollop of whipped cream for a delightful dessert.
- For a richer flavor, macerate the cherries with the sugar and almond extract for 30 minutes before cooking to allow the flavors to meld.
- Prep Time: 15 minutes
- Cook Time: 20 minutes
- Method: Stovetop
- Cuisine: American
FAQs
Can I use frozen cherries for this Cherry Pie Filling Recipe?
Absolutely! Frozen cherries work like a charm in this recipe. Just make sure to thaw them properly and drain any excess juice before you get started. Nobody wants a soggy pie, unless you’re secretly into that sort of thing, then who am I to judge? Thawing the cherries prevents a watery filling, ensuring your pie slice stands tall and proud, like a culinary champion. Plus, using frozen cherries means you can whip up this delightful dessert even when fresh cherries are out of season. Talk about a year-round cherry party!
How do I thicken my Cherry Pie Filling if it’s too runny?
Oh, the dreaded runny filling! Fear not, my friend. If your cherry concoction is looking a bit more like soup than pie filling, a simple fix is at hand. A cornstarch slurry is your best friend here. Just mix a tablespoon of cornstarch with two tablespoons of cold water until smooth, then gently stir it into your simmering cherry mixture. Let it cook for a minute or two until it thickens to your desired consistency. Remember, patience is a virtue, especially when pie is involved! This thickening method will save your Cherry Pie Filling Recipe.
What’s the best way to store leftover Cherry Pie Filling?
So, you managed to resist the urge to devour the entire batch of this delightful Cherry Pie Filling Recipe in one sitting? Impressive! To keep your leftover treasure fresh, simply transfer it to an airtight container and store it in the refrigerator. It will happily stay good for up to a week. You can also freeze it for longer storage. Just thaw it completely before using it in your next culinary adventure. Think of all the possibilities – cherry parfaits, cherry-filled crepes, or just a spoonful straight from the jar (no one’s watching!).
Can I use a different type of sweetener in this Cherry Pie Filling Recipe?
You betcha! While granulated sugar is a classic choice, feel free to experiment with other sweeteners. Honey, maple syrup, or even agave nectar can add a unique twist to your cherry pie filling. Just keep in mind that different sweeteners have varying levels of sweetness, so you might need to adjust the amount to your liking. Also, liquid sweeteners might slightly alter the consistency, so watch out for that. Embrace your inner culinary rebel and create a Cherry Pie Filling Recipe that’s uniquely yours!


Leave a Comment