

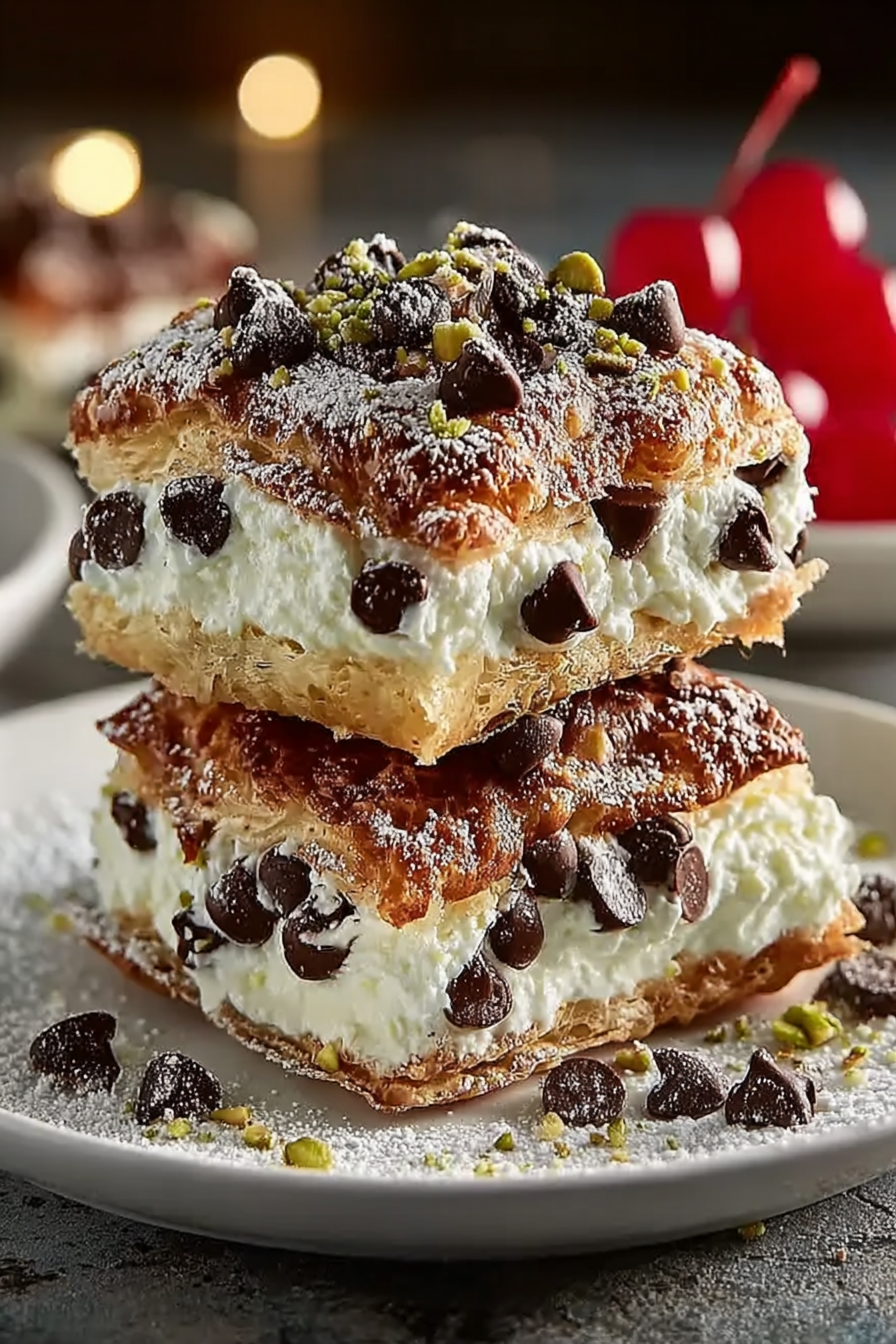
Have you ever craved a sweet treat so intensely that your taste buds practically staged a revolt? Imagine the creamy, dreamy filling of a classic cannoli, but in a handy, bite-sized square. That’s the magic of Classic Cannoli Squares. This recipe is a game changer, a dessert revolution, a culinary coup d’état of deliciousness!
My grandmother, bless her soul, used to make the most incredible cannolis. They were legendary, the stuff of family lore. These Classic Cannoli Squares are my tribute to her, a modern twist on a timeless classic, easier to make and just as delightful. Get ready for an explosion of flavor!
These Classic Cannoli Squares offer a delightful combination of crisp, flaky pastry and a creamy, sweet ricotta-style filling. They are incredibly easy to make and perfect for any occasion. The visual appeal is stunning, making them a showstopper dessert. And the versatility? Oh, the versatility! You can easily customize the filling to match your taste.
Ingredients for Classic Cannoli Squares
Here’s what you’ll need to make this delicious dish:
The full ingredients list, including measurements, is provided in the recipe card directly below.
How to Make Classic Cannoli Squares
Follow these simple steps to prepare this delicious dish:
Step 1: Prepare the Pastry
Preheat your oven to 350°F (175°C). Combine the flour, vegan butter, and sugar in a bowl. Use a pastry blender or your fingers to cut the butter into the flour until the mixture resembles coarse crumbs. Add a few tablespoons of cold water gradually, mixing until the dough comes together. Roll out the dough thinly and cut into squares. Bake for 12-15 minutes until golden brown.
Step 2: Make the Filling
In a separate bowl, whisk together the vegan ricotta, sweetened condensed coconut milk, Alcohol-free vanilla extract, and lemon zest. Stir in the agar-agar powder according to the package instructions. Heat gently until the agar-agar is completely dissolved and the mixture is smooth. Let the mixture cool slightly.
Step 3: Assemble the Squares
Once the pastry squares have cooled slightly, spread a generous layer of the ricotta filling onto each square. You may use a piping bag for more professional-looking squares.
Step 4: Add the Chocolate
Top each filled square with a sprinkle of vegan chocolate chips.
Step 5: Chill and Serve
Refrigerate the Classic Cannoli Squares for at least 30 minutes to allow the filling to set completely. This step is crucial for the best texture.
Step 6: Enjoy!
Serve your Classic Cannoli Squares chilled. They’re delicious on their own or paired with a scoop of vegan vanilla ice cream. A dusting of powdered sugar adds a nice touch.
Tips and Tricks for Classic Cannoli Squares
These little squares may seem simple, but a few tricks can elevate them to true culinary masterpieces. Firstly, don’t skimp on the quality of your vegan ricotta. A good-quality ricotta will make a world of difference in the flavor and texture of the filling. Secondly, ensure your pastry squares are completely cool before adding the filling. Warm pastry will melt the filling, creating a less-than-desirable result. Finally, don’t be afraid to experiment with different toppings. A sprinkle of chopped nuts, a drizzle of chocolate sauce, or even a dusting of cinnamon would add a wonderful dimension of flavor.
Serving Suggestions for Classic Cannoli Squares
These delightful bites are incredibly versatile. They’re fantastic served as an after-dinner treat, a delightful addition to a dessert platter, or even as a midday pick-me-up. Imagine indulging in one (or two!) with a cup of coffee or tea. The possibilities are truly endless! For an extra special touch, consider serving them on elegant dessert plates, garnished with fresh berries or a sprig of mint. They’ll be the star of any gathering, guaranteed to impress even the most discerning dessert connoisseurs.
Perfecting the Cooking Process
First, make the ricotta filling. Then, prepare the pastry dough. Bake the dough in a pan, then spread the filling evenly. Finally, dust with powdered sugar and serve these delightful Classic Cannoli Squares.
Add Your Touch
Swap the ricotta for mascarpone cheese for a richer flavor. Add chocolate chips or chopped nuts to the filling for extra texture. Experiment with different citrus zests for unique flavor profiles in your Classic Cannoli Squares.
Storing & Reheating
Store leftover Classic Cannoli Squares in an airtight container in the refrigerator for up to three days. Reheat gently in the microwave or oven for a few seconds to enjoy warm, gooey squares.
Prepare the ricotta filling well in advance; it allows the flavors to meld beautifully.
Don’t overbake the pastry crust; a slightly golden color indicates perfect crispness.
Using good quality ricotta cheese significantly elevates the flavor of the Classic Cannoli Squares.
My grandmother’s recipe for Classic Cannoli Squares was a family favorite, and it’s still a cherished tradition at every family gathering.
Classic Cannoli Squares
: A Recipe for Sweet Success
Lets dive into the detailed recipe for these amazing Classic Cannoli Squares! This isn’t just any cannoli recipe—we’re talking about squares, the easiest way to enjoy this classic Italian treat. Forget the fiddly rolling and frying; this recipe makes cannoli unbelievably accessible, and delicious. Are you ready to create these delightful Classic Cannoli Squares? Lets get started!
The Sweet Ricotta Filling
: The Heart of the Matter
This filling is where the magic happens. Creamy, subtly sweet, and bursting with flavor, it’s the star of our Classic Cannoli Squares. We’re ditching the traditional cannoli shells for a simple, baked pastry base, so prepare yourself for a revelation.
Ingredients:
15 ounces whole milk ricotta cheese, drained well
1/2 cup granulated sugar
1 teaspoon Alcohol-free vanilla extract
1/4 teaspoon ground cinnamon
Zest of 1 lemon
1/4 cup mini chocolate chips (optional)
Instructions:
In a medium bowl, combine the ricotta, sugar, Alcohol-free vanilla extract, cinnamon, and lemon zest. Mix well until everything is thoroughly combined and creamy. Gently fold in the chocolate chips, if using. Taste and adjust the sweetness as needed. Set aside while you prepare the pastry. Trust me, your taste buds will thank you for this amazing Classic Cannoli Squares filling!
The Pastry Base
: Simple and Delicious
The pastry for these Classic Cannoli Squares is surprisingly simple. We’re using a basic shortbread-style crust, which bakes up beautifully and provides the perfect canvas for that luscious ricotta filling.
Ingredients:
1 1/2 cups all-purpose flour
1/2 teaspoon salt
1/2 cup (1 stick) unsalted butter, chilled and cubed
1/4 cup powdered sugar
1/4 cup ice water
Instructions:
Whisk together the flour and salt in a large bowl. Cut in the cold butter using a pastry blender or your fingers until the mixture resembles coarse crumbs. Gradually add the powdered sugar and ice water, mixing until the dough just comes together. Don’t overmix! Form the dough into a disc, wrap it in plastic wrap, and chill in the refrigerator for at least 30 minutes. This chilling step is crucial for a flaky crust.
On a lightly floured surface, roll out the chilled dough into a 12×15 inch rectangle. Transfer the dough to a greased and lightly floured 9×13 inch baking pan. Trim the excess dough. Prick the dough all over with a fork to prevent it from bubbling. Bake in a preheated oven at 350°F (175°C) for 15-20 minutes, or until lightly golden brown.
Assembling Your Classic Cannoli Squares
This is the fun part! Once the pastry is cool, spread the ricotta filling evenly over the top. You can get creative here; dollop it, swirl it, or spread it perfectly—it’s your Classic Cannoli Squares, your way! Dust generously with powdered sugar. Cut into squares and serve.
Adding That Extra Special Touch to Your Classic Cannoli Squares
You can easily make these Classic Cannoli Squares your own! For a richer flavor, try using mascarpone cheese instead of ricotta. If you like a little crunch, add chopped nuts or candied citrus peel to the filling. You could even drizzle a little melted dark chocolate over the top for an extra decadent treat.
Storing and Reheating Your Classic Cannoli Squares
Store leftover Classic Cannoli Squares in an airtight container in the refrigerator. They’re best served at room temperature, so let them sit out for a bit before enjoying them. You can gently warm them up in the microwave or oven for a few seconds if you prefer them warm.
Tips for Cannoli Square Success
Make sure your ricotta is well-drained—this is key to a light and airy filling.
Don’t overwork the pastry dough—it should come together easily, and the cold butter is essential for flakiness.
Get creative with the toppings—a sprinkle of cinnamon, a dusting of cocoa powder, or a drizzle of chocolate will all add a delicious touch.
Conclusion for Classic Cannoli Squares
These Classic Cannoli Squares offer a delightful twist on a beloved Italian dessert. The ease of assembly, coupled with the rich, creamy filling and crispy pastry base, makes them a guaranteed crowd-pleaser. Whether you’re a seasoned baker or a kitchen novice, this recipe is simple enough for anyone to tackle. The ability to prepare elements in advance adds to its convenience, making it a perfect choice for any occasion. So ditch the complicated cannoli shells and embrace the joy of these delectable squares. They’re a guaranteed winner!
Print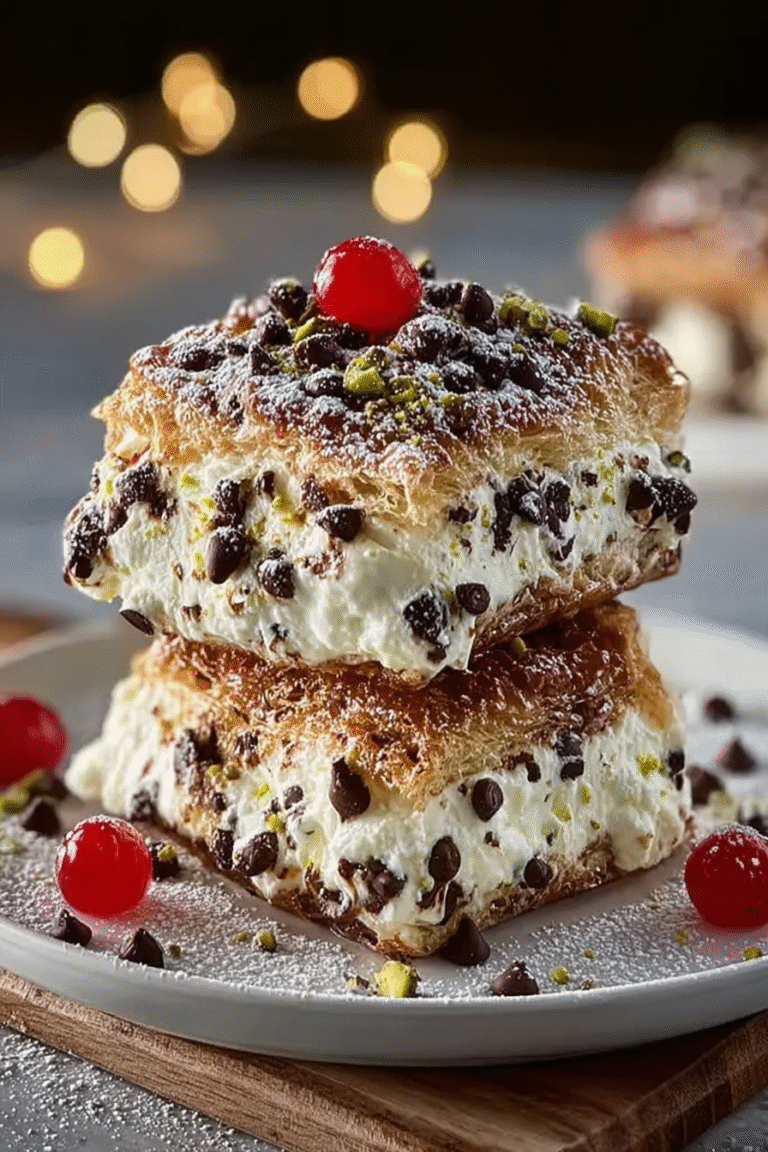
Classic Cannoli Squares
Delicious classic cannoli squares recipe with detailed instructions and nutritional information.
- Total Time: 35 minutes
- Yield: 4 servings 1x
Ingredients
- 1 ½ cups all-purpose flour
- ½ teaspoon baking powder
- ¼ teaspoon salt
- ½ cup (1 stick) unsalted butter, softened
- ½ cup granulated sugar
- 2 large eggs
- 1 teaspoon vanilla extract
- 15 ounces ricotta cheese, drained well
- ½ cup powdered sugar
- 1 teaspoon vanilla extract
- ½ cup mini chocolate chips
- ½ cup chopped pistachios
Instructions
- Step 1: Preheat oven to 350°F (175°C). Grease and flour a 9×13 inch baking pan. In a medium bowl, whisk together flour, baking powder, and salt.
- Step 2: In a large bowl, cream together the softened butter and granulated sugar until light and fluffy. Beat in the eggs one at a time, then stir in the vanilla extract. Gradually add the dry ingredients to the wet ingredients, mixing until just combined. Do not overmix.
- Step 3: Pour the batter into the prepared pan and spread evenly. Bake for 20-25 minutes, or until a toothpick inserted into the center comes out clean. Let the cake cool completely in the pan.
- Step 4: While the cake is cooling, prepare the ricotta filling. In a medium bowl, combine the ricotta cheese, powdered sugar, and vanilla extract. Mix until smooth and creamy. Stir in the mini chocolate chips and chopped pistachios.
- Step 5: Once the cake is completely cool, spread the ricotta filling evenly over the top. Cut into squares and serve.
Notes
- Store leftover cannoli squares in an airtight container in the refrigerator for up to 3 days, but they are best enjoyed fresh.
- For a warm, gooey center, gently reheat individual squares in the microwave for 10-15 seconds.
- Serve these delightful squares with a dusting of powdered sugar and a dollop of extra ricotta filling for an elevated presentation.
- To prevent the filling from becoming watery, make sure your ricotta cheese is VERY well-drained before mixing it with the other ingredients.
- Prep Time: 15 minutes
- Cook Time: 20 minutes
- Method: Stovetop
- Cuisine: American
FAQs
Are Classic Cannoli Squares difficult to make?
Don’t let the “classic” part intimidate you! These Cannoli Squares are surprisingly straightforward. The creamy ricotta filling comes together quickly, and the pastry base is much easier to manage than fiddling with individual cannoli shells. You’ll find yourself surprised at how simple it is to create this impressive dessert, perfect for a potluck or a quiet night in. Honestly, even a baking novice can pull this off. You might even find yourself wondering why you didn’t try it sooner!
Can I make the Classic Cannoli Squares ahead of time?
Absolutely! The beauty of these squares lies in their make-ahead capabilities. You can bake the pastry crust a day or two in advance and store it airtight. Similarly, the ricotta filling can be prepared ahead of time and refrigerated. Assemble the squares just before serving for optimal freshness and texture. This makes them perfect for parties or gatherings where you want to minimize last-minute stress.
What can I substitute for the ricotta cheese in Classic Cannoli Squares?
While ricotta is traditional, you can experiment with other creamy cheeses! A mixture of mascarpone and cream cheese could work well, offering a similar texture and richness. Just remember to adjust the sweetness according to your chosen substitute. If you’re aiming for a lighter version, Greek yogurt might be a surprisingly tasty option—though you might need to add a touch more sweetener.
How do I store leftover Classic Cannoli Squares?
Store leftover Classic Cannoli Squares in an airtight container in the refrigerator for up to 3 days. They are best served at room temperature, so allow them to sit for a bit before enjoying. While freezing isn’t ideal, you could freeze the unfilled pastry crust and the filling separately, then assemble and bake them when you’re ready. Just be sure to let them come to room temperature before serving for the best experience.


Leave a Comment