

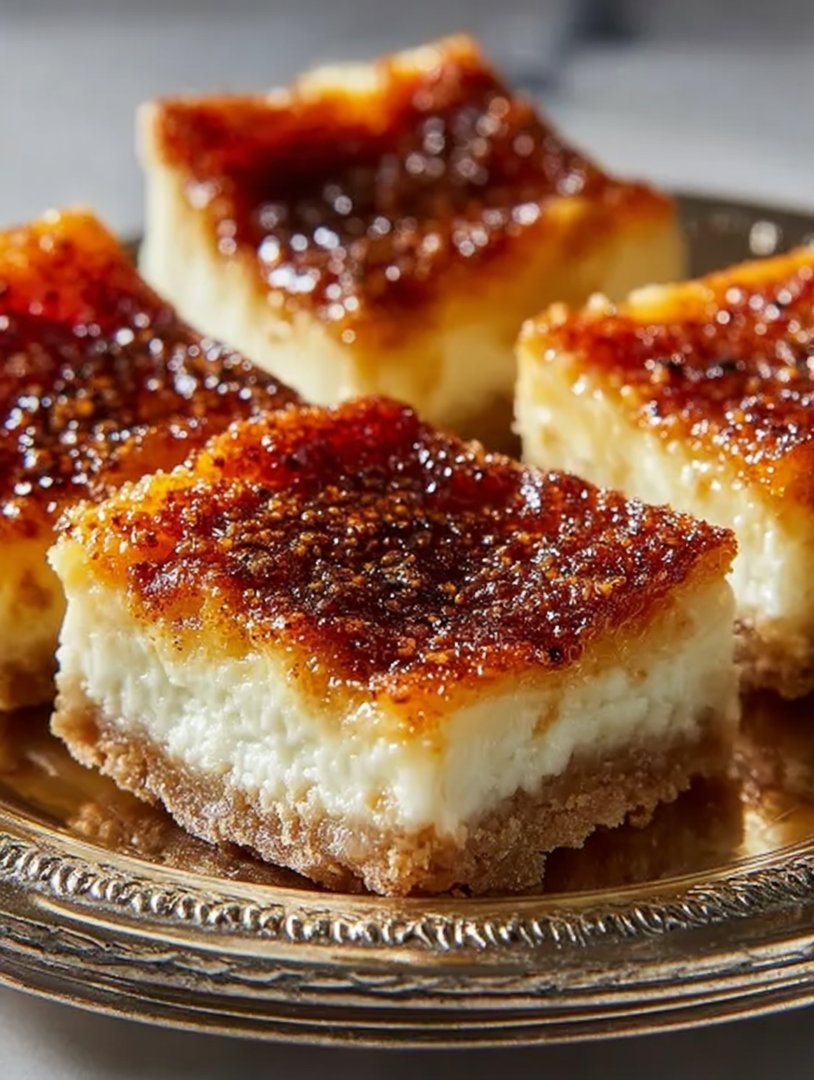
Picture this: a symphony of creamy cheesecake mingling with the caramelized crunch of crème brûlée. It’s not just a dessert; it’s a dessert bar that redefines indulgence, and these Crème Brûlée Cheesecake Bars are about to become your new obsession.
These aren’t your grandma’s cheesecake squares; these are little slices of heaven that combine the best of both worlds. Imagine the satisfying crack of the sugar topping giving way to a velvety smooth cheesecake filling – pure bliss, especially when you crave something that’s both elegant and utterly irresistible.
Here’s why you’ll fall head-over-heels for these Crème Brûlée Cheesecake Bars:
- Effortlessly elevate any gathering with a dessert that looks and tastes like a professional pastry chef created it.
- The harmonious blend of creamy cheesecake and crunchy brûlée offers an unforgettable taste sensation in every single bite.
- Visually stunning, the golden-brown, torched top makes these bars a show-stopping centerpiece for any dessert table.
- Easily adaptable to different occasions, these bars are perfect for casual brunches or sophisticated evening soirees.
Ingredients for Crème Brûlée Cheesecake Bars
Here’s what you’ll need to make this delicious dish:
The full ingredients list, including measurements, is provided in the recipe card directly below.
How to Make Crème Brûlée Cheesecake Bars
Follow these simple steps to prepare this delicious dish:
Step 1: Prepare the Graham Cracker Crust
Preheat your oven to 350°F (175°C). In a medium bowl, combine the graham cracker crumbs, melted butter, and granulated sugar. Press the mixture firmly into the bottom of a 9×13 inch baking pan. Bake for 8-10 minutes, or until lightly golden. Let cool slightly.
Step 2: Make the Cheesecake Filling
In a large bowl, beat the softened cream cheese and granulated sugar until smooth and creamy. Add the sour cream, eggs, and vanilla extract, mixing until just combined. Be careful not to overmix, as this can cause cracks in the cheesecake.
Step 3: Assemble and Bake
Pour the cheesecake filling over the cooled graham cracker crust. Spread evenly. Bake for 30-35 minutes, or until the edges are set but the center still has a slight jiggle. Turn off the oven and let the cheesecake sit in the oven with the door slightly ajar for 1 hour to prevent cracking.
Step 4: Chill the Cheesecake
Remove the cheesecake from the oven and let it cool completely at room temperature. Then, cover it with plastic wrap and refrigerate for at least 4 hours, or preferably overnight. This allows the cheesecake to set properly and develop its flavor.
Step 5: Create the Crème Brûlée Topping
Before serving, sprinkle a thin, even layer of powdered sugar over the top of the chilled cheesecake. Use a kitchen torch to caramelize the sugar, moving the flame evenly across the surface until it is golden brown and bubbly. Be careful not to burn the sugar.
Step 6: Serve and Enjoy
Let the caramelized sugar cool and harden slightly before slicing the cheesecake into bars. Serve immediately and watch as your friends and family devour these irresistible Crème Brûlée Cheesecake Bars. The combination of creamy cheesecake and crunchy, caramelized topping is simply divine.
Variations and Substitutions for Crème Brûlée Cheesecake Bars (formatted as H2 heading)
Want to put your own spin on these already amazing bars? Here are a few ideas to get your creative culinary juices flowing:
Flavor Infusions for Crème Brûlée Cheesecake Bars (formatted as H3 heading)
Add a burst of flavor by infusing the cheesecake filling with citrus zest, like lemon or orange. A teaspoon of almond extract can also add a delightful nutty dimension. For a chocolate twist, swirl in some melted dark chocolate before baking.
Crust Alternatives for Crème Brûlée Cheesecake Bars (formatted as H3 heading)
While graham cracker crust is classic, feel free to experiment. Try using chocolate wafers, vanilla wafers, or even a shortbread crust for a different textural and flavor experience. Just adjust the butter and sugar accordingly.
Topping Transformations for Crème Brûlée Cheesecake Bars (formatted as H3 heading)
Instead of plain powdered sugar, consider using brown sugar for a deeper caramel flavor. For an extra layer of decadence, drizzle with salted caramel sauce after torching. You can also sprinkle with a pinch of sea salt to enhance the sweetness.
Dietary Adaptations for Crème Brûlée Cheesecake Bars (formatted as H3 heading)
To make these bars gluten-free, use gluten-free graham crackers or almond flour for the crust. For a lighter version, use light cream cheese and a sugar substitute. Just be mindful that sugar substitutes may affect the texture and baking time.
Tips for Perfect Crème Brûlée Cheesecake Bars (formatted as H2 heading)
Achieving cheesecake perfection can be a bit of an art, but fear not! Here are some tried-and-true tips to ensure your Crème Brûlée Cheesecake Bars turn out flawless every time:
Cream Cheese Considerations for Crème Brûlée Cheesecake Bars (formatted as H3 heading)
Always start with room temperature cream cheese. This is crucial for achieving a smooth, lump-free batter. If you’re short on time, you can soften it by microwaving it in 20-second intervals, but be careful not to melt it.
The Art of Gentle Mixing for Crème Brûlée Cheesecake Bars (formatted as H3 heading)
Overmixing the cheesecake batter can incorporate too much air, leading to cracks during baking. Mix just until the ingredients are combined, and avoid whipping. A gentle hand is key to a smooth and creamy texture.
Water Bath Wonders for Crème Brûlée Cheesecake Bars (formatted as H3 heading)
For an ultra-creamy cheesecake with minimal cracking, consider baking it in a water bath. Wrap the bottom of your baking pan tightly in foil, then place it inside a larger pan. Fill the outer pan with hot water, reaching about halfway up the sides of the cheesecake pan. This helps to bake the cheesecake evenly and prevents it from drying out.
Torch Techniques for Crème Brûlée Cheesecake Bars (formatted as H3 heading)
When torching the sugar topping, keep the flame moving to avoid burning. Hold the torch a few inches away from the surface and use a sweeping motion. If you don’t have a kitchen torch, you can broil the cheesecake for a minute or two, but watch it closely to prevent burning.
Serving Suggestions for Crème Brûlée Cheesecake Bars (formatted as H2 heading)
These Crème Brûlée Cheesecake Bars are delightful on their own, but here are some ways to elevate the experience even further:
Dessert Pairings for Crème Brûlée Cheesecake Bars (formatted as H3 heading)
Serve alongside fresh berries, such as raspberries or strawberries, for a burst of freshness and color. A dollop of whipped cream or a scoop of vanilla ice cream also makes a perfect complement.
Beverage Bliss for Crème Brûlée Cheesecake Bars (formatted as H3 heading)
Pair these bars with a cup of strong coffee or a soothing herbal tea. For a more decadent treat, try it with a creamy milkshake or a sparkling cider.
Occasions to Celebrate with Crème Brûlée Cheesecake Bars (formatted as H3 heading)
These bars are perfect for any occasion, from casual get-togethers to elegant dinner parties. They make a stunning addition to holiday dessert tables and are sure to impress at birthdays and anniversaries.
Storage Secrets for Crème Brûlée Cheesecake Bars (formatted as H3 heading)
Store leftover bars in an airtight container in the refrigerator for up to 3-4 days. For best results, add the brûlée topping just before serving to maintain its crispness.
With these tips and tricks, you’re well on your way to creating Crème Brûlée Cheesecake Bars that are sure to become a household favorite. Enjoy the process and savor every delicious bite!
Perfecting the Cooking Process
For efficiency, start by prepping your cheesecake filling, letting it chill while you tackle the crust. Blind-bake the crust before pouring in the filling, ensuring a perfectly crisp base. Finally, create the brûlée topping just before serving for that signature crackle.
Add Your Touch
Feel free to experiment with different extracts in the cheesecake filling. Vanilla is classic, but almond or lemon extract can also add a delightful twist. For the brûlée topping, try using flavored sugars like vanilla bean or even a hint of cinnamon.
Storing & Reheating
Store these delectable bars in an airtight container in the refrigerator for up to 3 days. While reheating isn’t recommended, you can let them sit at room temperature for about 15 minutes to soften slightly before serving. The brûlée topping is best fresh!
Here are a few tips for achieving crème brûlée cheesecake bar perfection:
- Don’t overmix the cheesecake batter; this can introduce air and cause cracks during baking. Gently fold in the ingredients until just combined.
- For an even brûlée, use a kitchen torch with adjustable flame and move it in a consistent sweeping motion across the sugar topping.
- Chill the cheesecake bars thoroughly before brûléeing the top; a cold base helps the topping set properly without melting the cheesecake.
(Personal anecdote)
My Aunt Mildred once said my baking could “charm the socks off a garden gnome.” That’s the highest compliment I’ve ever received, and it fuels my passion for creating treats like these Crème Brûlée Cheesecake Bars!
Okay, let’s dive into the deliciousness that is the Crème Brûlée Cheesecake Bar. Trust me, these aren’t your average cheesecake squares. We’re talking about a symphony of textures and flavors, a party in your mouth, a… well, you get the idea. They’re good. Really, really good. And I promise, even if you’ve never baked a cheesecake before, I’ll guide you through it. Think of me as your baking spirit guide, minus the flowing robes and questionable life choices.
The Allure of Crème Brûlée Cheesecake Bars
What makes these bars so darn irresistible? It’s the juxtaposition, baby! The creamy, dreamy cheesecake filling nestled on a buttery, crumbly crust, topped with that iconic, brittle caramelized sugar crust of a crème brûlée. It’s like the perfect marriage of sophistication and comfort food. Think of it as the culinary equivalent of wearing sweatpants to a black-tie event. Unexpected, perhaps, but undeniably awesome.
Why These Bars Will Be Your New Obsession
Forget spending hours meticulously crafting individual crème brûlées. These bars deliver all the same flavor and texture sensations in a fraction of the time. Plus, they’re portable! Take them to potlucks, picnics, or just hoard them in your fridge for emergency dessert situations (we’ve all been there). These Crème Brûlée Cheesecake Bars are a guaranteed crowd-pleaser.
Breaking Down the Layers of Deliciousness
Let’s get into the nitty-gritty of what makes these bars tick. We’re talking about three distinct layers, each playing a crucial role in the overall flavor harmony. First, we have the crust, providing a sturdy and buttery foundation. Then comes the cheesecake filling, a creamy canvas for all the good stuff. And finally, the star of the show, the brûlée topping, adding that signature crackle and caramelized sweetness.
Crafting the Perfect Crust: The Foundation of Flavor
The crust is more than just a vessel; it’s an integral part of the overall experience. We want something that’s sturdy enough to hold the filling, but also tender and buttery enough to complement the creamy cheesecake.
Choosing Your Crust Adventure: Graham Cracker vs. Cookie
I’m partial to a classic graham cracker crust, but feel free to get creative! Shortbread cookies, vanilla wafers, or even crushed pretzels can add a unique twist. Just remember to adjust the sweetness accordingly. A pretzel crust, for example, might benefit from a little extra sugar.
The Secret to a Buttery, Non-Soggy Crust
Melted butter is your best friend here. It binds the crumbs together and creates a waterproof barrier, preventing the filling from seeping through and making the crust soggy. Pulse the crumbs and melted butter in a food processor until they resemble wet sand, then press firmly into your baking pan. Blind baking is also key!
The Cheesecake Filling: Creamy, Dreamy Perfection
Ah, the cheesecake filling. This is where the magic truly happens. We’re aiming for a texture that’s rich, smooth, and utterly decadent.
Cream Cheese: The Star of the Show
Full-fat cream cheese is non-negotiable. Don’t even think about using the low-fat stuff. It just won’t give you the same creamy texture. Make sure your cream cheese is softened to room temperature before you start mixing, to avoid lumps.
Sweetness and Flavor Enhancers: Sugar and Vanilla
Granulated sugar provides the perfect amount of sweetness, while a splash of vanilla extract enhances all the other flavors. Don’t be afraid to experiment with other extracts, like almond or lemon, for a unique twist.
The Importance of Gentle Mixing: No Overmixing Allowed!
Overmixing the cheesecake batter can incorporate too much air, leading to cracks during baking. Gently fold in the ingredients until just combined. Trust me, your patience will be rewarded with a perfectly smooth and creamy cheesecake.
The Brûlée Topping: Achieving that Signature Crackle
This is where the real fun begins! The brûlée topping is what transforms these bars from ordinary cheesecake into something truly extraordinary.
Sugar Selection: Granulated vs. Turbinado
I prefer granulated sugar for the brûlée topping, as it melts evenly and creates a smooth, brittle crust. Turbinado sugar, with its larger crystals, can also be used for a more rustic look and a slightly different texture.
The Torch Technique: Mastering the Flame
A kitchen torch is essential for achieving that signature caramelized crust. Start with a low flame and move the torch in a consistent sweeping motion across the sugar topping. Be patient, and don’t hold the torch in one spot for too long, or you’ll risk burning the sugar.
When to Brûlée: Timing is Everything
The brûlée topping is best applied just before serving. If you brûlée the bars too far in advance, the sugar will absorb moisture and lose its crackly texture.
Troubleshooting Your Crème Brûlée Cheesecake Bars
Even the most experienced bakers encounter occasional hiccups. Here are a few common problems and how to fix them.
Cracked Cheesecake: Prevention and Solutions
Cracked cheesecake is a common frustration, but it’s usually easy to prevent. Avoid overmixing the batter, and bake the cheesecake in a water bath to ensure even cooking. If your cheesecake does crack, don’t despair! You can always cover it up with the brûlée topping.
Soggy Crust: How to Avoid the Dreaded Sog
A soggy crust is a baker’s worst nightmare. Make sure you’re using enough melted butter to bind the crumbs together, and blind-bake the crust before adding the filling.
Uneven Brûlée: Achieving a Consistent Crust
An uneven brûlée is usually caused by inconsistent torching. Practice your technique and be patient. Remember to move the torch in a consistent sweeping motion, and don’t hold it in one spot for too long.
Beyond the Basics: Creative Variations
Once you’ve mastered the basic recipe, the possibilities are endless! Get creative and experiment with different flavors and toppings.
Flavor Infusions: Extracts, Zests, and Spices
Infuse the cheesecake filling with different extracts, zests, or spices for a unique twist. Lemon zest, almond extract, or even a hint of cinnamon can add a delightful flavor dimension.
Topping Transformations: Fruit, Chocolate, and More
Top your Crème Brûlée Cheesecake Bars with fresh fruit, chocolate shavings, or a drizzle of caramel sauce for an extra layer of indulgence.
Making it a Seasonal Sensation
Adapt this recipe to the seasons by using seasonal fruits and flavors. Pumpkin spice cheesecake bars in the fall, or strawberry cheesecake bars in the spring, are always a hit.
Conclusion for Crème Brûlée Cheesecake Bars :
These Crème Brûlée Cheesecake Bars are truly a delightful dessert, perfect for impressing guests or simply treating yourself. The creamy cheesecake filling, combined with the crunchy caramelized sugar crust, creates a symphony of textures and flavors that is hard to resist. Remember to avoid overbaking, cool slowly, and torch the sugar just before serving for the ultimate experience. Enjoy every decadent bite of these irresistible bars!
Print
Crème Brûlée Cheesecake Bars
Delicious crème brûlée cheesecake bars recipe with detailed instructions and nutritional information.
- Total Time: 35 minutes
- Yield: 4 servings
Ingredients
- Graham cracker crumbs: 1 1/2 cups
- Melted butter: 6 tablespoons
- Cream cheese, softened: 24 ounces
- Granulated sugar: 1 cup
- Eggs: 3 large
- Vanilla extract: 1 teaspoon
- Heavy cream: 1/2 cup
- Turbinado sugar: 2 tablespoons
Instructions
- Step 1: Preheat oven to 350°F (175°C). Combine graham cracker crumbs and melted butter. Press into the bottom of a 9×13 inch pan. Bake for 8 minutes.
- Step 2: In a large bowl, beat cream cheese and granulated sugar until smooth. Beat in eggs one at a time, then stir in vanilla extract and heavy cream.
- Step 3: Pour cream cheese mixture over the pre-baked crust.
- Step 4: Bake for 30-35 minutes, or until the center is almost set. Let cool completely, then refrigerate for at least 2 hours.
- Step 5: Before serving, sprinkle turbinado sugar evenly over the top of the cheesecake bars. Use a kitchen torch to caramelize the sugar until golden brown.
Notes
- Store leftover bars, well-covered, in the refrigerator for up to 3 days to maintain their creamy texture.
- If the caramelized sugar softens after refrigeration, briefly re-torch individual bars just before serving for that satisfying crack.
- Garnish each crème brûlée cheesecake bar with fresh berries or a dollop of whipped cream for an elegant presentation.
- For an extra smooth cheesecake filling, ensure your cream cheese is fully softened to room temperature before mixing.
- Prep Time: 15 minutes
- Cook Time: 20 minutes
- Method: Stovetop
- Cuisine: American
FAQs :
Can I make Crème Brûlée Cheesecake Bars ahead of time?
Absolutely! These bars are fantastic make-ahead desserts. In fact, I often find the flavors meld even better after a day or two in the fridge. After baking and cooling, cover the bars tightly and store them in the refrigerator for up to three days. Just remember to add the caramelized sugar topping right before serving. This will prevent it from getting soggy, ensuring that satisfying, crisp crack with every bite. You can also freeze them for longer storage, without the caramelized topping, of course!
How do I get that perfect caramelized sugar crust?
Ah, the million-dollar question! The secret lies in a generous sprinkle of sugar and even heat. I recommend using a kitchen torch for the most consistent results. Move the flame evenly across the surface until the sugar melts and turns a beautiful amber color. If you don’t have a torch, you can broil them in the oven, but watch them like a hawk! They can go from perfectly caramelized to burnt in seconds. Patience is key, and a little practice never hurts!
What can I substitute for the vanilla extract?
If you’re looking to mix things up, almond extract would be a lovely substitute, adding a subtle nutty flavor that complements the creamy cheesecake. Alternatively, a dash of lemon or orange zest can bring a bright, citrusy note to the bars. If you want a richer taste, try using vanilla bean paste instead of extract. It has a more intense vanilla flavor and those little black specks look gorgeous. Just use an equal amount of paste for the extract.
My cheesecake bars cracked, what did I do wrong?
Don’t worry, cracks happen! Usually, cracking occurs because of rapid temperature changes. To prevent this, bake the cheesecake bars in a water bath. This provides gentle, even heat. Also, let the bars cool slowly in the oven with the door slightly ajar after baking. This gradual cooling process will minimize the risk of cracks. And remember, even if they do crack, they’ll still taste amazing, so don’t stress too much!


Leave a Comment