
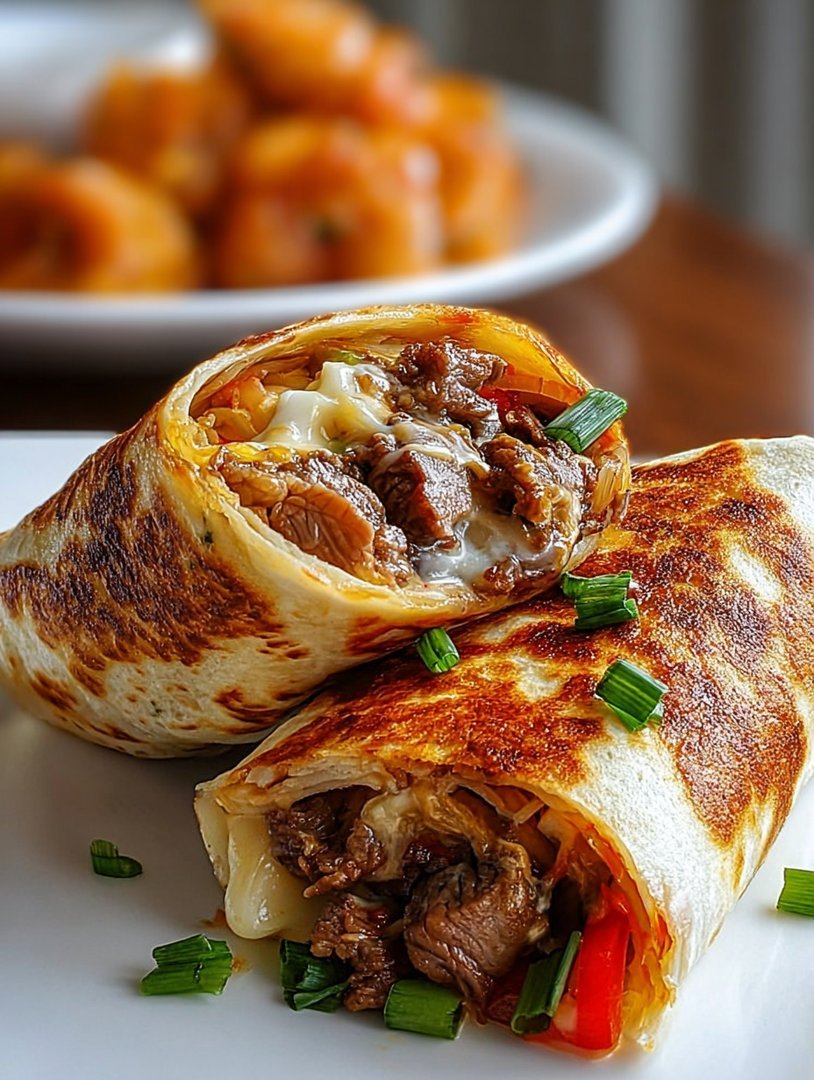
Imagine sinking your teeth into a wrap so perfectly crisp, so oozing with savory goodness, it sends shivers of culinary delight down your spine. That’s what awaits you with these Crispy Philly Cheesesteak Grilled Wraps!
These aren’t your average wraps; they’re a flavor explosion, a textural masterpiece, a symphony of cheesy, meaty, crispy perfection all wrapped up in a neat little package. Trust me, your taste buds will thank you.
- Effortlessly crafted in under 30 minutes, making it perfect for quick weeknight dinners or weekend gatherings.
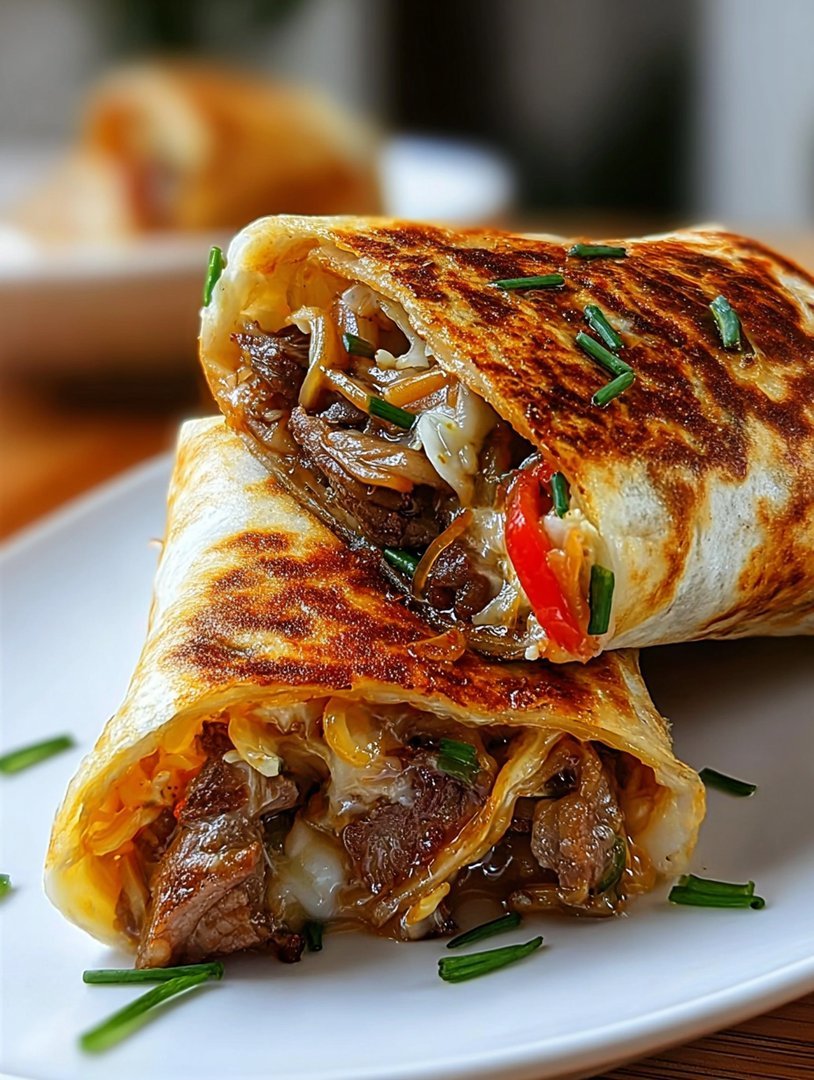
- The harmonious blend of tender beef, melted cheese, and crisp wrap creates an unforgettable flavor profile.
- Golden-brown and perfectly toasted, each wrap offers a visual delight that’s as appealing as it is delicious.
- Easily customizable with your favorite toppings, offering a versatile dish that suits any preference or occasion.
Ingredients for Crispy Philly Cheesesteak Grilled Wraps
Here’s what you’ll need to make this delicious dish:
The full ingredients list, including measurements, is provided in the recipe card directly below.
How to Make Crispy Philly Cheesesteak Grilled Wraps
Follow these simple steps to prepare this delicious dish:
Step 1: Prep the Ingredients
Thinly slice the beef sirloin, onions, and bell peppers. Have the provolone cheese slices ready to go.
Step 2: Sauté the Vegetables
Heat olive oil in a large skillet over medium-high heat. Add the sliced onions and bell peppers. Sauté until they are softened and slightly caramelized, about 5-7 minutes. Season with salt and pepper. Remove from the skillet and set aside.
Step 3: Cook the Beef
In the same skillet, add a bit more olive oil if needed. Add the thinly sliced beef sirloin and cook until browned, about 3-5 minutes. Season with salt and pepper. Break the beef apart with a spatula as it cooks.
Step 4: Assemble the Wraps
Lay out the large flour tortillas. Spread a layer of the sautéed onions and bell peppers on each tortilla. Top with the cooked beef and provolone cheese slices.
Step 5: Fold and Grill
Fold in the sides of the tortilla and then roll it up tightly, burrito-style. Melt butter in a clean skillet over medium heat. Place the wraps in the skillet, seam-side down, and grill until golden brown and crispy on both sides, about 2-3 minutes per side.
Step 6: Serve and Enjoy
Remove the Crispy Philly Cheesesteak Grilled Wraps from the skillet and let them cool slightly before slicing in half. Serve immediately and enjoy every delicious bite!
Perfecting the Cooking Process
To nail these Crispy Philly Cheesesteak Grilled Wraps, focus on sequence. Sear your chicken or beef first to lock in juices. While that rests, prep your veggies. Then, assemble and grill for that perfect crispy, melty goodness. This method ensures everything cooks evenly.
Add Your Touch
Feeling adventurous? Swap the provolone for pepper jack for a spicier kick. Add sliced mushrooms or bell peppers to the veggie mix for extra flavor. Or, try using a different kind of wrap, like a sun-dried tomato tortilla. Make it your own!
Storing & Reheating
Got leftovers? Store your Crispy Philly Cheesesteak Grilled Wraps in an airtight container in the fridge. To reheat, pop them in a skillet or panini press until heated through and crispy again. Avoid microwaving for the best texture.
Here are some tips for making the best Crispy Philly Cheesesteak Grilled Wraps:
- Don’t overcrowd the skillet when searing the meat; work in batches to ensure a good sear and prevent steaming.
- Use a sharp knife to thinly slice the meat and vegetables for even cooking and better layering in the wraps.
- Press the wraps firmly on the grill or panini press to achieve maximum crispiness and a well-sealed edge.
(Personal anecdote formated as paragraph subheading (very important! don’t write any title for this paragraph))
I remember the first time I made these for a summer barbecue. My friends devoured them so fast, I barely got one! The secret? A little extra seasoning and perfectly caramelized onions.
Now, let’s dive into the heart of the matter: crafting the ultimate Crispy Philly Cheesesteak Grilled Wraps. Forget those soggy, flavorless imitations you’ve encountered before. We’re talking about a culinary masterpiece, a symphony of savory meat, gooey cheese, and crisp tortilla that will have your taste buds singing.
First, let’s talk about the key to success: the meat. We’re ditching the usual suspect and opting for thinly sliced chicken or beef. Why? Because it’s delicious, readily available, and cooks up in a flash. Plus, it’s a fantastic alternative for anyone avoiding certain meats. Think of it as the star of our show, ready to be transformed into a flavor explosion.
The Meat of the Matter: Chicken or Beef?
Choosing between chicken and beef is like choosing between a comedy and an action movie—both are great, but they offer different experiences. Chicken offers a lighter, more delicate flavor, while beef brings a richer, bolder taste. Personally, I lean towards a thinly sliced sirloin. However, both options make incredibly flavorful Crispy Philly Cheesesteak Grilled Wraps. The secret is how you prepare them.
Slicing and Dicing for Deliciousness
The key to perfectly cooked meat is even slicing. Whether you’re using chicken or beef, aim for thin, uniform slices. This ensures that the meat cooks quickly and evenly, preventing any tough or chewy bites. If you’re using chicken breasts, slightly freezing them for about 30 minutes before slicing can make the process much easier. For beef, ask your butcher to slice it thinly, or invest in a good quality slicer. Remember, we want speed and even cooking here!
Next up: the cheese. Let’s be honest, what’s a Philly Cheesesteak without that glorious, melty, gooey goodness? We’re skipping the usual cheese spread (too processed!) and going straight for provolone. Its mild, slightly tangy flavor complements the meat perfectly without overpowering it. Of course, if you’re feeling a bit rebellious, feel free to experiment with other cheeses like mozzarella, or even a sharp cheddar. But trust me, provolone is the way to go for that authentic Philly experience.
Cheese, Please! Provolone Perfection
Provolone is my personal cheese of choice for this recipe. It melts beautifully, has a subtle flavor, and really lets the meat and veggies shine. If you’re feeling adventurous, you could experiment with other cheeses. But remember, the goal is to complement, not to compete.
The Meltdown: Achieving Cheesy Nirvana
The key to achieving cheesy perfection is layering. Place your cheese slices directly on top of the hot meat as it’s cooking. This allows the cheese to melt quickly and evenly, creating that irresistible, gooey blanket we all crave. If you’re using a griddle or skillet, you can even cover it with a lid for a few seconds to help the cheese melt faster. Just keep a close eye on it to prevent burning!
But wait, there’s more! We can’t forget about the veggies. Sautéed onions and peppers are the classic choice, adding a touch of sweetness and a satisfying crunch. I like to use a mix of yellow onions and green bell peppers, but feel free to get creative. Red onions, poblano peppers, or even mushrooms would be delicious additions. Just remember to cook them until they’re soft and slightly caramelized, releasing their natural sweetness.
Veggies: The Unsung Heroes
While the meat and cheese often steal the show, the veggies are the unsung heroes of these wraps. They add texture, flavor, and a pop of color. Don’t skimp on the onions and peppers! They’re essential for creating that authentic Philly Cheesesteak flavor profile.
Sautéed to Perfection: The Veggie Dance
The secret to perfectly sautéed veggies is patience. Start by heating a generous amount of olive oil in a large skillet over medium heat. Add your sliced onions and peppers, and cook them slowly, stirring occasionally, until they’re soft, slightly caramelized, and oh-so-delicious. This process can take anywhere from 10 to 15 minutes, but trust me, it’s worth the wait. The slower you cook them, the sweeter and more flavorful they become.
Now, for the grand finale: the tortilla. We’re not talking about those flimsy, store-bought tortillas that fall apart at the slightest touch. No, we’re going for sturdy, flavorful tortillas that can stand up to all that juicy meat, cheese, and veggies. Look for the thick-cut variety, or even better, make your own! A little bit of char adds a smoky flavor that takes these wraps to the next level.
The Wrap It Up: Tortilla Talk
The tortilla is the foundation of our Crispy Philly Cheesesteak Grilled Wraps, so it’s important to choose wisely. A good quality tortilla will be sturdy enough to hold all the fillings without tearing, and flavorful enough to complement the other ingredients.
Grilling for Glory: Achieving Tortilla Perfection
To achieve tortilla perfection, heat a dry skillet or griddle over medium heat. Place your tortilla in the skillet and cook for about 30 seconds per side, or until it’s lightly browned and slightly crispy. Be careful not to overcook it, or it will become brittle and crack. The goal is to create a warm, pliable tortilla that’s ready to embrace its delicious filling. A little char is a good thing here.
Finally, it’s time to assemble our masterpieces. Lay your tortilla flat on a clean surface. Spread a generous layer of the sautéed onions and peppers down the center. Top with the sliced meat and the melty provolone cheese. Fold in the sides of the tortilla and roll it up tightly, like a burrito. Repeat until all your ingredients are used up.
Assembly Time: Building Your Masterpiece
This is where the magic happens. The key to a well-assembled wrap is layering. Start with the veggies, then add the meat and cheese. This ensures that the cheese melts evenly and everything stays in place.
Grilling to Perfection: Achieving Crispy Bliss
Now, for the final touch: grilling. Heat a panini press or a skillet over medium heat. Brush the outside of each wrap with a little olive oil or butter. Place the wraps in the panini press or skillet and cook for about 3-4 minutes per side, or until they’re golden brown and crispy. The panini press will create those beautiful grill marks. Serve immediately and prepare to be amazed!
And there you have it: Crispy Philly Cheesesteak Grilled Wraps that are guaranteed to impress. They’re quick, easy, and packed with flavor. Whether you’re making them for a weeknight dinner or a weekend gathering, these wraps are sure to be a hit. So go ahead, fire up the grill and get ready to experience a taste sensation that will leave you craving more! The key to keeping the Crispy Philly Cheesesteak Grilled Wraps at their best is to follow these tips.
These Crispy Philly Cheesesteak Grilled Wraps are a testament to the fact that you don’t need fancy ingredients or complicated techniques to create something truly delicious. With just a few simple ingredients and a little bit of love, you can transform ordinary ingredients into an extraordinary meal. So go ahead, embrace your inner chef and get cooking! You might just surprise yourself with what you can create. Remember the great taste of a Crispy Philly Cheesesteak Grilled Wrap.
Conclusion for Crispy Philly Cheesesteak Grilled Wraps
These Crispy Philly Cheesesteak Grilled Wraps are a fantastic and fun twist on the classic sandwich. We’ve shown you how easy it is to create a satisfying and flavorful meal with simple ingredients and a few clever techniques. From selecting the perfect steak to choosing your favorite cheese and adding your own veggie variations, the possibilities are endless. These wraps are perfect for a quick weeknight dinner, a game-day gathering, or any occasion that calls for delicious and easy-to-eat food. So get grilling and enjoy this crowd-pleasing delight!
Print
Crispy Philly Cheesesteak Grilled Wraps
Delicious crispy philly cheesesteak grilled wraps recipe with detailed instructions and nutritional information.
- Total Time: 35 minutes
- Yield: 4 servings
Ingredients
- Thinly sliced steak (ribeye or sirloin) – 1 pound
- Onion, thinly sliced – 1 medium
- Green bell pepper, thinly sliced – 1 medium
- Provolone cheese slices – 8 slices
- Hoagie rolls or large flour tortillas – 4
- Butter – 2 tablespoons
- Olive oil – 1 tablespoon
- Salt and pepper to taste
Instructions
- Step 1: Heat olive oil in a large skillet or griddle over medium-high heat. Add the sliced steak and cook, breaking it up with a spatula, until browned. Season with salt and pepper.
- Step 2: Add the sliced onions and green bell peppers to the skillet with the steak. Continue cooking, stirring occasionally, until the vegetables are softened and slightly caramelized, about 5-7 minutes.
- Step 3: Reduce the heat to low. Divide the steak and vegetable mixture into four portions. Top each portion with two slices of provolone cheese. Cover the skillet or griddle and allow the cheese to melt completely.
- Step 4: While the cheese is melting, lightly butter the outside of each tortilla or hoagie roll.
- Step 5: Carefully scoop each cheesy steak and vegetable portion into a tortilla or roll.
- Step 6: Grill each wrap or sandwich on a preheated grill pan or in the same skillet, buttered side down, until golden brown and crispy, about 2-3 minutes per side. Serve immediately.
Notes
- For best flavor, store leftover wraps individually wrapped in the refrigerator and consume within 2 days.
- Reheat in a skillet over medium-low heat, flipping occasionally, to re-crisp the tortilla and melt the cheese without drying out the steak.
- Serve these cheesy wraps with a side of spicy sriracha mayo or a cool, creamy coleslaw for a delightful contrast in flavors.
- Don't overcrowd the skillet while cooking the steak; work in batches if needed to ensure proper browning and prevent steaming.
- Prep Time: 15 minutes
- Cook Time: 20 minutes
- Method: Stovetop
- Cuisine: American
FAQs
What kind of steak is best for Crispy Philly Cheesesteak Grilled Wraps?
For truly delectable Crispy Philly Cheesesteak Grilled Wraps, thinly sliced ribeye is your best bet. Its rich marbling melts beautifully as it cooks, rendering a tender and flavorful filling. If ribeye isn’t available or you are seeking a budget-friendly alternative, sirloin is also a great option. Just be sure to slice it thinly against the grain to ensure it remains tender and easy to chew. Avoid tougher cuts, as they can become chewy and detract from the overall satisfying experience of these delightful wraps.
Can I use pre-sliced cheese for these delightful Crispy Philly Cheesesteak Grilled Wraps?
Absolutely! Pre-sliced provolone, mozzarella, or even white cheddar can be used for these Crispy Philly Cheesesteak Grilled Wraps. They are convenient and melt beautifully. However, if you are aiming for ultimate meltiness and a slightly more nuanced flavor, consider purchasing a block of your preferred cheese and slicing it yourself. Freshly sliced cheese often has a creamier texture and a more pronounced taste. Regardless of your choice, ensure the cheese is evenly distributed throughout the steak mixture for a perfect cheesy bite every time.
What other vegetables can I add to my Crispy Philly Cheesesteak Grilled Wraps?
Beyond the classic onions and peppers, feel free to get creative with your Crispy Philly Cheesesteak Grilled Wraps! Mushrooms are a fantastic addition, adding an earthy umami flavor that complements the steak beautifully. Sliced banana peppers can provide a tangy kick, while spinach wilts down nicely and adds a boost of nutrients. Just remember to sauté any additional vegetables before adding them to the steak, ensuring they are tender and flavorful. Don’t be afraid to experiment and create your own signature wrap combination!
Can I prepare the filling for these yummy Crispy Philly Cheesesteak Grilled Wraps ahead of time?
Yes, you can definitely prepare the filling for these Crispy Philly Cheesesteak Grilled Wraps in advance! Cook the steak, onions, and peppers according to the recipe, then let it cool completely before storing it in an airtight container in the refrigerator for up to 24 hours. When you’re ready to assemble the wraps, simply reheat the filling in a skillet until warmed through, then proceed with adding the cheese and grilling the wraps. This is a great time-saving tip for busy weeknights or when you’re preparing for a gathering.

Leave a Comment