

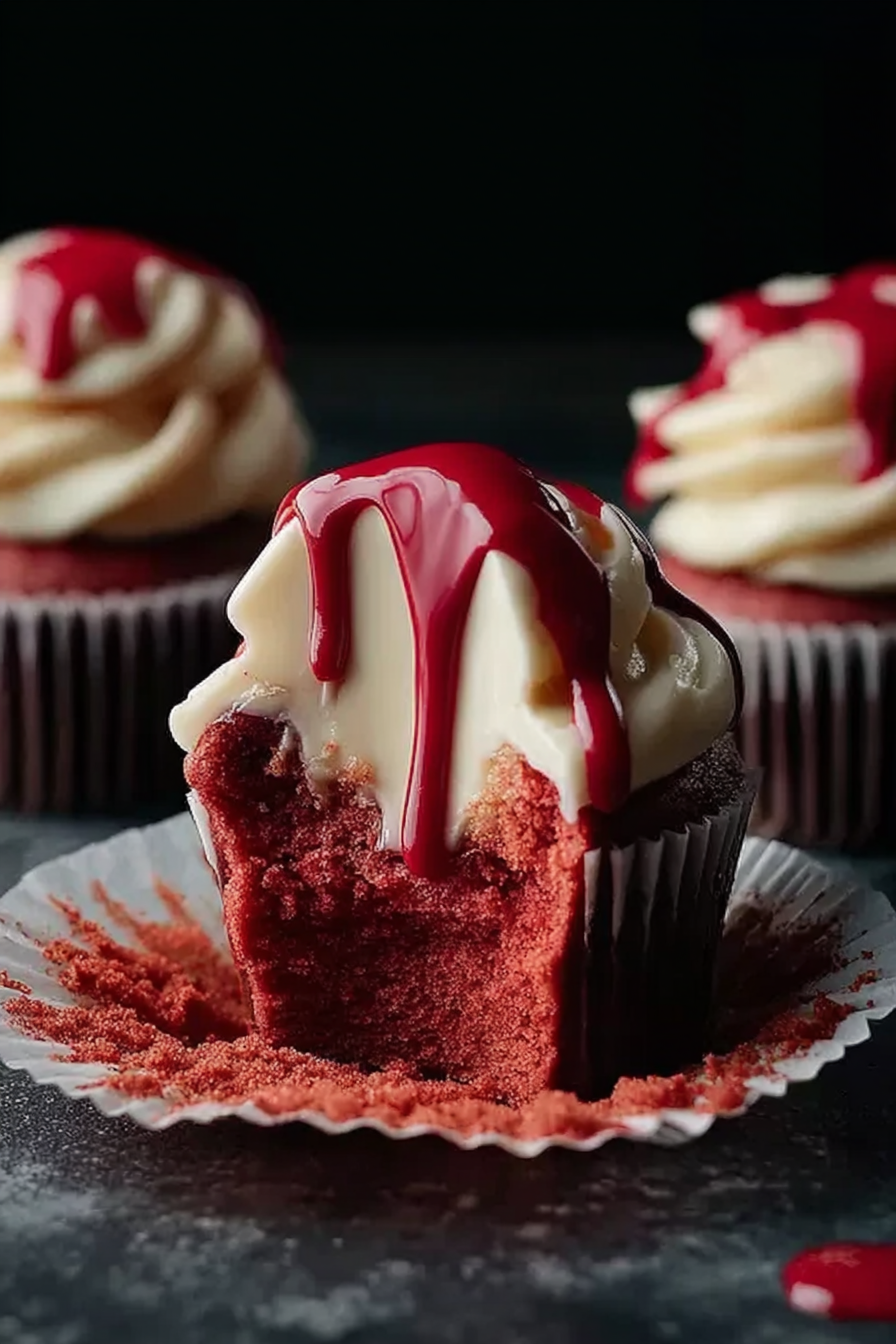
This Autumn celebration, ditch the boring treats and sink your teeth into something truly spooky-delicious: Autumn celebration Vampire Bite Cupcakes! Prepare for a frightfully fun baking adventure. These cupcakes are not only visually stunning but also incredibly easy to make.
Get ready to create cupcakes that are so good, they’ll have your guests screaming for more—in a good way, of course. We’re talking intensely moist cake, rich frosting, and a devilishly delightful surprise bite!
These Autumn celebration Vampire Bite Cupcakes boast several amazing features:
They’re incredibly easy to bake, even for novice bakers.
The flavor profile is a delightful balance of sweet and spooky.
Their spooky visual appeal will make them the star of any Autumn celebration gathering.
They are incredibly versatile, perfect for both kids and adults.
Ingredients for Autumn celebration Vampire Bite Cupcakes
Here’s what you’ll need to make this delicious dish:
The full ingredients list, including measurements, is provided in the recipe card directly below.
How to Make Autumn celebration Vampire Bite Cupcakes
Follow these simple steps to prepare this delicious dish:
Step 1: Baking the Cupcakes
Preheat your oven to 350°F (175°C). Line a muffin tin with cupcake liners. Prepare your chosen cupcake batter according to package directions or your recipe. Fill each liner about two-thirds full. Bake for 18-20 minutes, or until a toothpick inserted into the center comes out clean. Let the cupcakes cool completely in the tin before frosting.
Step 2: Preparing the Frosting
While the cupcakes cool, prepare your frosting. If using a box mix, follow the package directions. For homemade frosting, cream together your butter and cream cheese until light and fluffy. Gradually add powdered sugar, one cup at a time, mixing until smooth. Add a splash of milk or cream for desired consistency. If adding food coloring, now is the time. Remember, a little goes a long way!
Step 3: Assembling the Vampire Bites
Once the cupcakes are completely cool, frost each one generously. For an extra spooky touch, create a small indentation at the top of each cupcake with a spoon or knife.
Step 4: Adding the Gummy Worms
Press a gummy worm into the indentation you created, making it look like a vampire has just taken a bite!
Step 5: Creating the Eyes (optional)
Add two mini chocolate chips to the top of the gummy worm to create menacing eyes. This step is entirely optional but adds to the creepy charm.
Step 6: Adding the Final Touches
If using agar-agar, be sure to allow it to set before handling the cupcakes too much. Now admire your deliciously creepy creations! These Autumn celebration Vampire Bite Cupcakes are best served immediately but can be stored in an airtight container at room temperature for up to two days.
These Autumn celebration Vampire Bite Cupcakes are guaranteed to be a scream at your next Autumn celebration gathering. They’re easy to make, look fantastic, and taste even better. So, gather your ingredients, don your spooky apron, and prepare for a baking adventure you won’t soon forget. Happy haunting!
Perfecting the Cooking Process
First, make the cupcake batter, ensuring it’s perfectly smooth. While the batter rests, prepare the “blood” filling. Bake the cupcakes, then let them cool completely before frosting and decorating them as spooky Autumn celebration Vampire Bite Cupcakes.
Add Your Touch
Feel free to experiment! Swap the chocolate frosting for cream cheese frosting, or add sprinkles for extra Autumn celebration flair. Consider using different extracts like almond or vanilla to change the cupcake flavor. You can also add chopped nuts or chocolate chips to the batter.
Storing & Reheating
Store leftover Autumn celebration Vampire Bite Cupcakes in an airtight container at room temperature for up to two days, or in the refrigerator for up to four days. Reheat gently in the microwave for a few seconds if desired.
Prepare your cupcake liners before starting to avoid last-minute scrambling.
Don’t overmix the batter, as this can lead to tough cupcakes.
Let the cupcakes cool completely before frosting to prevent the frosting from melting.
I once made these for my niece’s Autumn celebration party, and they were a huge hit! The kids went wild for the “vampire bites”.
The Spooktacular Autumn celebration Vampire Bite Cupcakes Recipe
This recipe delivers hauntingly delicious Autumn celebration Vampire Bite Cupcakes that are guaranteed to be a scream at your next party! Forget those store-bought, mass-produced treats – these homemade delights are easy to make, and the customization options are endless. We’re talking about cupcakes so good, they’ll make even the grumpiest ghoul crack a smile.
Ingredients
: For the devilishly delicious cupcakes
One and a half cups all-purpose flour
One teaspoon baking soda
Half a teaspoon baking powder
A quarter teaspoon salt
Half a cup (one stick) unsalted butter, softened
One and a half cups granulated sugar
Two large eggs
One teaspoon alcohol-free vanilla extract
One cup buttermilk
Ingredients
: For the blood-curdling filling
Half a cup raspberry jam
Two tablespoons water
Ingredients
: For the frightfully fantastic frosting
One cup (two sticks) unsalted butter, softened
Three cups powdered sugar
Half a cup unsweetened cocoa powder
Half a cup milk
One teaspoon alcohol-free vanilla extract
Red food coloring (gel or liquid)
Instructions
: Creating the Cupcake Corpses
Preheat your oven to 350°F (175°C) and line a 12-cup muffin tin with cupcake liners. This is crucial – trust me, you don’t want burnt cupcakes or a sticky mess. In a medium bowl, whisk together the flour, baking soda, baking powder, and salt. This is your dry ingredient army, ready to conquer.
In a large bowl, cream together the softened butter and sugar until light and fluffy. This is where your muscles come in handy; get those arms working! Beat in the eggs one at a time, then stir in the alcohol-free vanilla extract. Gradually add the dry ingredients to the wet ingredients, alternating with the buttermilk, beginning and ending with the dry ingredients. Mix until just combined – overmixing is a villain in cupcake land.
Fill the cupcake liners about two-thirds full. Bake for 18-20 minutes, or until a toothpick inserted into the center comes out clean. Let the cupcakes cool completely in the muffin tin before frosting.
Instructions
: Conjuring the Crimson Filling
In a small saucepan, combine the raspberry jam and water. Heat over low heat, stirring occasionally, until the jam is smooth and melted. Let this cool completely. This “blood” is the key to our vampire bite effect!
Instructions
: Mastering the Monstrous Frosting
In a large bowl, beat the softened butter until light and fluffy. Gradually add the powdered sugar and cocoa powder, alternating with the milk, and beat until smooth and creamy. Stir in the alcohol-free vanilla extract and add red food coloring until you reach your desired shade of blood-red.
Instructions
: Assembling the Army of the Undead (Cupcakes)
Once the cupcakes are completely cool, use a small knife or melon baller to carefully cut a small “bite” out of the top of each cupcake. Fill the hole with the raspberry jam filling. Frost the cupcakes and, if desired, add additional details like mini chocolate chips to simulate teeth.
Serving Suggestions
: Unleash the Spooky Feast
Serve these Autumn celebration Vampire Bite Cupcakes at your Autumn celebration party, or any spooky gathering. Their creepy-cute design and delicious taste will be a monstrous hit! They also make a fantastic addition to a themed Autumn celebration dessert spread.
Variations
: Unleash Your Inner Monster Chef
Feel free to get creative with your Autumn celebration Vampire Bite Cupcakes. Try different frostings, fillings, or decorations to personalize your treats! You can add a touch of orange food coloring to your frosting to make it more of a pumpkin spice variety, or try using a different kind of jam for a unique flavor twist. The possibilities are as endless as your imagination! Get creative, have fun, and most importantly, don’t be afraid to experiment!
Conclusion for Autumn celebration Vampire Bite Cupcakes
These Autumn celebration Vampire Bite Cupcakes are a fun and delicious treat that is perfect for your Autumn celebration party. The recipe is relatively easy to follow and uses readily available ingredients. Remember to make the cupcakes ahead of time and frost them just before serving for optimal results. The spooky fangs are a surefire hit with kids and adults alike! So, gather your ingredients, get creative, and prepare for a hauntingly delicious Autumn celebration celebration! Happy baking, and may your cupcakes be delightfully creepy!
Print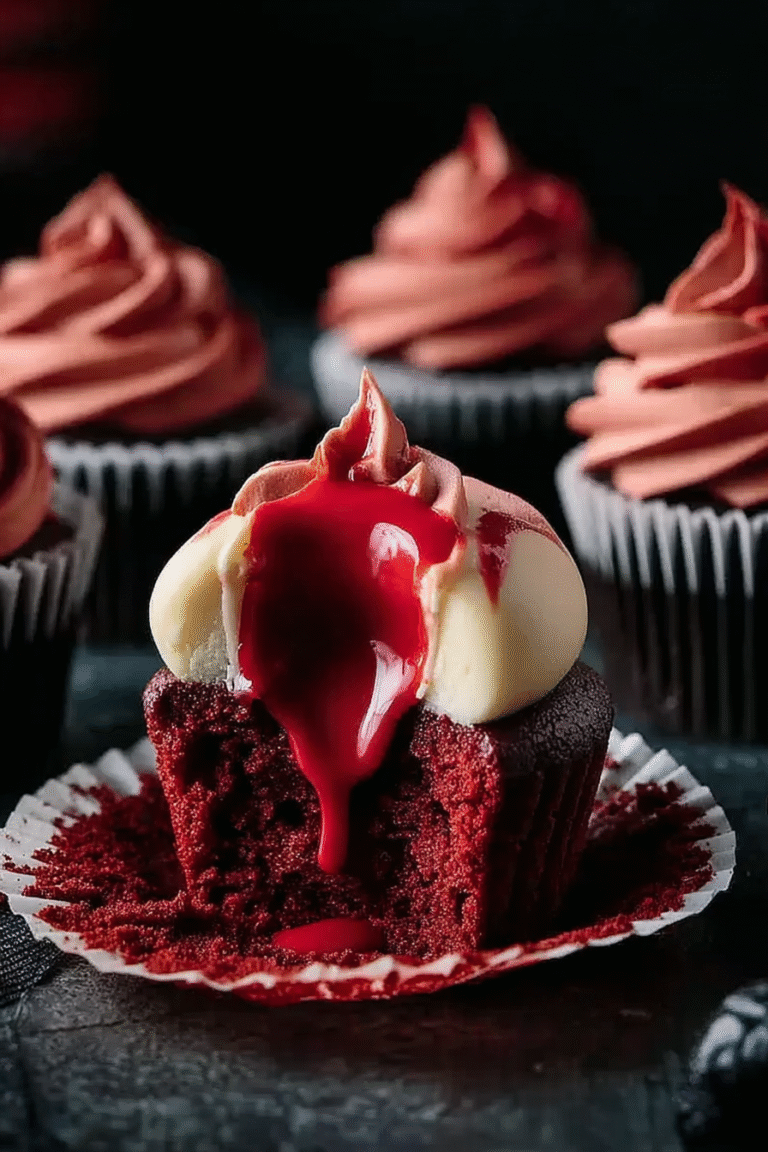
Halloween Vampire Bite Cupcakes
Delicious halloween vampire bite cupcakes recipe with detailed instructions and nutritional information.
- Total Time: 35 minutes
- Yield: 4 servings 1x
Ingredients
- 1 box (15.25 ounces) chocolate cake mix
- 1 ¼ cups water
- ⅓ cup vegetable oil
- 3 large eggs
- 1 container (16 ounces) chocolate frosting
- 1 cup strawberry jam
- 1 package (1 ounce) white chocolate candy melts
- Mini chocolate chips
Instructions
- Step 1: Preheat oven to 350°F (175°C). Line a muffin tin with cupcake liners. Prepare the chocolate cake mix according to package directions using the water, oil, and eggs.
- Step 2: Fill each cupcake liner about ¾ full with batter. Bake for 18-20 minutes, or until a toothpick inserted into the center comes out clean. Let cupcakes cool completely in the muffin tin before frosting.
- Step 3: Once cooled, frost each cupcake with a generous amount of chocolate frosting.
- Step 4: Using a small spoon or piping bag, create a small "bite" mark in the top of each cupcake by removing a small amount of frosting. Fill the indentation with a small dollop of strawberry jam to simulate blood.
- Step 5: Melt the white chocolate candy melts according to package directions. Transfer the melted chocolate to a piping bag fitted with a small round tip, or use a zip-top bag with a corner snipped off. Pipe two small white "fangs" onto the front of each cupcake above the "bite" mark. Add a few mini chocolate chips around the "bite" for extra detail.
- Step 6: Let the white chocolate set completely before serving.
Notes
- Store leftover Vampire Bite Cupcakes in an airtight container at room temperature for up to 3 days, or freeze them for longer storage.
- For a warm, gooey center, microwave individual cupcakes for 10-15 seconds before serving.
- Serve these spooky treats at your Halloween party alongside other frighteningly fun desserts for a truly memorable spread.
- To prevent the strawberry jam from bleeding into the frosting, let the cupcakes cool completely before adding the "blood" and ensure the jam is slightly chilled.
- Prep Time: 15 minutes
- Cook Time: 20 minutes
- Method: Stovetop
- Cuisine: American
FAQs
How long do these Autumn celebration Vampire Bite Cupcakes last?
These spooky delights are best enjoyed fresh, within a day or two. Their deliciousness is truly maximized when consumed immediately. However, you can store them in an airtight container in the refrigerator for up to three days. Just be sure to let them come to room temperature for optimal taste before indulging. Don’t worry, they won’t turn into real vampires in the fridge, promise!
Can I make the Autumn celebration Vampire Bite Cupcakes ahead of time?
Absolutely! You can bake the cupcakes a day or two in advance. In fact, letting the frosting set overnight can make it easier to pipe those perfect vampire fangs. Store the unfrosted cupcakes in an airtight container at room temperature. Frost them just before serving for optimal freshness and a less soggy cupcake experience. Planning ahead means more time for spooky fun on Autumn celebration!
What can I substitute for the agar-agar in the Autumn celebration Vampire Bite Cupcakes recipe?
While agar-agar gives a fantastically firm set for the “blood,” you can experiment with other plant-based gelling agents like pectin or carrageenan. However, be aware that the setting time and consistency might differ slightly. Always follow the package instructions for the substitute you choose. Don’t be afraid to get creative; culinary experimentation can be a lot of fun and lead to tasty surprises! Remember to always check that your substitute is suitable for use in baking.
Are these Autumn celebration Vampire Bite Cupcakes suitable for people with dietary restrictions?
These Autumn celebration Vampire Bite Cupcakes are naturally free from chicken, turkey ham, beef bacon, and alcohol. They also avoid animal agar-agar, using agar-agar instead. However, always check ingredient labels to ensure they meet specific dietary requirements and preferences. While this recipe avoids common allergens, individual needs and sensitivities vary; please read the full recipe carefully. If you have specific concerns, consult a nutritionist or allergy specialist.


Leave a Comment