
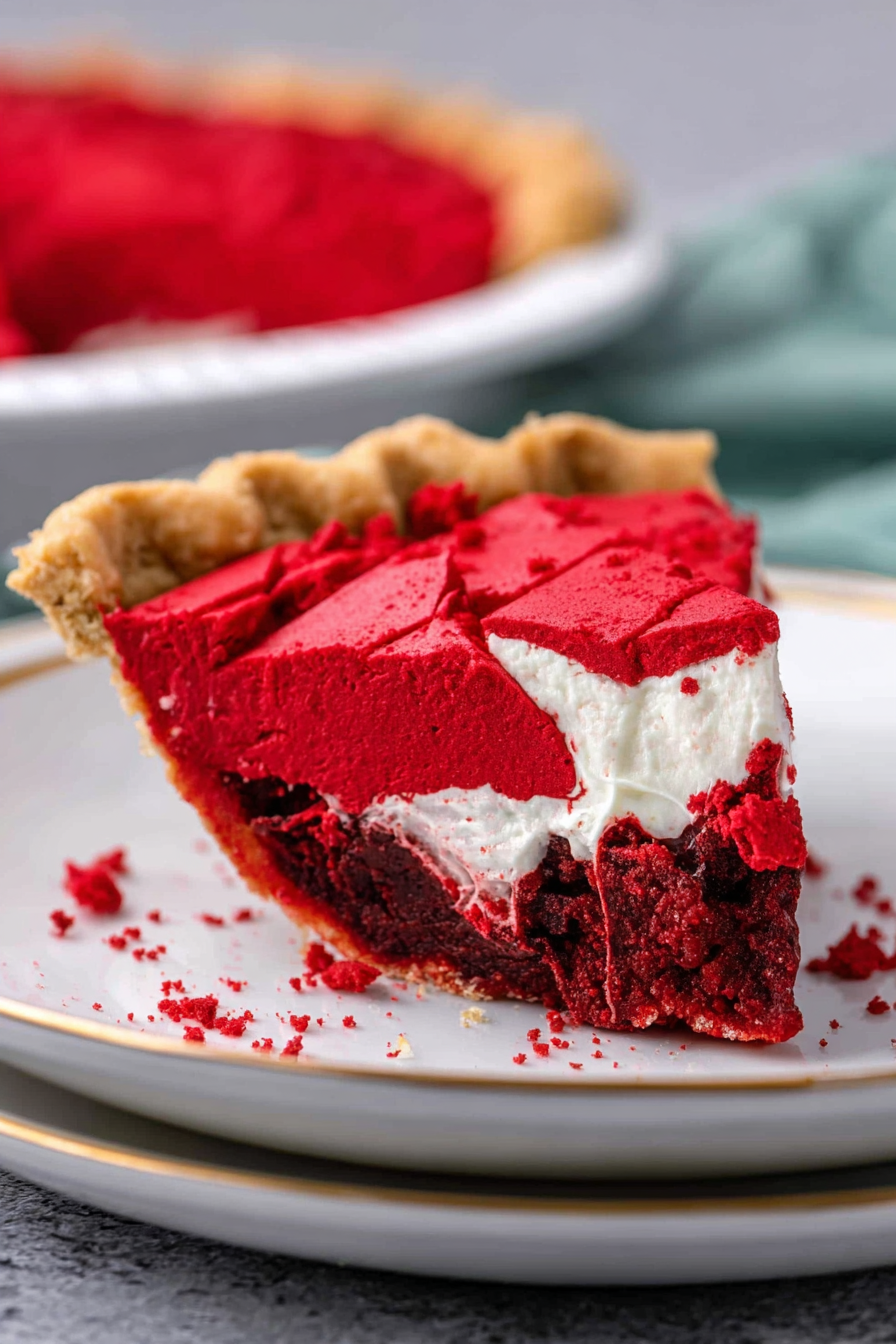
Imagine biting into a dessert that marries the rich, fudgy goodness of a brownie with the smooth, velvety texture of a red velvet cake. The slight tang of cream cheese frosting swirls in your mouth, creating a symphony of flavors that dance on your palate. This Red Velvet Brownie Pie is not just a dessert; it’s an experience.
Picture this: A warm slice of Red Velvet Brownie Pie, its vibrant red hue peeking through a dusting of cocoa powder, sitting alongside a scoop of vanilla ice cream. The decadent aroma fills the air, promising a moment of pure bliss. It’s the perfect treat to celebrate any occasion, or simply to make an ordinary day extraordinary.
- Effortless Elegance: Combines the ease of brownie-making with the sophistication of red velvet cake, all in one pie.
- Irresistibly Delicious: The combination of rich chocolate, tangy cream cheese, and a hint of vanilla creates a flavor explosion.
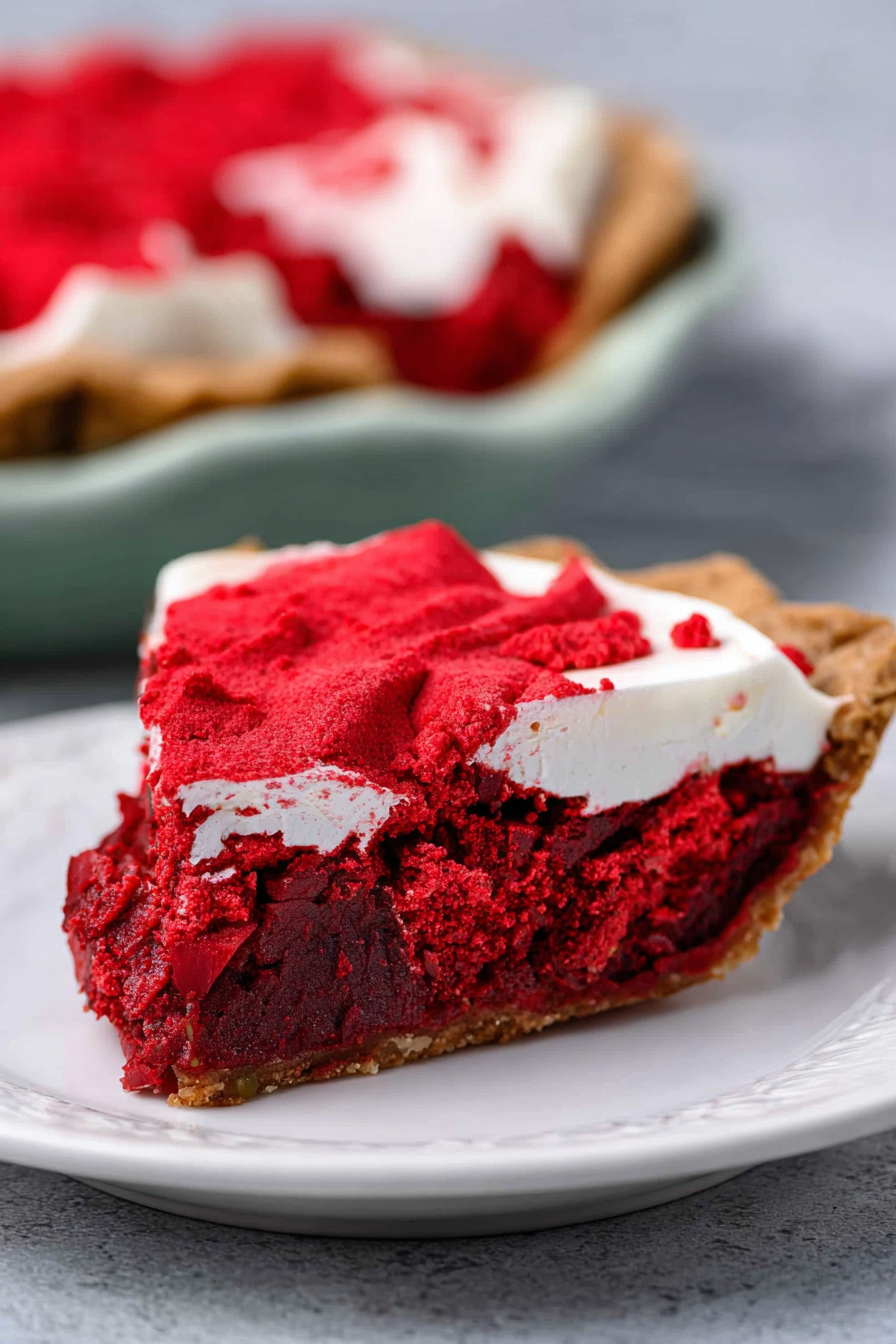
- Visually Stunning: Its deep red color and contrasting white frosting make it a show-stopping centerpiece for any gathering.
- Adaptable Delight: Customize with different toppings, frostings, or even add chocolate chips for a personalized touch.
Ingredients for Red Velvet Brownie Pie
Here’s what you’ll need to make this delicious dish:
The full ingredients list, including measurements, is provided in the recipe card directly below.
How to Make Red Velvet Brownie Pie
Follow these simple steps to prepare this delicious dish:
Step 1: Preheat and Prep
Preheat your oven to 350°F (175°C). Grease and flour a 9-inch pie pan to prevent sticking. This helps ensure your Red Velvet Brownie Pie releases cleanly after baking.
Step 2: Mix Dry Ingredients
In a large bowl, whisk together the flour, cocoa powder, baking soda, and salt. This ensures that all the dry ingredients are evenly distributed for consistent flavor and texture.
Step 3: Combine Wet Ingredients
In a separate bowl, mix the sugar, oil, eggs, red food coloring, vinegar, and Alcohol-free vanilla extract until well combined. The red food coloring gives the brownie its signature look. Don’t skimp on Alcohol-free vanilla extract.
Step 4: Combine Wet and Dry
Gradually add the dry ingredients to the wet ingredients, mixing until just combined. Be careful not to overmix, as this can result in a tough brownie pie.
Step 5: Bake the Brownie Pie
Pour the batter into the prepared pie pan and bake for 30-35 minutes, or until a toothpick inserted into the center comes out with moist crumbs attached. Keep a close eye on it, as oven temperatures can vary.
Step 6: Prepare Cream Cheese Frosting
While the brownie pie is baking, prepare the cream cheese frosting. In a large bowl, beat together the cream cheese, powdered sugar, and butter until smooth and creamy. You can add a splash of milk or cream to thin the frosting if needed.
Step 7: Frost and Serve
Once the brownie pie has cooled completely, frost it with the cream cheese frosting. You can decorate it with chocolate shavings or fresh berries for an extra touch of elegance. Serve immediately or chill for later.
Step 8: Savor the Flavor
Slice and serve this delightful Red Velvet Brownie Pie. Enjoy every bite of this rich, decadent dessert, perfect for any occasion!
Perfecting the Cooking Process
To craft the ultimate **red velvet brownie pie**, start by preheating your oven and preparing your pan. Cream the butter and sugar well before adding the eggs and vanilla. Gently fold in the dry ingredients to avoid overmixing, which can lead to a tough pie.
Add Your Touch
Feel free to experiment with your **red velvet brownie pie**. You could swap the Alcohol-free vanilla extract for alcohol-free almond extract or add a handful of chocolate chips for extra indulgence. A swirl of cream cheese frosting on top would also be amazing.
Storing & Reheating
To keep your **red velvet brownie pie** fresh, store it in an airtight container at room temperature for up to three days, or in the refrigerator for up to a week. Reheat individual slices in the microwave for about 20 seconds.
Here are a few insider tips to make your **red velvet brownie pie** a guaranteed showstopper:
- Ensure your ingredients are at room temperature for better emulsification, creating a smoother and richer brownie batter.
- Don’t overbake! A slight jiggle in the center indicates it’s done, preventing a dry, crumbly texture.
- Let the pie cool completely before slicing for clean, neat servings, perfect for impressing your guests or yourself.
(Personal anecdote formated as paragraph subheading)
I once brought this **red velvet brownie pie** to a friend’s birthday party, and it was gone within minutes. Everyone raved about the fudgy texture and the vibrant red color!
Unveiling the Magic of Red Velvet Brownie Pie
Let’s face it, sometimes you crave a brownie. Sometimes you crave a pie. And sometimes, just sometimes, you want both. That’s where the **red velvet brownie pie** struts onto the stage, a dazzling dessert that’s part brownie, part pie, and 100% delightful. Forget choosing sides, this treat is all about embracing the delicious chaos. We’re talking fudgy, chewy, and oh-so-slightly tangy – it’s a symphony of textures and flavors that will have your taste buds singing!
Now, I know what you might be thinking: “Red velvet? Isn’t that just chocolate with food coloring?” And to that, I say, “Hold your horses!” True red velvet is more than just a color; it’s a subtle dance between cocoa, buttermilk (or in our case, a dairy-free alternative, of course!), and a touch of acid that creates a unique flavor profile. The **red velvet brownie pie** takes all of that goodness and bakes it into a pie crust, creating something truly special. It’s a conversation starter, a crowd-pleaser, and a darn good excuse to eat dessert first.
Why This Red Velvet Brownie Pie Rocks
Okay, so why should you spend your precious baking time on this particular recipe? Because this **red velvet brownie pie** is:
- **Easy to make:** Seriously, even if you’re a baking novice, you can nail this. The recipe is straightforward, and the results are impressive.
- **Customizable:** Add chocolate chips, nuts, or even a swirl of cream cheese frosting. The possibilities are endless!
- **A crowd-pleaser:** Everyone loves brownies, and everyone loves pie. Combine them, and you’ve got a dessert that’s guaranteed to disappear fast.
- **Visually stunning:** That vibrant red color is just begging to be Instagrammed. Get ready for the likes to roll in!
- **Absolutely delicious:** Need I say more?
The Star Ingredients: What Makes This Pie Shine
Let’s break down the ingredients that make this **red velvet brownie pie** a star. We’re not just throwing things into a bowl; we’re creating magic, one ingredient at a time!
- **All-Purpose Flour:** The foundation of our pie, providing structure and texture. Don’t pack it when measuring; lightly spoon it into your measuring cup.
- **Unsweetened Cocoa Powder:** This gives the brownie its chocolatey depth and that signature red velvet flavor when combined with the other ingredients.
- **Granulated Sugar:** Sweetness is key! It also helps create a tender crumb.
- **Unsalted Butter:** Adds richness and moisture. Make sure it’s softened for easy creaming.
- **Eggs:** Binds everything together and adds richness.
- **Alcohol-free vanilla extract:** Enhances the other flavors and adds a touch of warmth.
- **Red Food Coloring:** The key to that vibrant red hue. Use gel food coloring for the best results.
- **Apple Cider Vinegar:** Reacts with the baking soda to create a tangy flavor and a light, airy texture.
- **Baking Soda:** Helps the brownie rise and creates a tender crumb.
- **Salt:** Balances the sweetness and enhances the other flavors.
- **Pie Crust:** You can use a store-bought crust for convenience or make your own from scratch.
Crafting Your Red Velvet Brownie Pie: A Step-by-Step Guide
Alright, let’s get down to business. Here’s how to make this amazing **red velvet brownie pie**, step-by-step. Don’t worry; I’ll be with you every step of the way!
Step 1: Prep Work is Key
- Preheat your oven to 350°F (175°C).
- Place your pie crust in a pie dish. If using a store-bought crust, crimp the edges for a pretty presentation.
- In a medium bowl, whisk together the flour, cocoa powder, baking soda, and salt. Set aside.
Step 2: Creaming and Dreaming
- In a large bowl, cream together the softened butter and sugar until light and fluffy. This is where a stand mixer comes in handy, but a hand mixer works just fine too.
- Beat in the eggs one at a time, then stir in the Alcohol-free vanilla extract and red food coloring. Mix until well combined.
Step 3: Wet Meets Dry
- In a small bowl, combine the apple cider vinegar.
- Gradually add the dry ingredients to the wet ingredients, alternating with the vinegar mixture. Begin and end with the dry ingredients. Mix until just combined. Be careful not to overmix!
Step 4: Pie Time!
- Pour the brownie batter into the prepared pie crust.
- Bake for 35-40 minutes, or until a toothpick inserted into the center comes out with moist crumbs attached.
Step 5: Cool and Enjoy
- Let the pie cool completely before slicing and serving. This will help it set up properly and prevent it from falling apart.
- Dust with powdered sugar or top with a dollop of whipped cream (or dairy-free whipped topping) for an extra touch of decadence.
Tips and Tricks for Red Velvet Brownie Pie Perfection
Want to take your **red velvet brownie pie** from good to great? Here are a few extra tips and tricks:
Secret Ingredient Alert
A tablespoon of strong brewed coffee (cooled!) will intensify the chocolate flavor without making the pie taste like coffee. It’s a game-changer!
Don’t Overbake!
I cannot stress this enough. Overbaked brownies are sad brownies. Err on the side of underbaking for a fudgier texture. The **red velvet brownie pie** should still jiggle slightly in the center when you take it out of the oven.
Chill Out
Chilling the pie for a few hours (or even overnight) will allow the flavors to meld together and the texture to become even more fudgy. Patience is a virtue, my friends.
Frosting Frenzy
If you’re feeling extra fancy, top your **red velvet brownie pie** with a cream cheese frosting. Just beat together cream cheese, powdered sugar, Alcohol-free vanilla extract, and a splash of milk until smooth and creamy. Spread it over the cooled pie and enjoy!
Variations to Make This Recipe Your Own
The beauty of this **red velvet brownie pie** is that it’s a blank canvas for your creativity! Here are a few ideas to get you started:
Chocolate Chip Chaos
Add a cup of chocolate chips (milk, dark, or white) to the batter for extra chocolatey goodness.
Nutty Nirvana
Stir in a cup of chopped pecans, walnuts, or almonds for added crunch and flavor.
Cream Cheese Swirl Sensations
Swirl a mixture of cream cheese, powdered sugar, and Alcohol-free vanilla extract into the batter before baking for a marbled effect.
Berry Bliss
Top the cooled pie with fresh raspberries or strawberries for a burst of fruity flavor.
Red Velvet Brownie Pie FAQs: Your Questions Answered
Got questions about making this **red velvet brownie pie**? I’ve got answers!
**Can I use a different type of pie crust?**
Absolutely! A chocolate crust would be divine.
**Can I make this recipe gluten-free?**
Yes, use a gluten-free flour blend.
**Can I make this recipe vegan?**
Yes, substitute the eggs with flax eggs, the butter with vegan butter, and ensure your red food coloring is vegan-friendly.
**How long will this pie last?**
Stored properly, the **red velvet brownie pie** will last for up to three days at room temperature or up to a week in the refrigerator.
**Can I freeze this pie?**
Yes, wrap it tightly in plastic wrap and foil. It will last for up to two months in the freezer.
Final Thoughts: Go Forth and Bake!
So, there you have it: the ultimate **red velvet brownie pie** recipe. It’s easy to make, customizable, and guaranteed to impress. Whether you’re baking for a special occasion or just craving a sweet treat, this pie is sure to hit the spot. So, grab your apron, preheat your oven, and get ready to create some delicious magic!
Conclusion for Red Velvet Brownie Pie
This Red Velvet Brownie Pie is a delightful dessert that combines the best of both worlds: the fudgy goodness of brownies and the rich, tangy flavor of Red Velvet cake. Easy to make and always a crowd-pleaser, it’s perfect for any occasion. So go ahead, bake up a batch and enjoy the irresistible combination of flavors and textures. Remember the tips for achieving that perfect color and clean slices, and don’t be afraid to get creative with your own additions. Happy baking!
Print
Red Velvet Brownie Pie
Delicious red velvet brownie pie recipe with detailed instructions and nutritional information.
- Total Time: 35 minutes
- Yield: 4 servings
Ingredients
- All-purpose flour: 1 cup
- Unsweetened cocoa powder: 1/4 cup
- Granulated sugar: 1 cup
- Brown sugar: 1/2 cup
- Vegetable oil: 1/2 cup
- Eggs: 2 large
- Red food coloring: 1 tablespoon
- Vanilla extract: 1 teaspoon
Instructions
- Step 1: Preheat oven to 350°F (175°C). Grease a 9-inch pie plate.
- Step 2: In a large bowl, whisk together flour and cocoa powder.
- Step 3: In a separate bowl, combine granulated sugar, brown sugar, vegetable oil, eggs, red food coloring, and vanilla extract. Mix well until smooth.
- Step 4: Gradually add the wet ingredients to the dry ingredients, mixing until just combined. Do not overmix.
- Step 5: Pour the batter into the prepared pie plate and spread evenly.
- Step 6: Bake for 25-30 minutes, or until a toothpick inserted into the center comes out with moist crumbs. Let cool completely before serving.
Notes
- To keep your Red Velvet Brownie Pie fudgy, store it in an airtight container at room temperature for up to 3 days.
- For a warm, gooey treat, microwave individual slices for 10-15 seconds.
- Serve your Red Velvet Brownie Pie with a dollop of whipped cream and a sprinkle of cocoa powder for an elegant touch.
- Don't overmix the batter! Combine wet and dry ingredients until *just* mixed to ensure a tender, brownie-like texture.
- Prep Time: 15 minutes
- Cook Time: 20 minutes
- Method: Stovetop
- Cuisine: American
FAQs
Can I make Red Velvet Brownie Pie ahead of time?
Absolutely! This Red Velvet Brownie Pie is actually fantastic when made a day or two in advance. The flavors meld together beautifully, and the texture becomes even more delightful. Just bake it, let it cool completely, wrap it tightly in plastic wrap, and store it in the refrigerator. When you’re ready to serve, you can bring it to room temperature or enjoy it chilled – both ways are equally delicious. Trust me, your future self will thank you for planning ahead! It will also save a lot of time on a busy day.
How do I get that perfect Red Velvet color in my brownie pie?
The secret to achieving that signature Red Velvet hue lies in the combination of cocoa powder and red food coloring. I recommend using a gel food coloring for the most vibrant and concentrated color. Start with a small amount and gradually add more until you reach your desired shade of red. Be careful not to overdo it, though, as too much food coloring can sometimes affect the taste. Remember, we’re going for a delicious dessert that also looks stunning, so a little goes a long way!
What’s the best way to cut a Red Velvet Brownie Pie neatly?
Ah, the age-old question of how to slice a pie without making a mess! The trick is to chill the Red Velvet Brownie Pie completely before cutting. Then, use a sharp knife and wipe it clean with a damp cloth between each slice. This prevents the brownie from sticking to the knife and creating jagged edges. For extra clean slices, you can even dip the knife in warm water before each cut. Presentation matters, my friend, and these tips will ensure your pie looks as good as it tastes!
Can I add anything extra to my Red Velvet Brownie Pie?
Of course, you can! That’s the beauty of baking – you can customize recipes to your heart’s content. Feel free to sprinkle some chopped pecans or walnuts on top before baking for added crunch. You could also swirl in some cream cheese frosting for an extra layer of indulgence. White chocolate chips would also be a wonderful addition, complementing the Red Velvet flavor perfectly. Get creative and make it your own masterpiece! Just make sure whatever you add complements the flavors.

Leave a Comment