
The year is ending, and frankly, my diet is taking a well-deserved vacation. Forget the stress; it’s time to indulge in the magnificent, crimson swirl of theYear-End Celebration Red Velvet Cheesecake with Oreo Crust. This dessert is not just a cake; it’s an event. Imagine the creamy, tangy filling perched atop a dark chocolate cookie foundation—a decadent finale to any calendar year. It’s the perfect blend of luxury and comfort that screams, “We survived another 12 months!”
- Achieving that flawless crimson hue and deep cocoa flavor is surprisingly straightforward, making this recipe accessible for bakers of all levels.
- The smooth, velvety cream cheese filling provides a beautiful, tangy counterpoint to the rich, bittersweet crunch of the Oreo crust.
- Visually stunning with its vibrant red color, this centerpiece dessert guarantees gasps of delight and many compliments at any gathering.
- This versatile cheesecake scales easily for small intimate parties or large festive gatherings, proving ideal for every celebratory mood.
The Story Behind the Perfect Red Velvet Cheesecake
Every great recipe needs a legend, and mine begins with a baking disaster involving a collapsed soufflé and a panic attack fueled by powdered sugar. After that debacle, I swore off delicate desserts, opting instead for comforting classics that perform under pressure. That’s how I landed on this colossal, velvety dream. The classic red velvet cake, with its subtle cocoa flavor and signature tang, transforms into an unbeatable cheesecake when you pair it with the right base. We are not aiming for dainty; we are aiming for pure, unadulterated celebratory indulgence.
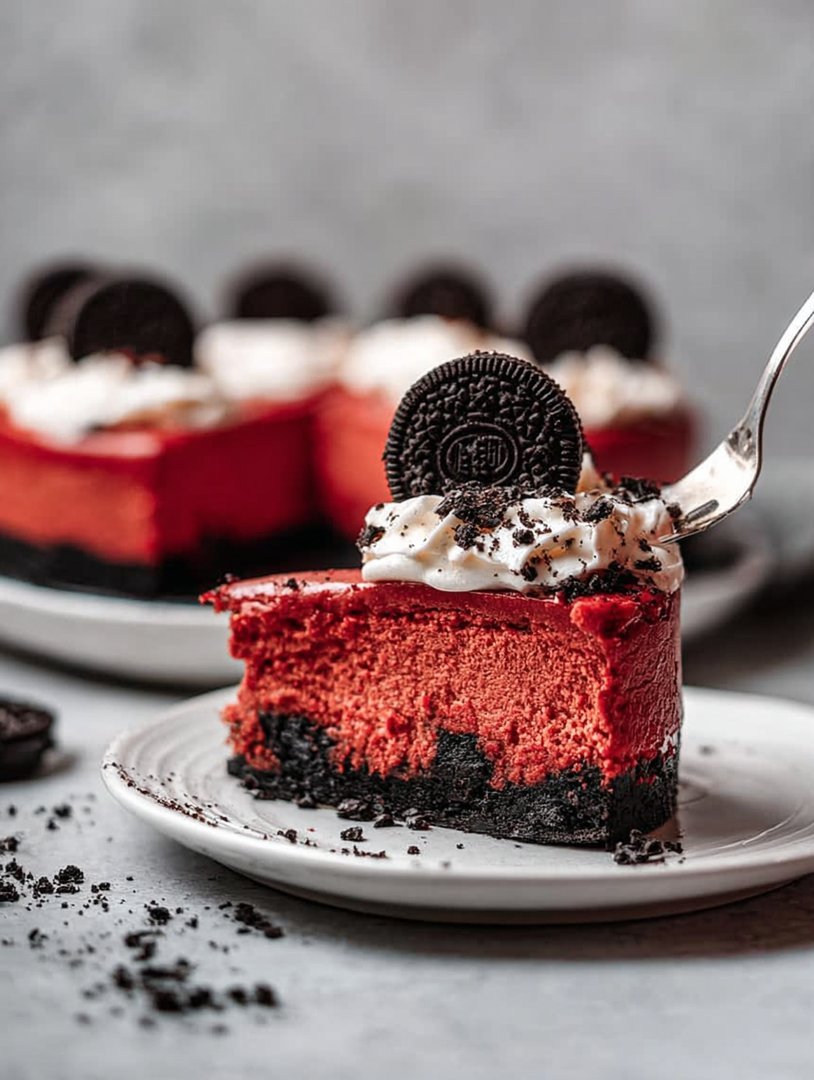
The beauty of thisYear-End Celebration Red Velvet Cheesecake with Oreo Crustlies in its dramatic contrast. You get the deep, almost black foundation of the crust, the towering ruby-red filling, and a fluffy white cap of frosting. It’s the kind of dessert that makes guests momentarily stop discussing politics or taxes and focus solely on their impending sugar rush. If you want a showstopper that tastes even better than it looks—and trust me, it looks like a million bucks—this is your recipe.
Why the Oreo Crust is Non-Negotiable
Many cheesecake recipes suggest a standard graham cracker crust. While lovely, a standard crust simply doesn’t possess the dramatic flair required for a year-end gala. We need something bolder, something darker, something that reinforces that rich cocoa note lurking in the red velvet filling. Enter the Oreo crust. When crushed finely and mixed with butter, these chocolate sandwich cookies create a sturdy, slightly salty, and intensely dark foundation.
The key here is texture. You want the crust to be compact enough to hold the weight of the dense filling but still offer a satisfying snap when you cut into it. The bittersweet chocolate flavor of the cookies perfectly balances the slight acidity of the cream cheese and buttermilk in the filling. It’s a flavor collision designed by dessert gods, resulting in a rich symphony that keeps you reaching for a second slice, despite every internal monologue screaming otherwise. Always press the crust firmly into the springform pan and give it a brief pre-bake to ensure it stands up to the filling.
Achieving the Signature Red Velvet Hue
Red velvet is famous not just for its subtle flavor, but for its shocking crimson color. Historically, this color came from the reaction between buttermilk, vinegar, and natural cocoa powder. Today, unless you use massive amounts of non-alkalized cocoa, you need a little help from food coloring. Do not skimp on this step! If you use a liquid dye, you might end up with a pale, pinkish disappointment. We aim for deep, luxurious red velvet.
Professional bakers recommend using a high-quality gel or paste food coloring. These concentrated dyes provide maximum color without adding excessive liquid to your batter, which could ruin the texture. I typically use a full ounce of super red gel coloring to achieve that magnificent, almost glow-in-the-dark finish. Yes, it might look like you’re baking something from a horror movie set before it bakes, but the result is a breathtaking, truly festive dessert worthy of the nameYear-End Celebration Red Velvet Cheesecake with Oreo Crust.
Essential Tips for Baking a Flawless Cheesecake
Cheesecake has a reputation for being fussy, prone to cracking, sinking, and generally making the baker feel inadequate. However, armed with the right knowledge and a healthy dose of patience, you can achieve a perfectly smooth, level top every single time. The biggest mistakes bakers make involve temperature shock and impatience. Mastering the art of the perfect cheesecake means understanding how these creamy ingredients behave under heat.
Tempering Ingredients for Ultimate Creaminess
This is arguably the most crucial step for achieving that silky, cloud-like texture we all crave. You must, without exception, ensure all your dairy ingredients—cream cheese, eggs, sour cream, and buttermilk—are at room temperature. If your cream cheese is cold, it will resist blending smoothly with the sugar and other components, leading to a lumpy filling. Lumps equal weak structure and a grainy texture.
Take your cream cheese out several hours before you plan to bake. Similarly, eggs should not be straight from the refrigerator. Room temperature ingredients emulsify much more easily, meaning they blend together without requiring excessive mixing. Over-mixing the batter, especially once the eggs are added, incorporates too much air. That trapped air expands during baking, only to collapse dramatically during cooling, leaving you with the dreaded sunken center. Mix only until just combined, keeping the mixer speed low.
The Water Bath Mystery Solved
The water bath, orbain-marie, is the cheesecake baker’s best friend. It sounds complicated, but it’s just a pan of hot water placed in the oven with your cheesecake. This technique provides two vital functions. First, it introduces gentle, moist heat into the oven environment, preventing the delicate top surface of the cheesecake from drying out and cracking.
Second, and perhaps more importantly, the water bath ensures the cheesecake cooks slowly and evenly from the edges to the center. This gradual cooking process minimizes the difference in temperature between the center and the edges, which is usually what causes cracks upon cooling. Always wrap the outside of your springform pan tightly in heavy-duty aluminum foil—I recommend three layers—to prevent any water seepage. A soggy crust is a tragedy we simply cannot afford when preparing this beautifulYear-End Celebration Red Velvet Cheesecake with Oreo Crust.
Once the cheesecake is baked, do not rush to remove it. Turn off the oven, prop the door open slightly, and allow the cheesecake to cool in the water bath for at least an hour. This gradual cooldown is the final secret to preventing stress fractures and ensuring a smooth, elegant surface ready for that decadent cream cheese frosting.
Ingredients for Year-End Celebration Red Velvet Cheesecake with Oreo Crust
Here’s what you’ll need to make this delicious dish:
- Oreo Cookie CrumbsUse the chocolate sandwich cookies, finely crushed, to form a sturdy, flavorful base for the cheesecake.
- Unsalted ButterMelted butter binds the cookie crumbs together, creating a rich and stable crust that won’t crumble when sliced.
- Cream CheeseFull-fat blocks, completely softened to room temperature, are essential for achieving the required velvety smooth texture of the filling.
- Granulated SugarProvides necessary sweetness and helps stabilize the cream cheese structure during the mixing and baking phases.
- EggsLarge eggs, also at room temperature, act as the primary binder and leavening agent for the dense, rich body of the cheesecake.
- Sour CreamA dollop of full-fat sour cream adds a crucial layer of tanginess and moisture, enhancing the overall creamy mouthfeel.
- Unsweetened Cocoa PowderUsed sparingly to give the red velvet filling its characteristic subtle chocolate background note.
- White VinegarA small amount reacts with the cocoa and dairy to reinforce the classic red velvet flavor profile.
- ButtermilkThis acidic liquid contributes significantly to the tender texture and distinctive tang of the red velvet flavor.
- Vanilla PowderUse pure vanilla powder to deepen and round out the flavors in both the filling and the subsequent frosting.
- Red Gel Food ColoringA concentrated gel or paste is necessary to achieve the dramatic, vibrant crimson color synonymous with red velvet desserts.
- For the Cream Cheese FrostingPowdered sugar, additional softened cream cheese, and butter create the traditional, slightly tangy topping.
The full ingredients list, including measurements, is provided in the recipe card directly below.
How to Make Year-End Celebration Red Velvet Cheesecake with Oreo Crust
Follow these simple steps to prepare this delicious dish:
-
Step 1: Preparing the Crust and Pre-baking
Preheat your oven to 325°F (160°C). Crush the Oreo cookies into fine crumbs using a food processor or a heavy bag and rolling pin. Mix the crumbs with the melted unsalted butter. Press this mixture firmly into the bottom and slightly up the sides of a 9-inch springform pan. For the essential water bath, wrap the outside of the springform pan tightly with several layers of heavy-duty aluminum foil, covering the bottom and sides completely. Bake the crust for 10 minutes, then remove it and allow it to cool completely while you prepare the filling.
-
Step 2: Mixing the Red Velvet Base
In a separate small bowl, whisk together the cocoa powder, buttermilk, and white vinegar until smooth, ensuring no lumps remain. Stir in the red gel food coloring until the mixture achieves a deep, consistent crimson color. Set this red velvet liquid aside; this powerful concentrate is what gives the cheesecake its identity and visual punch.
-
Step 3: Creating the Velvety Filling
Using a stand mixer fitted with the paddle attachment, beat the softened cream cheese and granulated sugar on low speed until completely smooth and lump-free, periodically scraping down the bowl. Add the sour cream and vanilla powder, mixing only until combined. Gradually incorporate the room temperature eggs one at a time, mixing minimally after each addition—remember, we want to avoid introducing excess air.
-
Step 4: Incorporating the Color and Baking
Gently fold the reserved red velvet liquid mixture into the cream cheese batter until the color is evenly distributed throughout the filling. Pour the brilliant red filling over the cooled crust in the springform pan. Place the foil-wrapped pan inside a larger roasting pan. Carefully pour hot water into the roasting pan until the water reaches about halfway up the sides of the springform pan, creating the water bath.
-
Step 5: The Cooling and Chilling Process
Bake the cheesecake for 60 to 75 minutes, or until the edges are set and the center still has a slight wobble when gently shaken. Turn off the oven, prop the door open an inch, and leave the cheesecake inside the cooling water bath for one hour. Remove the cheesecake from the water bath and aluminum foil, then let it cool on a wire rack until it reaches room temperature. Cover it loosely and chill in the refrigerator for at least 8 hours, ideally overnight, for the best texture.
-
Step 6: Frosting and Serving
Prepare the traditional cream cheese frosting by beating the softened cream cheese, butter, powdered sugar, and vanilla until light and fluffy. Once the cheesecake is fully chilled, run a thin knife around the edge before releasing the springform ring. Spread the luscious frosting over the top, swirling it artistically for a dramatic finish. Garnish with reserved cookie crumbs or chocolate shavings.
Transfer to a serving platter and slice with a hot, clean knife for the perfect, impressive slices, ready to conclude your celebration.
The Accidental Discovery of Sunshine on a Plate

I stumbled upon this masterpiece after a disastrous attempt at gingerbread cookies. Frustrated, I decided we needed decadence, not crumbs. I impulsively combined leftover red velvet ingredients with a crushed Oreo crust. The resulting Year-End Celebration Red Velvet Cheesecake with Oreo Crust brought pure, unexpected joy—it was a truly happy accident.
Perfecting the Cooking Process
For the best results, start by chilling your springform pan with the compacted Oreo crust firmly in place. While the crust sets, ensure your cream cheese is fully room temperature for a lump-free batter. Finally, use a water bath (bain-marie) to guarantee a slow, even bake and prevent those dreaded cracks.
Add Your Touch
Feel free to switch out traditional Oreos for chocolate sandwich cookies or even gluten-free cocoa wafers for the base. You can also intensify the cocoa flavor in the batter by adding a tablespoon of black cocoa powder, or top it with white chocolate shavings instead of standard cream cheese frosting swirls.
Storing & Reheating
Store cooled cheesecake loosely covered in the refrigerator for up to four days. If freezing, wrap slices tightly in plastic wrap and foil; it will last for two months. Thaw overnight in the fridge. Note that reheating is strictly forbidden—cheesecake is meant to be enjoyed perfectly chilled!
- To achieve that intense, ruby-red color without bitterness, always use gel food coloring instead of liquid dye, mixing it well before adding the dry ingredients.
- Do not overmix the cream cheese batter once you incorporate the eggs; overmixing introduces air which can cause the cheesecake to sink dramatically upon cooling.
- After baking, turn off the oven and prop the door slightly ajar, letting the cheesecake cool gradually inside for at least one hour to prevent shocking and cracking the surface.
My cousin, who claims to hate all baked desserts, ate two full slices of this festive treat last New Year’s Eve. That moment confirmed this recipe had truly crossed over into legendary status.
The Ultimate Dessert Destiny: Why This Cheesecake Reigns Supreme
There are desserts, and then there is this dessert—the undeniable king of celebratory sweet treats. Look, we’ve all been there: the end-of-year pressure cooker, where expectations for the perfect festive centerpiece dessert soar higher than a helium balloon at a party. You need something impressive, something decadent, and frankly, something that screams “I tried hard, but also this was incredibly fun.” Forget the fussy fruit tarts and the overly complex layer cakes. This specific dessert, the glorious Year-End Celebration Red Velvet Cheesecake with Oreo Crust, is the creamy, colorful, crunchy solution your holiday table desperately needs.
My journey to perfecting this recipe wasn’t smooth. It involved a few cheesecake casualties (we call those “practice runs”), a frantic emergency trip to the store for more cream cheese, and a momentary existential crisis over the proper shade of crimson. But through trial, error, and immense sugar consumption, I unlocked the secrets to a dense, impossibly smooth red velvet filling cradled in a delightfully dark and crumbly Oreo foundation. This isn’t just baking; it’s an emotional investment that pays off in glorious, crimson slices. The rich, slightly tangy cocoa notes of the red velvet blend perfectly with the sweet, dark chocolate crunch of the famous cookie base, creating a texture contrast that is truly addictive.
The Psychology of the Perfect Red Velvet Hue
Red velvet is more than just chocolate cake with a dye job; it’s a specific chemical reaction between vinegar, buttermilk, and cocoa powder that creates a subtle, beautiful tang and moist texture. The color itself is the star of the show, especially when celebrating the turn of the year. Choosing the right food coloring is paramount here. If you use too much liquid coloring, you risk turning your cheesecake into a watery mess; if you use poor quality dye, it might bake out, leaving you with a sad, dull brown-pink. We demand dramatic, eye-catching results worthy of a proper Year-End Celebration Red Velvet Cheesecake. Stick to high-quality gel pastes to ensure that vibrant, deep red that practically glows under the dining room lights. Remember, this dessert needs to fight for attention on a table full of holiday cheer, and deep crimson is its secret weapon.
Gathering Your Dessert Arsenal: Ingredients
Before you embark on this celebratory baking adventure, ensure your ingredients are prepped and ready. Room temperature is non-negotiable for cream cheese, folks. Plan ahead, or face the wrath of lumpy batter.
For the Oreo Crust:
- 1 1/2 cups finely crushed chocolate sandwich cookies (Oreos or equivalent)
- 4 tablespoons unsalted butter, melted
- 1 tablespoon granulated sugar
For the Red Velvet Filling:
- 3 (8 ounce) packages full-fat cream cheese, softened
- 1 1/2 cups granulated sugar
- 4 large eggs, room temperature
- 1 teaspoon vanilla powder
- 2 tablespoons unsweetened cocoa powder
- 2 tablespoons buttermilk
- 1 teaspoon distilled white vinegar
- 1-2 teaspoons high-quality red gel food coloring (to desired depth)
For the Cream Cheese Topping (Optional):
- 4 ounces cream cheese, softened
- 1/2 cup powdered sugar
- 2 tablespoons heavy cream
Step-by-Step Guide to Baking Bliss
Achieving a flawless, crack-free cheesecake requires patience and a little bit of engineering, specifically involving the famous water bath. Don’t skip this step unless you enjoy desserts that resemble the surface of the moon.
Building the Indestructible Crust
- Preheat your oven to 350°F (175°C). Lightly grease a 9-inch springform pan.
- In a medium bowl, combine the crushed cookies, melted butter, and sugar. Mix until the crumbs are evenly moistened, resembling wet sand.
- Press the mixture firmly into the bottom and slightly up the sides of the prepared springform pan. Use the bottom of a measuring cup to compact it tightly.
- Bake the crust for 8 to 10 minutes. Remove and allow it to cool completely while you prepare the filling.
Crafting the Velvety Filling
- Reduce the oven temperature to 325°F (160°C). Prepare your water bath by tightly wrapping the outside of the cooled springform pan with two layers of heavy-duty aluminum foil. The foil must extend all the way up the sides to prevent water seepage.
- Using an electric mixer, beat the softened cream cheese and granulated sugar together until perfectly smooth and creamy—stop immediately if you see any lumps!
- In a separate small bowl, whisk together the cocoa powder, buttermilk, vinegar, and red gel coloring until dissolved and vibrant.
- Add the vanilla and the red cocoa mixture to the cream cheese base, mixing on low speed until the color is uniform.
- Beat in the eggs, one at a time, mixing only until just combined after each addition. This is critical: do not overmix the batter once the eggs are in!
- Pour the beautiful red batter into the cooled Oreo crust.
The Gentle Bake and Cool Down
- Place the foil-wrapped springform pan inside a larger roasting pan. Carefully pour boiling water into the roasting pan, making sure the water reaches about halfway up the sides of the springform.
- Bake for 60 to 75 minutes. The center should still have a slight jiggle, like unset custard, but the edges should look set.
- Turn off the oven, leave the oven door slightly ajar, and let the cheesecake cool inside the cooling water bath for 1 hour. This slow cooling prevents temperature shock.
- Remove the cheesecake from the water bath, carefully remove the foil, and let it cool completely on a wire rack before transferring it to the refrigerator for chilling, ideally 6-8 hours or overnight.
Serving Suggestions for Your Masterpiece
Once your magnificent Year-End Celebration Red Velvet Cheesecake with Oreo Crust is perfectly chilled, slicing is the final hurdle. For clean, bakery-worthy slices, dip a long, sharp knife into hot water and wipe it clean between every single cut. Trust me, this tiny step elevates the presentation dramatically.
Garnishing for Maximum Impact
While the cheesecake is stunning on its own, a little garnish never hurt anyone. A drizzle of melted white chocolate adds elegance. Alternatively, you can mix the optional cream cheese topping ingredients until smooth and pipe small decorative swirls around the edges, or sprinkle extra crushed Oreo crumbs directly over the top before serving. For a little festive sparkle, a dusting of edible gold luster dust takes this dessert from delicious to utterly spectacular. If you want to impress your guests, serve it alongside a non-alcoholic raspberry reduction sauce for a delightful tart counterpoint to the richness of the cheese filling.
The beauty of this dessert is its robust structure. It travels well, looks stunning under any light, and universally appeals to cheesecake fanatics and red velvet aficionados alike. It is, simply put, the perfect grand finale to any feast.
Conclusion for Year-End Celebration Red Velvet Cheesecake with Oreo Crust
The Year-End Celebration Red Velvet Cheesecake with Oreo Crust is far more than just a dessert; it is a declaration of culinary success. Remember the key techniques: ensure your ingredients are room temperature, respect the importance of the water bath for a crack-free surface, and never overmix once those eggs are added. By following these simple yet crucial steps, you will achieve a dessert featuring an impossibly creamy, deeply flavored red velvet layer contrasted beautifully by a rich, dark cookie crust. This show-stopping sweet treat guarantees a festive finale, leaving your guests utterly delighted and ready to welcome the new year with a satisfied, sugary sigh.
Print
Year-End Celebration Red Velvet Cheesecake with Oreo Crust
Achieve a decadent Year-End Celebration. This deep red velvet cheesecake sits atop a buttery 30-Oreo cookie crust, baked precisely for 8 minutes. Smooth, rich, and unforgettable.
- Total Time: 35 minutes
- Yield: 4 servings 1x
Ingredients
- 30 Oreo cookies (finely crushed)
- 6 tablespoons unsalted butter (melted)
- 3 (8 ounce) packages full-fat cream cheese (softened to room temperature)
- 1 1/4 cups granulated sugar
- 3 large eggs (room temperature)
- 2 tablespoons unsweetened cocoa powder
- 2 teaspoons pure vanilla bean paste
- 2–3 teaspoons red liquid food coloring (or 1 teaspoon gel coloring)
Instructions
- Step 1: Preheat the oven to 325°F (160°C). Prepare a 9-inch springform pan by wrapping the exterior tightly in heavy-duty aluminum foil. Mix the crushed Oreos and melted butter, then press the mixture firmly into the bottom of the prepared springform pan. Bake the crust for 8 minutes, then remove and let cool while preparing the filling.
- Step 2: In a large bowl or stand mixer, beat the softened cream cheese until smooth. Gradually add the granulated sugar, cocoa powder, and vanilla powder, mixing until fully combined. Add the red food coloring until the desired deep red hue is achieved, scraping down the sides of the bowl frequently.
- Step 3: Carefully incorporate the eggs one at a time, mixing on low speed only until each egg is just combined. Avoid overmixing once the eggs are added, as this can introduce too much air and cause the cheesecake to crack during baking. Pour the red velvet filling over the cooled Oreo crust.
- Step 4: Place the foil-wrapped springform pan inside a large roasting pan. Carefully fill the roasting pan with boiling water until the water reaches about halfway up the sides of the springform pan (creating a water bath). Bake for 55 to 65 minutes, or until the edges are set but the center still jiggles slightly.
- Step 5: Turn off the oven, crack the oven door slightly, and let the cheesecake cool inside the oven for 1 hour. Remove the cheesecake from the water bath and allow it to cool completely on a wire rack. Once cool, cover and refrigerate for at least 6 hours, or preferably overnight, before releasing the springform pan and serving.
Notes
- Ensure the cream cheese and eggs are truly at room temperature before mixing; this prevents lumps and guarantees a smooth emulsion, drastically reducing the risk of cracks during baking.
- For the cleanest slices and best texture, this cheesecake absolutely requires a minimum of 6 hours (preferably overnight) in the refrigerator to fully set before the springform pan is released.
- When wrapping the springform pan for the water bath, use two layers of heavy-duty foil pressed firmly against the sides to prevent leaks that could compromise the Oreo crust.
- Enhance the celebration factor by topping each chilled slice with a dollop of fresh whipped cream and a sprinkle of leftover crushed Oreos or chocolate shavings just before serving.
- Prep Time: 15 minutes
- Cook Time: 20 minutes
- Method: Stovetop
- Cuisine: American

Leave a Comment