

The swirling aroma of rich chocolate and sweet cherries baked into a creamy, dreamy cheesecake is enough to make anyone weak in the knees. Get ready to experience a slice of pure bliss with this Chocolate Cherry Cheesecake!
I remember the first time I made this. It was for a friend’s birthday, and let’s just say, there wasn’t a crumb left! This Chocolate Cherry Cheesecake is more than just a dessert; it’s an experience, perfect for celebrations or just a cozy night in.
Here are some reasons why you’ll absolutely adore this recipe:
- This recipe features an easy preparation that makes baking this decadent dessert a breeze, even for beginners.
- The complex taste of rich chocolate and sweet cherries blend together in a perfect marriage of flavors that dances on your palate.
- With its striking layers and vibrant cherry topping, this cheesecake is a showstopper that will impress anyone who sees it.
- This cheesecake is incredibly versatile, making it ideal for birthdays, holidays, or any special occasion that calls for a standout dessert.
Ingredients for Chocolate Cherry Cheesecake
Here’s what you’ll need to make this delicious dish:
The full ingredients list, including measurements, is provided in the recipe card directly below.
How to Make Chocolate Cherry Cheesecake
Follow these simple steps to prepare this delicious dish:
Step 1: Prepare the Chocolate Cookie Crust
Crush the chocolate cookies into fine crumbs using a food processor or by placing them in a resealable bag and crushing them with a rolling pin. Mix the cookie crumbs with melted butter until well combined. Press the mixture evenly into the bottom of a springform pan to create a solid crust.
Step 2: Make the Cheesecake Filling
In a large bowl, beat the softened cream cheese and granulated sugar until smooth and creamy. Gradually add the eggs, one at a time, beating well after each addition. Stir in the Alcohol-free vanilla extract, sour cream, and cocoa powder until the filling is well combined and free of lumps.
Step 3: Assemble the Cheesecake
Pour half of the chocolate cheesecake filling over the prepared cookie crust. Spoon half of the cherry pie filling over the chocolate layer. Gently pour the remaining chocolate cheesecake filling over the cherry layer, followed by the remaining cherry pie filling.
Step 4: Bake the Cheesecake
Preheat your oven to 350°F (175°C). Place the springform pan on a baking sheet and bake for 55-65 minutes, or until the edges are set and the center is just slightly jiggly. Turn off the oven and let the cheesecake cool inside the oven with the door slightly ajar for an hour to prevent cracking.
Step 5: Chill and Serve
Remove the cheesecake from the oven and let it cool completely at room temperature. Cover the cheesecake with plastic wrap and refrigerate for at least 4 hours, or preferably overnight, to allow it to set completely.
Step 6: Garnish and Enjoy
Carefully remove the cheesecake from the springform pan. Garnish with extra cherries or a drizzle of melted chocolate, if desired. Slice and serve this divine Chocolate Cherry Cheesecake for an unforgettable dessert experience.
Perfecting the Cooking Process

For a seamless experience, start by preparing the cheesecake base and chilling it. While the base sets, tackle the cherry topping, allowing it to cool slightly before adorning the cheesecake. Finally, whip up that dreamy chocolate cheesecake filling!
Add Your Touch
Feeling adventurous? Swap the cherries for raspberries or blackberries. A dash of alcohol-free almond extract in the filling can add a nutty depth. For a visual flair, swirl melted white chocolate into the topping before it sets. Get creative!
Storing & Reheating
Keep your *Chocolate Cherry Cheesecake* in the refrigerator for up to 3 days. To maintain its texture, avoid freezing. There is no need to reheat it, just take it out of the fridge and enjoy it chilled.
Chef’s Tips for Chocolate Cherry Cheesecake Excellence
Making a chocolate cherry cheesecake can be a delightful adventure, but a few insider tips can transform your creation from good to absolutely glorious!
- Ensure your cream cheese is at room temperature to avoid lumps in the batter. Trust me, nobody wants a lumpy cheesecake!
- Gently tap the baking pan on the counter before baking to release any trapped air bubbles. This will prevent cracks and ensure a smooth surface.
- Resist the urge to open the oven door while the cheesecake is baking. Temperature fluctuations are the enemy of perfect cheesecake texture.
(Personal anecdote formated as paragraph subheading)
My cousin once said my chocolate cherry cheesecake was so good, it made him question all his life choices. I think he just wanted another slice, but I’ll take the compliment!
Understanding Chocolate Cherry Cheesecake
Let’s talk about *Chocolate Cherry Cheesecake*. It is a dessert that can transform any meal into a celebration. It’s that showstopper you bring to a party, and suddenly, you’re the dessert hero. This recipe isn’t just about following steps; it’s about creating an experience, a symphony of flavors that dance on your taste buds. It’s rich, decadent, and surprisingly easy to make once you understand the basics.
Why Chocolate Cherry Cheesecake?
Why *Chocolate Cherry Cheesecake* specifically? Because it’s a flavor combination sent from the dessert gods. The slightly tart cherries cut through the richness of the chocolate cheesecake, creating a perfect balance that keeps you coming back for more. It’s a sophisticated twist on a classic dessert, guaranteed to impress even the most discerning palate. Plus, who can resist the allure of chocolate and cherries? It’s a timeless pairing that never fails to deliver.
Gathering Your Arsenal: Ingredients and Equipment
Before we dive into the recipe, let’s make sure you have everything you need. This isn’t a race, but having all your ingredients prepped and ready will make the process much smoother. Think of it as your culinary mise en place.
- **For the Crust:** Crushed chocolate cookies, melted butter.
- **For the Filling:** Cream cheese, sugar, eggs, sour cream, Alcohol-free vanilla extract, cocoa powder, semi-sweet chocolate.
- **For the Topping:** Fresh or frozen cherries, sugar, cornstarch, lemon juice.
As for equipment, you’ll need a springform pan, mixing bowls, a hand mixer or stand mixer, and a few other kitchen essentials. Don’t worry; we’re not performing brain surgery here, just baking a delicious cheesecake.
Crafting the Perfect Crust
The crust is the foundation of our *Chocolate Cherry Cheesecake*, so we want to get it right. It needs to be sturdy enough to hold the filling but not so hard that it’s difficult to cut through. Think of it as the unsung hero of the dessert world.
Mixing and Pressing the Crust
First, crush your chocolate cookies into fine crumbs. You can use a food processor or, if you’re feeling old-school, place them in a ziplock bag and crush them with a rolling pin. Then, mix the crumbs with melted butter until they’re evenly moistened. Press the mixture firmly into the bottom of your springform pan, creating a compact and even layer. This step is crucial for preventing a soggy crust.
Pre-Baking the Crust
To ensure a crisp crust, pre-bake it in a preheated oven for about 10 minutes. This will help it set and prevent it from becoming soggy when the filling is added. Let the crust cool completely before pouring in the cheesecake batter. Patience is a virtue, especially when it comes to baking.
The Creamy Chocolate Cheesecake Filling
Ah, the heart and soul of our *Chocolate Cherry Cheesecake*! This is where the magic happens. The filling needs to be rich, smooth, and bursting with chocolate flavor. It’s a delicate balance of ingredients that requires a bit of finesse, but trust me, the end result is worth the effort.
Mixing the Cheesecake Batter
Start by creaming together the cream cheese and sugar until light and fluffy. This is where that room-temperature cream cheese comes in handy. If your cream cheese is too cold, you’ll end up with a lumpy batter, which is not what we want. Next, beat in the eggs one at a time, followed by the sour cream and Alcohol-free vanilla extract. Finally, gently fold in the cocoa powder and melted chocolate until everything is evenly combined. Be careful not to overmix, as this can lead to a tough cheesecake.
Adding the Chocolate Magic
For that extra dose of chocolate goodness, we’re adding melted semi-sweet chocolate to the batter. This not only enhances the flavor but also gives the cheesecake a beautiful, rich color. Make sure the chocolate is cooled slightly before adding it to the batter to prevent it from cooking the eggs.
The Luscious Cherry Topping
Now for the pièce de résistance: the cherry topping. This is what elevates our *Chocolate Cherry Cheesecake* from ordinary to extraordinary. The sweet and tart cherries create a delightful contrast to the rich chocolate cheesecake, making each bite a flavor explosion.
Preparing the Cherry Compote
In a saucepan, combine the cherries, sugar, cornstarch, and lemon juice. Cook over medium heat, stirring constantly, until the mixture thickens and the cherries are tender. This should take about 10-15 minutes. Let the topping cool slightly before pouring it over the cheesecake.
Arranging the Cherry Delight
Once the cheesecake has cooled completely, carefully pour the cherry topping over the top, spreading it evenly. For a visually appealing touch, you can arrange the cherries in a decorative pattern. Get creative and have fun with it!
Baking Your Chocolate Cherry Cheesecake to Perfection
Baking a cheesecake can be a bit intimidating, but with a few simple tricks, you can achieve a perfectly cooked cheesecake every time. The key is to bake it low and slow, and to avoid opening the oven door during baking.
The Water Bath Method
To prevent cracks and ensure a moist cheesecake, we’re using the water bath method. Wrap the bottom of your springform pan tightly in aluminum foil to prevent water from seeping in. Place the pan in a larger baking dish and fill the dish with hot water, reaching about halfway up the sides of the springform pan. Bake in a preheated oven at a low temperature for about an hour and a half.
Cooling and Chilling
Once the cheesecake is done baking, turn off the oven and let it cool inside the oven with the door slightly ajar for about an hour. This will prevent it from cracking due to sudden temperature changes. Then, remove the cheesecake from the water bath and let it cool completely on a wire rack before chilling it in the refrigerator for at least 4 hours, or preferably overnight.
The Grand Finale: Serving Your Masterpiece
After all that hard work, it’s time to finally enjoy your *Chocolate Cherry Cheesecake*. But before you dig in, let’s talk about serving and presentation.
Presentation Matters
Carefully remove the cheesecake from the springform pan and place it on a serving platter. You can garnish it with fresh cherries, chocolate shavings, or a dusting of cocoa powder for an extra touch of elegance.
Slicing and Enjoying
Use a sharp knife dipped in hot water to slice the cheesecake. This will help create clean, even slices. Serve chilled and enjoy every decadent bite!
Troubleshooting Common Cheesecake Challenges
Even the most experienced bakers encounter challenges from time to time. Here are a few common cheesecake problems and how to fix them.
Cracked Cheesecake
The most common cheesecake woe is a cracked surface. This is usually caused by baking the cheesecake at too high a temperature or by sudden temperature changes. To prevent cracks, use the water bath method and let the cheesecake cool gradually in the oven.
Soggy Crust
A soggy crust is another common problem. To prevent this, pre-bake the crust and make sure it’s firmly pressed into the bottom of the pan.
Lumpy Filling
A lumpy filling is usually caused by using cold cream cheese. Make sure your cream cheese is at room temperature before mixing the batter.
Chocolate Cherry Cheesecake: A Recipe for Success
Making a *Chocolate Cherry Cheesecake* may seem daunting at first, but with a little patience and practice, you can create a truly unforgettable dessert. Remember to follow the steps carefully, use high-quality ingredients, and don’t be afraid to experiment. Happy baking!
Conclusion for Chocolate Cherry Cheesecake :
This Chocolate Cherry Cheesecake is a symphony of flavors and textures, and it’s easier to make than you might think. The creamy chocolate base combined with the tangy cherries creates an unforgettable dessert experience. Remember the water bath for crack-free perfection, and don’t be afraid to experiment with different fruit combinations. So go ahead, impress your friends and family (or just yourself!) with this decadent treat. It’s a delicious way to celebrate any occasion, big or small. Happy baking!
Print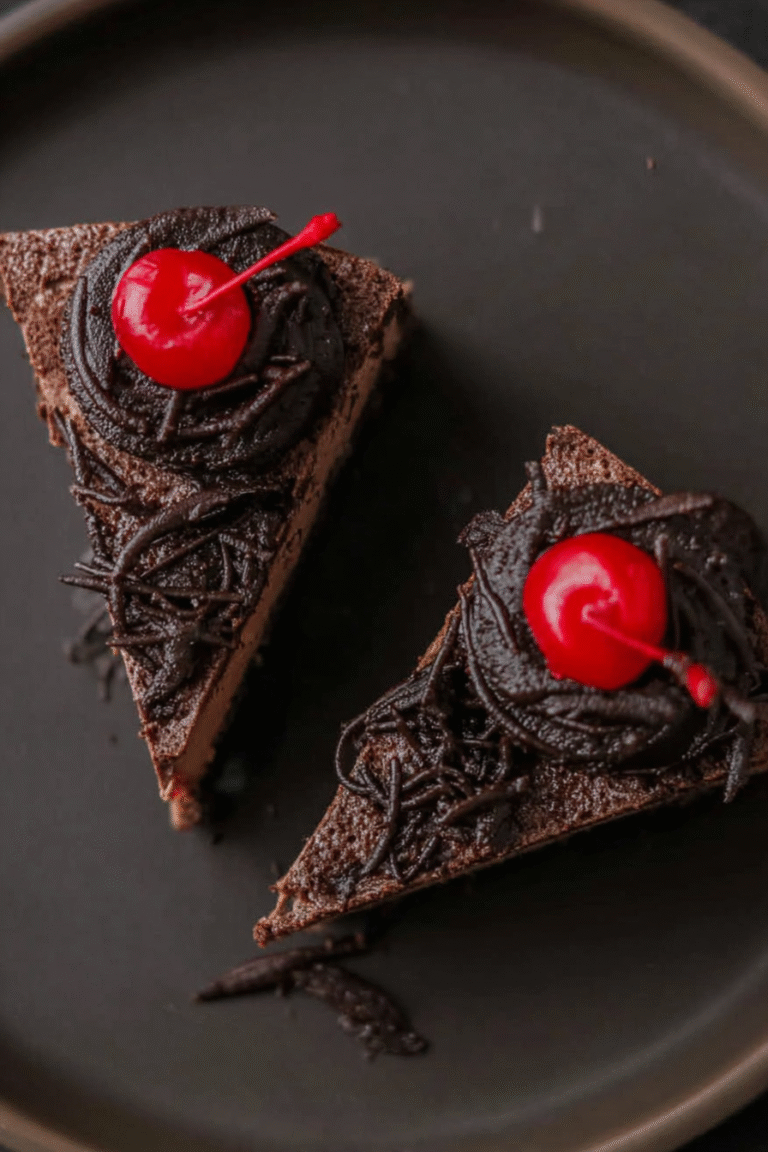
Chocolate Cherry Cheesecake
Delicious chocolate cherry cheesecake recipe with detailed instructions and nutritional information.
- Total Time: 35 minutes
- Yield: 4 servings
Ingredients
- Graham cracker crumbs: 1 1/2 cups
- Unsalted butter, melted: 6 tablespoons
- Cream cheese, softened: 32 ounces
- Granulated sugar: 1 1/4 cups
- Eggs: 4 large
- Vanilla extract: 1 teaspoon
- Sour cream: 1 cup
- Canned cherry pie filling: 1 (21 ounce) can
Instructions
- Step 1: Preheat oven to 350°F (175°C). In a bowl, combine graham cracker crumbs and melted butter. Press mixture into the bottom of a 9-inch springform pan.
- Step 2: In a large bowl, beat cream cheese and sugar until smooth. Beat in eggs one at a time, then stir in vanilla extract and sour cream.
- Step 3: Pour cream cheese mixture over the crust. Bake for 55-65 minutes, or until the center is almost set.
- Step 4: Let cool completely in the oven with the door ajar. Then, refrigerate for at least 4 hours, or preferably overnight.
- Step 5: Top with cherry pie filling before serving. Run a thin knife along the edge of the pan before releasing the cheesecake.
Notes
- Store leftover cheesecake tightly covered in the refrigerator for up to 3 days to maintain its creamy texture.
- Since this cheesecake is best served cold, there is no need to reheat it.
- A dollop of whipped cream or a sprinkle of shaved chocolate adds an elegant touch to each slice, complementing the cherry topping.
- For a perfectly smooth cheesecake, ensure your cream cheese is truly softened before mixing – leaving it out at room temperature for at least an hour is ideal.
- Prep Time: 15 minutes
- Cook Time: 20 minutes
- Method: Stovetop
- Cuisine: American
FAQs :
What makes this Chocolate Cherry Cheesecake recipe so special?
Okay, let’s be real. There are approximately a billion cheesecake recipes on the internet. But this one? This one’s got pizzazz! Imagine a rich, dark chocolate cheesecake, swirled with a vibrant cherry filling that’s both sweet and tart. It’s baked to creamy perfection and guaranteed to impress. This isn’t your grandma’s plain cheesecake (unless your grandma is secretly a pastry wizard). It’s a showstopper perfect for celebrations, or, you know, a Tuesday when you need a serious pick-me-up. Its flavor profile stands out distinctly, making it exceptionally memorable.
Can I substitute any ingredients in this Chocolate Cherry Cheesecake?
Absolutely! Baking is all about adapting. If you’re not a huge fan of cherries, try using raspberries or blackberries for a different fruity twist. If you prefer a less intense chocolate flavor, use semi-sweet chocolate instead of dark chocolate. For a tangier taste, add a tablespoon of lemon juice to the cheesecake filling. Just remember that substituting ingredients might slightly alter the texture and taste, but that’s part of the fun! Experimentation is key to discovering your own perfect version. Don’t be afraid to get creative and make it your own.
How do I prevent my Chocolate Cherry Cheesecake from cracking?
Cracking can be a cheesecake baker’s worst nightmare! The secret weapon? A water bath. Wrapping the springform pan in foil and placing it in a larger pan filled with hot water creates a humid environment that helps the cheesecake bake evenly and prevents it from drying out and cracking. Also, avoid overbaking! The cheesecake should still have a slight wiggle in the center when you take it out of the oven. As it cools, it will continue to set. Patience is your friend in the realm of crack-free cheesecakes.
How long does Chocolate Cherry Cheesecake last?
If, by some miracle, you manage to not devour this cheesecake in one sitting, it will keep well in the refrigerator for up to 5 days. Make sure to store it in an airtight container to prevent it from drying out or absorbing any funky fridge odors. You can also freeze slices for longer storage. Just wrap them individually in plastic wrap and then place them in a freezer-safe bag. When you’re ready to enjoy, thaw them overnight in the refrigerator. It’s almost as good as freshly baked!


Leave a Comment