
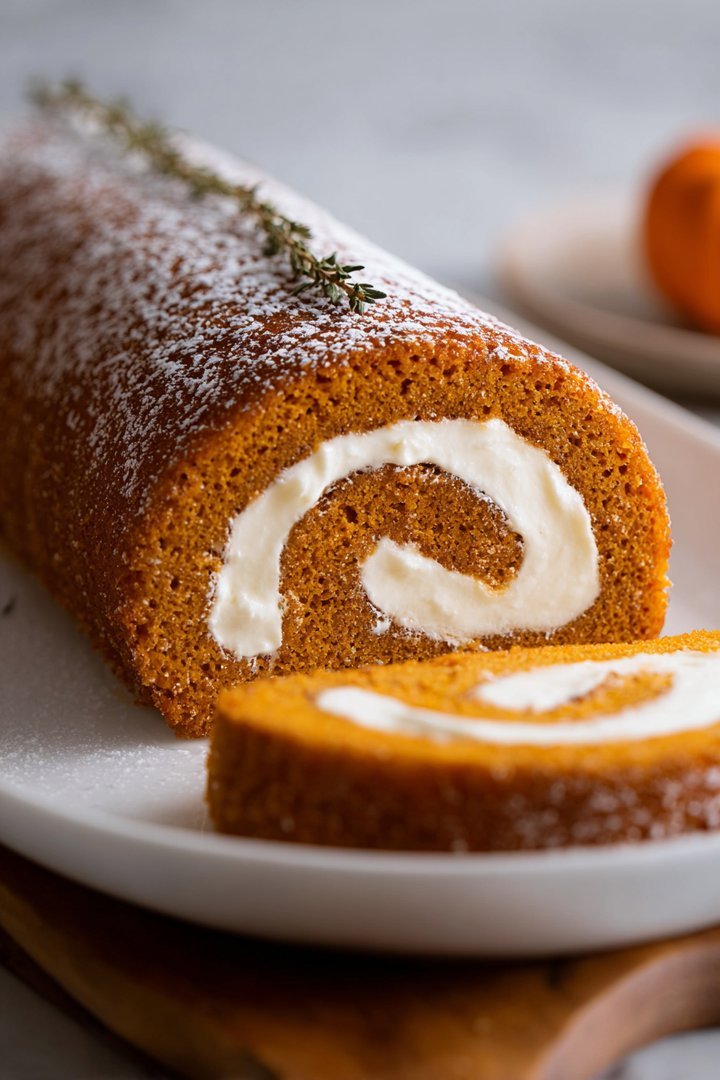
The mere mention of **Pumpkin Roll** conjures images of crisp autumn days, the scent of cinnamon and spice hanging in the air, and the joy of sharing something truly special with loved ones. It’s more than just a dessert; it’s a warm, comforting hug in pastry form.
Imagine sinking your teeth into a soft, spiced cake swirled with a luscious cream cheese filling. It’s a delightful dance of textures and flavors, perfect for Harvest celebration, holiday gatherings, or even just a cozy afternoon treat. Get ready to create a masterpiece!
Here are some compelling reasons why this Pumpkin Roll recipe will become your new go-to:
- Effortlessly impress your friends and family with a dessert that looks and tastes like it came straight from a professional bakery.
- Experience the perfect balance of warm pumpkin spices and tangy cream cheese filling, a flavor combination that is simply irresistible.
- The vibrant colors and elegant swirl make this Pumpkin Roll a visually stunning centerpiece for any dessert table.
- Customize your Pumpkin Roll with different extracts or spices to create a unique flavor profile that suits your personal preferences.
Ingredients for Pumpkin Roll
Here’s what you’ll need to make this delicious dish:
The full ingredients list, including measurements, is provided in the recipe card directly below.
How to Make Pumpkin Roll
Follow these simple steps to prepare this delicious dish:
Step 1: Prepare the Cake Batter
Preheat oven to 350°F (175°C). Grease and line a 10×15 inch jelly roll pan with parchment paper, leaving an overhang on the sides. This will make it easier to lift the cake out later. In a medium bowl, whisk together the flour, baking powder, baking soda, cinnamon, ginger, nutmeg, and salt.
Step 2: Combine Wet Ingredients
In a separate large bowl, beat together the pumpkin puree, sugar, eggs, and Alcohol-free vanilla extract until well combined. Make sure there are no lumps.
Step 3: Mix Wet and Dry Ingredients
Gradually add the dry ingredients to the wet ingredients, mixing until just combined. Be careful not to overmix the batter.
Step 4: Bake the Cake
Pour the batter into the prepared pan and spread it evenly. Bake for 13-15 minutes, or until a toothpick inserted into the center comes out clean.
Step 5: Roll the Cake
While the cake is still warm, carefully invert it onto a clean kitchen towel dusted with powdered sugar. Gently peel off the parchment paper. Starting from one of the short ends, roll the cake up tightly in the towel. Let it cool completely in the rolled-up position. This is crucial for preventing cracks later.
Step 6: Prepare the Filling
While the cake is cooling, prepare the cream cheese filling. In a large bowl, beat together the softened cream cheese, powdered sugar, and softened butter until smooth and creamy.
Step 7: Assemble the Pumpkin Roll
Once the cake is completely cool, carefully unroll it. Spread the cream cheese filling evenly over the cake. Re-roll the cake tightly, without the towel this time.
Step 8: Chill and Serve
Wrap the Pumpkin Roll in plastic wrap and chill in the refrigerator for at least 1 hour to allow the filling to set. Before serving, dust with powdered sugar and slice into 1-inch thick pieces.
Transfer to a serving plate and enjoy this spiced cake delight, the perfect addition to gatherings or to cozy up any afternoon!
Perfecting the Cooking Process
The key to an exceptional dessert is all in the timing! Start by prepping your dry ingredients, then move onto the cream cheese frosting. This ensures each component is ready and waiting, so the assembly is smooth and your creation, a delicious **pumpkin roll**, is divine!
Add Your Touch
Feel free to play around with the spices! Not a fan of cloves? Leave them out! Want an extra kick? Add a pinch of cayenne to the cream cheese frosting. Consider swapping walnuts for pecans or adding chocolate chips to the cake batter for a truly personal **pumpkin roll**.
Storing & Reheating
To keep your masterpiece fresh, tightly wrap the **pumpkin roll** in plastic wrap and refrigerate for up to three days. If you want to enjoy it later, you can freeze it for up to a month. Thaw it in the refrigerator overnight before slicing and serving for the best flavor and texture.
3 Expert Tips for the Perfect Pumpkin Roll:
- Make sure the cake is still slightly warm when you roll it; this prevents cracking and helps it hold its shape perfectly.
- Don’t overbake the cake! It should be just set in the center to maintain its moist, tender texture, resulting in the ultimate dessert experience.
- For an extra smooth cream cheese frosting, ensure the cream cheese is fully softened before mixing; no one likes lumpy frosting.
(Personal anecdote formated as paragraph subheading (very important! don’t write any title for this paragraph))
My family raved about it last Harvest celebration, declaring it the best pumpkin roll ever. The secret? A dash of nutmeg and a whole lot of love!
Okay, let’s dive into the wonderful, autumnal world of the **pumpkin roll**! We’re not just talking about any old cake; we’re talking about a swirl of spiced pumpkin goodness embraced by a cloud of creamy, dreamy filling. Imagine biting into a slice – the soft, moist cake practically melts in your mouth, the spices dance on your tongue, and the sweet cream cheese frosting ties it all together in a symphony of fall flavors. Are you drooling yet? I know I am. Forget the basic pumpkin pie; we’re leveling up!
This recipe isn’t just a set of instructions; it’s a journey. A journey to create a show-stopping dessert that will impress your friends, delight your family, and maybe even earn you bragging rights at the next holiday gathering. And don’t worry, even if you’re not a seasoned baker, I’m here to guide you every step of the way. We’re going to make this **pumpkin roll** together, and it’s going to be epic!
Getting Down to Basics: The Pumpkin Cake
First things first, let’s talk about the cake itself. We’re not using a box mix here, folks. We’re going for the real deal – a homemade pumpkin cake that’s bursting with flavor and moist enough to make your taste buds sing. The base of this cake is, of course, pumpkin puree. Make sure you’re using pure pumpkin puree, not pumpkin pie filling. Trust me, there’s a difference. Pumpkin pie filling has added sugars and spices that we don’t need. We want to control the flavor profile ourselves.
Next up, we have the spices. Cinnamon, ginger, nutmeg, and cloves – the holy quartet of fall baking. These spices are what give the pumpkin roll its signature warm, cozy flavor. Don’t be afraid to adjust the amounts to your liking. If you’re a cinnamon fanatic, go ahead and add a little extra. If you’re not a fan of cloves, you can leave them out. It’s your cake, your rules! We need flour, sugar, eggs, and baking soda to bring all of this together. Mix until just combined.
Baking the Perfect Pumpkin Sheet Cake
Now comes the crucial part – baking. We’re baking the cake on a baking sheet, not in a cake pan. This is what gives us that thin, flexible cake layer that’s perfect for rolling. Spread the batter evenly on the prepared baking sheet and bake until a toothpick inserted into the center comes out clean. This usually takes around 13-15 minutes, but keep an eye on it. You don’t want to overbake the cake, or it will be dry and brittle.
Once the cake is out of the oven, immediately invert it onto a clean kitchen towel that has been dusted with powdered sugar. Gently peel off the parchment paper and roll up the cake in the towel. This step is essential! Rolling the cake while it’s still warm helps it to form its shape and prevents it from cracking later. Let the cake cool completely in the towel before you even think about adding the frosting.
The Creamy Dreamy Filling: Cream Cheese Frosting
What’s a **pumpkin roll** without its luscious cream cheese filling? It’s nothing! This is where the magic truly happens. We’re talking about a rich, tangy, and slightly sweet cream cheese frosting that perfectly complements the spiced pumpkin cake. The key to a good cream cheese frosting is to start with softened cream cheese. Trust me on this one. If your cream cheese is too cold, it will be lumpy, and no one wants lumpy frosting.
Beat the softened cream cheese until it’s smooth and creamy, then add in powdered sugar, butter, and a splash of Alcohol-free vanilla extract. Beat until everything is well combined and the frosting is light and fluffy. Don’t overbeat the frosting, or it will become too soft. Once the frosting is ready, carefully unroll the cooled cake and spread it evenly with the cream cheese frosting. Leave a small border around the edges.
Rolling it All Up: The Grand Finale
Now comes the moment of truth – rolling the cake back up. This can be a little tricky, but don’t worry, you got this! Gently lift the edge of the cake and start rolling it up tightly, using the towel to help you. Once the cake is rolled up, wrap it tightly in plastic wrap and refrigerate it for at least an hour. This allows the frosting to set and the cake to hold its shape.
After the cake has chilled, unwrap it and trim off the ends. This will give you a clean, professional-looking roll. Dust the roll with powdered sugar and slice it into serving pieces. Admire your work of art! You’ve just created a beautiful and delicious **pumpkin roll** that’s sure to impress. Now, go ahead and take a bite. You deserve it!
Troubleshooting Your Pumpkin Roll
Even the most experienced bakers can run into problems from time to time. Don’t worry if your **pumpkin roll** doesn’t turn out perfect on your first try. Baking is all about learning and experimenting. Here are a few common problems and how to fix them:
- **Cake Cracking:** The most common culprit for a cracked cake is overbaking. Make sure you’re not baking the cake for too long. Also, make sure you’re rolling the cake while it’s still warm.
- **Frosting Too Soft:** If your frosting is too soft, it could be because your cream cheese or butter was too warm. Try chilling the frosting in the refrigerator for a few minutes before spreading it on the cake.
- **Cake Too Dry:** If your cake is too dry, it could be because you overbaked it. Next time, try reducing the baking time by a minute or two.
Pumpkin Roll Variations
Want to spice things up a bit? There are endless variations you can try with this **pumpkin roll** recipe. Here are a few ideas:
- **Chocolate Pumpkin Roll:** Add cocoa powder to the cake batter for a chocolatey twist.
- **Nutty Pumpkin Roll:** Add chopped nuts, such as pecans or walnuts, to the cake batter or sprinkle them on top of the frosting.
- **Spiced Pumpkin Roll:** Add extra spices, such as cardamom or allspice, to the cake batter for a more intense flavor.
(Personal anecdote formated as paragraph subheading (very important! don’t write any title for this paragraph))
My first attempt looked like a cinnamon roll gone wrong, but hey, it still tasted amazing! Practice makes perfect, and now, it looks and tastes professionally made.
Share Your Pumpkin Roll Masterpiece
Now that you’ve conquered the **pumpkin roll**, it’s time to share your masterpiece with the world! Take a picture of your creation and post it on social media. Use the hashtag #PumpkinRollPerfection so I can see your amazing work. And don’t forget to share the recipe with your friends and family. They’ll thank you for it!
So, there you have it – everything you need to know to make the perfect **pumpkin roll**. Get in the kitchen and start baking. You might just surprise yourself with what you can create. Happy baking!
Conclusion for Pumpkin Roll
This Pumpkin Roll recipe is more than just a dessert; it’s a delicious journey into fall flavors and comforting textures. We’ve covered everything from ensuring a crack-free roll to delightful filling substitutions. Remember to roll while warm, store properly, and feel free to experiment with fillings to create your perfect pumpkin masterpiece. With a little patience and a dash of creativity, you’ll be serving up slices of happiness in no time. Happy baking, and may your pumpkin rolls always be the highlight of the season!
Print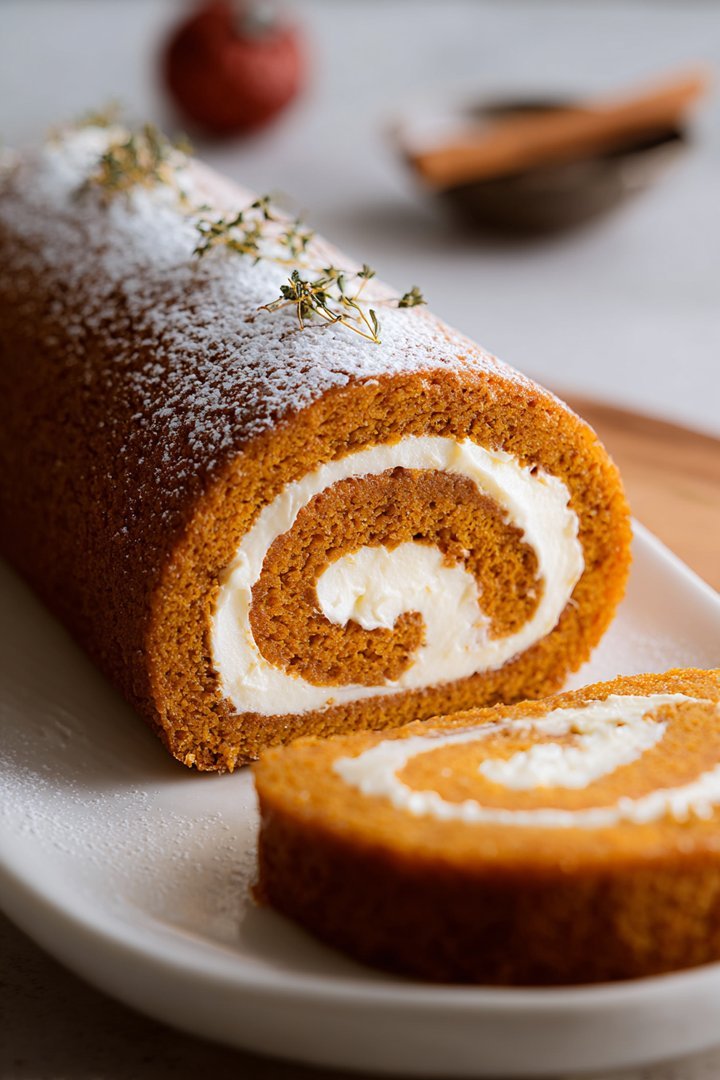
Pumpkin Roll
Delicious pumpkin roll recipe with detailed instructions and nutritional information.
- Total Time: 35 minutes
- Yield: 4 servings
Ingredients
- Pumpkin puree: 1 cup
- Eggs: 3 large
- Granulated sugar: 1 cup
- All-purpose flour: 3/4 cup
- Baking soda: 1 teaspoon
- Ground cinnamon: 1 teaspoon
- Cream cheese, softened: 8 ounces
- Powdered sugar: 1 cup
Instructions
- Step 1: Preheat oven to 350°F (175°C). Grease and flour a 10×15 inch jelly roll pan.
- Step 2: In a large bowl, beat together pumpkin puree, eggs, and granulated sugar until well combined.
- Step 3: In a separate bowl, whisk together flour, baking soda, and cinnamon. Gradually add the dry ingredients to the wet ingredients, mixing until just combined.
- Step 4: Spread the batter evenly into the prepared jelly roll pan. Bake for 13-15 minutes, or until a toothpick inserted into the center comes out clean.
- Step 5: Immediately turn the baked pumpkin sheet onto a clean kitchen towel dusted generously with powdered sugar. Carefully roll the cake up in the towel and let it cool completely.
- Step 6: While the cake cools, prepare the filling. In a bowl, beat together softened cream cheese and powdered sugar until smooth and creamy. Once the cake is cool, carefully unroll it, spread the cream cheese filling evenly over the surface, and re-roll it tightly. Wrap the roll in plastic wrap and refrigerate for at least 1 hour before serving.
Notes
- To prevent sticking, make sure the kitchen towel is generously coated with powdered sugar before rolling the warm cake.
- For longer storage, tightly wrap the pumpkin roll in plastic wrap and then foil, keeping it fresh in the refrigerator for up to 3 days.
- A slice of pumpkin roll pairs perfectly with a dollop of whipped cream and a sprinkle of chopped pecans.
- If you're short on time, the cream cheese filling can be made ahead and stored in the refrigerator until the cake is cool.
- Prep Time: 15 minutes
- Cook Time: 20 minutes
- Method: Stovetop
- Cuisine: American
FAQs
Can I make Pumpkin Roll ahead of time?
Absolutely! In fact, making this pumpkin roll ahead of time is highly recommended. Prepare the roll according to the instructions, then wrap it tightly in plastic wrap and refrigerate it for at least a few hours, or even overnight. This allows the flavors to meld together beautifully and makes slicing much easier. When you’re ready to serve, simply unwrap it and dust it with powdered sugar. A little planning goes a long way with this delightful dessert! I promise, your future self will thank you for the foresight.
How do I prevent my Pumpkin Roll from cracking?
Ah, the dreaded cracking! To avoid this culinary catastrophe, ensure your cake is still slightly warm when you roll it. Rolling it while it’s too cool can cause it to crack. Also, don’t overbake the cake! Overbaking leads to dryness, which inevitably leads to cracks. A perfectly baked cake is your best defense. Plus, using a clean tea towel generously dusted with powdered sugar can help create a smooth, crack-free surface as you roll. Think of it as a spa day for your pumpkin roll – relaxation is key!
What’s the best way to store a Pumpkin Roll?
Storing your pumpkin roll is simple. Wrap it tightly in plastic wrap to prevent it from drying out. You can store it in the refrigerator for up to three days. For longer storage, you can freeze it! Just wrap it well in plastic wrap, then place it in a freezer-safe bag or container. When you’re ready to enjoy it, thaw it in the refrigerator overnight. It’ll be almost as good as the day you made it – perfect for those pumpkin roll cravings that just won’t quit!
Can I substitute anything for the cream cheese filling in this Pumpkin Roll recipe?
If you’re not a fan of cream cheese, or you’re looking for a lighter alternative, you’ve got options! A mascarpone cheese filling would offer a similar creamy texture with a slightly less tangy flavor. Alternatively, you could try a stabilized whipped cream filling. To make a stabilized whipped cream, whip heavy cream with powdered sugar and a touch of Alcohol-free vanilla extract until stiff peaks form, then gently fold in a bit of softened butter or a plant-based gelling agent. This will help the whipped cream hold its shape and prevent it from becoming watery. Both options are delicious twists on the classic!

Leave a Comment