
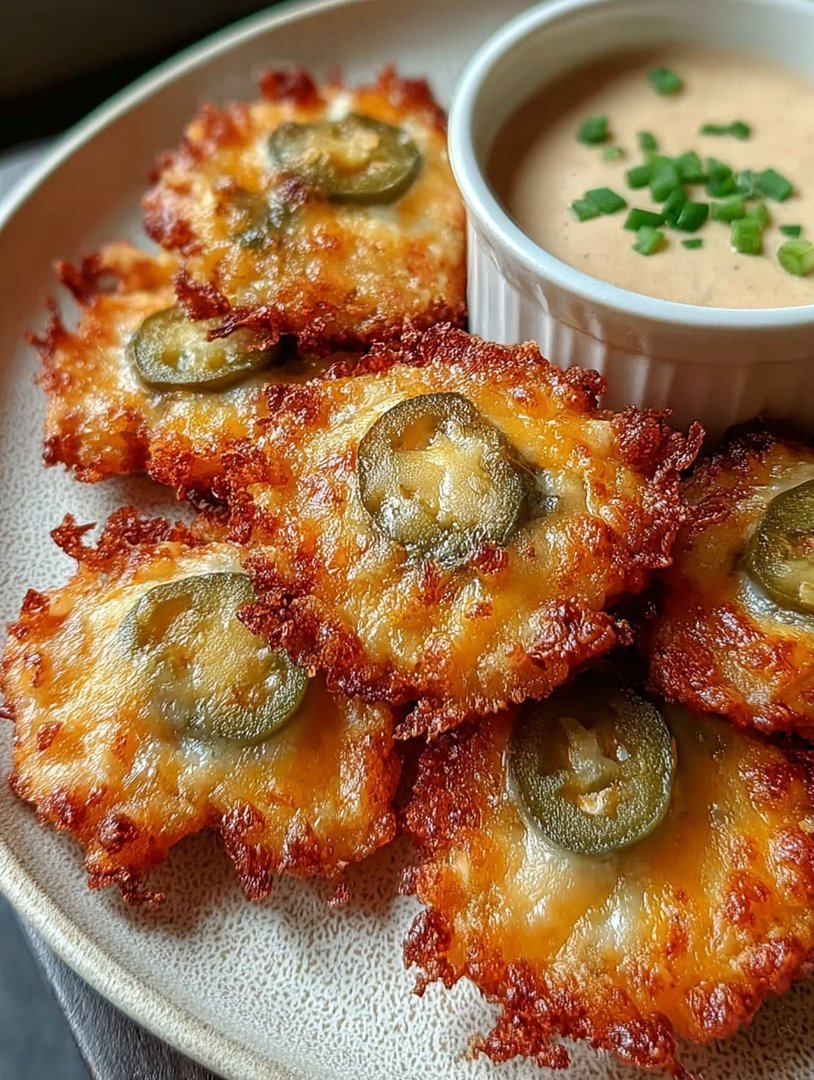
There is nothing quite like the crunch of a perfect appetizer, especially when it involves tangy brine and gooey melted goodness. If you crave that ideal salty-sour snack that makes your eyes widen, prepare yourself for these unforgettableCrispy Pickle Cheese Bites. They are the ultimate party trick and the easiest way to steal the show at any gathering, guaranteed to vanish before the main course even hits the table. Our journey to appetizer stardom begins with a promise: maximum flavor for minimal effort, resulting in crunchy, zesty, cheesy perfection that will silence even your most skeptical dinner guest. This recipe proves that sometimes the simplest ingredients create the most impressive fireworks.
- These delicious bites offer an irresistible crunch followed by the zesty tang of dill pickles and savory melted cheese, perfect for snack time.
- The recipe is surprisingly straightforward, demanding minimal effort for maximum flavor payoff, making it an ideal choice for last-minute entertaining.
- Their golden brown exterior and bubbly, cheesy center provide spectacular visual appeal, ensuring these appetizers disappear quickly from the platter.
- They are incredibly versatile, pairing perfectly with any dipping sauce, from creamy ranch to a spicy sriracha mayonnaise variation.
Ingredients for Crispy Pickle Cheese Bites
Here’s what you’ll need to make this delicious dish:
- Dill Pickle SlicesOpt for large, good-quality dill pickle chips or sandwich slices; patting them completely dry is the absolute secret weapon for crispiness.
- Cream CheeseUse softened full-fat cream cheese as the binder, allowing it to sit at room temperature for about thirty minutes before mixing.
- Shredded Cheddar CheeseSharp cheddar provides the best flavor punch, but a cheddar-Monterey Jack blend works well for extra gooeyness.
- All-Purpose FlourThis forms the foundational dredging layer, helping the egg mixture adhere effectively to the pickle and cheese base.
- Large EggsWhisked eggs create the vital bridge between the dry flour mixture and the outer crunchy breading layer.
- Panko Bread CrumbsPanko is crucial for achieving superior texture; traditional breadcrumbs will not deliver the same satisfying, airy crunch.
- Garlic Powder and Onion PowderThese spices enhance the savory profile of the cheese mixture, ensuring the bites are seasoned beyond just saltiness.
- Dried DillA small pinch of dried dill intensifies the pickle flavor and beautifully complements the tangy notes in the cheese filling.
- Vegetable Oil or Canola OilUse a high smoke point oil for frying, ensuring the oil is consistently hot to achieve that rapid, golden-brown crust.
The full ingredients list, including measurements, is provided in the recipe card directly below.
The Anatomy of a Legendary Appetizer
Why the Perfect Pickle Matters
Choosing the right pickle is not merely a suggestion; it is the foundation upon which your entire edible empire rests. We are looking for thick-cut, crunchy dill pickle slices, preferably the ones that still have some structural integrity, even after being soaked in brine. Avoid those sad, floppy slices at all costs. The goal is to maximize the surface area for cheese coverage while retaining enough firmness to hold up under the heat of the fryer or oven. Once you have your ideal slices, the next crucial step is drainage. Lay those pickles out on layers of paper towels, press down gently, and then repeat this process until they are profoundly dry. Excess moisture equals steam, and steam equals a soggy, disappointing exterior, which we are absolutely not allowing near ourCrispy Pickle Cheese Bites. This meticulous preparation is the key that unlocks maximum crunch.
The Ultimate Cheese Filling Strategy
The filling needs to be firm enough to hold its shape during the breading process but pliable enough to mix easily. Start by softening your cream cheese—microwaving it briefly is tempting, but letting it soften naturally at room temperature provides the best texture. In a medium bowl, combine the softened cream cheese, shredded cheddar, garlic powder, onion powder, and dried dill. Mix thoroughly until the cheese mixture is uniform and everything is fully incorporated. This mixture is not just melted cheese; it is a highly seasoned blanket of savory goodness designed to hug the pickle slice perfectly. Use a small offset spatula or a butter knife to spread a thin, even layer of this mixture onto one side of each dried pickle slice, creating a miniature, cheesy sandwich.
How to Make Crispy Pickle Cheese Bites
Follow these simple steps to prepare this delicious dish:
Step 1: Set Up the Breading Station
Prepare three separate shallow dishes. In the first dish, place the all-purpose flour. In the second, whisk the eggs until the whites and yolks are fully combined. In the third, spread out the Panko bread crumbs, ensuring they are evenly distributed. Having an assembly line is essential for efficiency and keeping the kitchen somewhat tidy, so place these dishes next to your pickle-cheese construction.
Step 2: Double Dip for Maximum Texture
Take a pickle slice coated with the cheese mixture. First, gently dredge it in the flour, shaking off any excess. Next, dip it entirely into the whisked egg mixture, allowing any surplus egg to drip back into the bowl. Finally, press the egg-coated pickle firmly into the Panko bread crumbs. The secret to supreme crunch is ensuring the entire surface, especially the edges, is completely covered with the Panko.
Step 3: Freeze the Bites for Structural Integrity
Once all the bites are coated, arrange them on a baking sheet lined with parchment paper. This step is non-negotiable for success. Transfer the tray to the freezer and allow theCrispy Pickle Cheese Bitesto chill for at least 30 minutes. Freezing prevents the cheese from melting too quickly during cooking and helps the crust adhere perfectly, resulting in a beautifully solid, compact appetizer.
Step 4: Achieving Golden Perfection
You have two excellent choices for cooking: frying or baking. For frying, heat about two inches of oil in a heavy-bottomed pot to 350°F (175°C). Carefully drop the frozen bites into the hot oil in batches, ensuring you do not overcrowd the pot. Fry for 2 to 3 minutes, flipping once, until they are deep golden brown and crispy. Alternatively, preheat your oven to 425°F (220°C). Lightly spray the frozen bites with cooking oil and bake for 12 to 15 minutes, until golden and bubbling.
Step 5: Draining and Serving
Regardless of your chosen cooking method, immediately transfer the goldenCrispy Pickle Cheese Bitesto a cooling rack or a plate lined with paper towels to drain excess oil. Serve them piping hot while the cheese is still wonderfully gooey inside. Transfer to plates and drizzle with sauce for the perfect finishing touch.
Troubleshooting and Perfecting Your Technique
The Art of the Double Fry
If you seek an unparalleled crunch, a technique often employed by professional chefs is the double fry. After the first quick fry (Step 4), which sets the crust, allow the bites to cool for about ten minutes. Then, increase the oil temperature slightly to 375°F (190°C) and fry them again for only 60 to 90 seconds. This secondary, hotter blast evaporates any remaining surface moisture, pushing the crispiness factor straight into the stratosphere. Remember that the bites should already be golden from the first fry; the second fry is purely about texture.
Mastering the Breading Line
A common pitfall in breading is mixing the wet and dry hands, resulting in messy, gummy fingers and uneven crusts. To avoid this kitchen catastrophe, designate one hand the “wet hand” for the egg mixture and the other the “dry hand” for the flour and Panko. Use the dry hand exclusively for dipping into the flour and breadcrumbs, and the wet hand solely for handling the egg. This simple system keeps your Panko clean, your hands relatively neat, and ensures every bite achieves a perfect, consistent coating. Consistency in coating is vital for uniform cooking and achieving that irresistible snap.
Creative Flavor Twists and Dip Pairings
These cheesy dill bites are magnificent on their own, but they also serve as a blank canvas for culinary creativity. Introducing a few minor variations can transform them completely, making them adaptable for any type of gathering, from a football watch party to a sophisticated cocktail event.
Spice It Up with Smoked Paprika
For those who enjoy a little heat and depth, incorporate half a teaspoon of smoked paprika into the Panko bread crumbs. The smoked flavor adds an incredible richness that complements the tanginess of the pickle, creating a slightly smoky, spicy crust. You could also mix a dash of cayenne pepper directly into the cream cheese filling for a powerful internal kick that sneaks up on the palate. These variations ensure that your fried pickle snacks cater to diverse taste preferences.
Herbaceous and Tangy Dipping Sauces
A great appetizer deserves an equally great dip. While classic ranch dressing is a fantastic choice, we encourage experimentation. A delightful alternative is a spicy aioli, made by whisking together mayonnaise, a splash of lemon juice, finely minced garlic, and a generous amount of hot sauce or sriracha. For a fresher, herbaceous option, try a whipped dill and sour cream dip. Simply combine sour cream, fresh chopped dill, a squeeze of fresh lime juice, and a pinch of salt and pepper. The cool creaminess cuts through the richness of the cheese and the oil, making each bite addictive. The contrast in temperature and texture between the hot, crunchy exterior and the cool, creamy dip is truly sublime.
Vegetarian Cheese Alternatives
If you are hosting guests with specific dietary preferences, this recipe is easily adapted. Ensure you select a robust cheddar alternative that melts well, such as a high-quality vegan cheddar block, finely shredded. The cream cheese binder can be substituted with a firm, plant-based cream cheese spread. The most important consideration when substituting is moisture content; some vegan cheeses contain higher amounts of water, so ensure both the pickle and the cheese substitute are thoroughly dried or drained before assembly to maintain the structural integrity needed for these delicious, cheesy dill bites. Experimenting with different cheese pairings, like pepper jack for a little kick or smoked gouda for depth, also allows you to customize the flavor profile. This recipe forCrispy Pickle Cheese Bitestransforms a humble ingredient into a spectacular, crowd-pleasing snack. They are a testament to the fact that the best appetizers are often the ones that are simple to make but complex in flavor and undeniably fun to eat. Get ready to watch them vanish before your eyes!
The Accidental Discovery of Sunshine on a Plate

The first time I createdCrispy Pickle Cheese Bites, it was a desperate, late-night raid of the fridge. I was seeking salty satisfaction and stumbled upon a rogue jar of pickles and leftover cheddar. The result was a culinary epiphany—a crispy, gooey, tangy explosion that instantly banished all late-night gloom and tasted like pure, savory sunshine.
Perfecting the Cooking Process
For the ultimate crunch, start by draining the pickles thoroughly; moisture is the enemy of crispiness. Next, prepare your breading station while the oil or oven preheats. Finally, coat the pickles meticulously and ensure consistent frying or baking times to achieve that perfect golden-brown exterior and melted center.
Add Your Touch
Feel free to customize these bites! Swap sharp cheddar for Monterey Jack, or add a pinch of smoked paprika to the breadcrumbs for depth. For extra heat, finely chop jalapeños into the cream cheese mixture. If you want a gluten-free crust, crush chicken-free seasoned crackers instead of traditional breadcrumbs.
Storing & Reheating
Store any cooled leftoverCrispy Pickle Cheese Bitesin an airtight container in the refrigerator for up to three days. To revive their glorious crunch, avoid the microwave! Reheat them quickly in a toaster oven or standard oven set to 350°F (175°C) until sizzling hot and crisp again.
The Great Pickle Debate: Spears vs. Chips
Let’s talk logistics. You might be wondering, why hasn’t someone combined the crunch of a fried appetizer with the glorious brine of a pickle sooner? They have, of course, but often they are deep-fried whole spears, which are delicious but require a vat of oil and have a tendency to explode dramatically, leaving you with third-degree cheese burns. We are elevating the experience by creating manageable, elegantCrispy Pickle Cheese Bites, perfect for easy snacking without the oil-spatter drama.
The secret here is management and restraint. We aren’t deep-frying mammoth spears; we are using sturdy, well-drained slices or small chunks. This minimizes the cooking time and maximizes the surface area for that essential crunchy coating. This recipe is fundamentally about achieving the perfect contrast: the smooth, tangy, creamy interior battling the sharp, salty pickle, all wrapped in a golden, audible crunch. If snack perfection had a flavor profile, this would be it. Prepare for these to vanish faster than a tax refund.
Ingredients: Your Culinary Weapons
To create these legendary bites, you need ingredients that are ready for battle. Remember, moisture is the enemy, so choose sturdy pickles and ensure your cheese mixture is robust enough to hold its shape.
- 2 cups (about 12 large) dill pickles, sliced into 1/2 inch thick rounds or halved lengthwise
- 8 oz cream cheese, softened
- 1 cup shredded sharp cheddar cheese
- 1/4 teaspoon garlic powder
- 1/4 teaspoon onion powder
- 1/2 teaspoon dried dill
- 1/4 cup finely chopped chives or scallions (green parts only)
- 1 large egg, beaten
- 1 tablespoon milk or water
- 1 1/2 cups plain dried breadcrumbs (Panko breadcrumbs recommended for maximum crunch)
- 1/2 cup all-purpose flour
- Neutral oil (like canola or vegetable) for shallow frying, or cooking spray for baking
- For dipping: Ranch or robust creamy garlic sauce
The Blueprint for Crunchy Perfection
This process might seem elaborate, involving multiple dips and coats, but trust me, every step is crucial for maintaining structural integrity. Think of it as wrapping a delicious, salty gift. Skip the wrapping, and the contents spill out everywhere. We want contained, crispy joy.
Prepping the Pickles: The Moisture Management Strategy
First and foremost, drain your pickles. Then, drain them again. Lay your pickle slices out on a paper towel-lined baking sheet and pat them relentlessly dry. If you are using spears, cut them into half-inch chunks. If you don’t remove the moisture, the cheese filling won’t adhere, resulting in soggy disappointment.
Creating the Tangy Cheese Core
In a medium bowl, combine the softened cream cheese, shredded cheddar, garlic powder, onion powder, dried dill, and chopped chives. Mix this until it is completely homogeneous and easily spreadable. This mixture is the delicious glue that holds everything together. Once mixed, place it in the freezer for about 10 minutes to firm up slightly. This makes the next step infinitely easier.
Now, take a small spoonful of the cheese mixture and place it on one pickle slice. Top it with another pickle slice, pressing gently to form a sealed ‘sandwich.’ The cheese filling should be visible around the edges but contained. Place these pickle sandwiches onto a separate parchment-lined baking sheet. Return these to the freezer for at least 30 minutes. This hardening step is non-negotiable; it prevents the filling from escaping during cooking.
The Triple-Coat Treatment
Set up your classic breading station: one bowl for the flour, one for the egg wash (egg beaten with milk/water), and one for the breadcrumbs. Working quickly with the chilled bites, gently dredge each one in the flour, shaking off the excess. Then, dip it into the egg wash, allowing any excess to drip away. Finally, roll it thoroughly in the Panko breadcrumbs, pressing lightly to ensure full coverage. For an exceptionally crunchy shell, repeat the egg wash and breadcrumb steps (a double coat). This armor is what gives theCrispy Pickle Cheese Bitestheir name. Keep the coated bites chilled until you are ready to cook.
Frying vs. Baking: Choosing Your Crunch Path
Method 1: The Glorious Shallow Fry
Heat about 1 inch of neutral oil in a heavy-bottomed skillet over medium heat until it reaches 350°F (175°C). Carefully place the chilled bites into the hot oil, ensuring you don’t overcrowd the pan. Fry for 2 to 3 minutes per side, until they achieve a deep golden-brown hue and the cheese filling is melting but contained. Use a slotted spoon to transfer them to a paper towel-lined plate immediately. Salt them lightly while hot.
Method 2: The Oven-Baked Crunch
Preheat your oven to 400°F (200°C). Lightly spray the coated bites with cooking spray—this aids in browning. Bake for 12 to 15 minutes, flipping halfway through, until they are golden and firm. While baking results in a healthier snack, the shallow fry delivers maximum crispiness and that delightful restaurant-style texture. Both methods produce incredibly satisfying results, so choose your adventure based on your current level of patience and desired crunch level.
Serve immediately with your favorite dipping sauce. The contrast of the hot, salty, tangy bites against a cool, creamy dipping sauce is simply unparalleled. These are not merely appetizers; they are tiny, edible celebrations.
Expert Tips for Flawless Bites
-
Use high-quality Panko breadcrumbs for maximum surface area and structural integrity; standard breadcrumbs often absorb too much oil and fall flat.
-
Always double-freeze the bites—first the filling, then the coated sandwich—to prevent the cheese from oozing out prematurely during cooking.
-
Maintain consistent oil temperature around 350°F (175°C) when frying; low temperatures result in oily bites, while too high causes burning before the cheese melts.
I once served theseCrispy Pickle Cheese Bitesat a football viewing party, and one guest, who claimed to hate pickles, ate half the platter before realizing what they were. That, my friends, is a true testament to their irresistible power.
Conclusion for Crispy Pickle Cheese Bites
The journey to creating perfectCrispy Pickle Cheese Bitesis a worthwhile adventure in texture and flavor contrast. We learned that the key to avoiding disaster lies in meticulous moisture removal and the mandatory double-freezing step, ensuring your cheesy filling stays exactly where it should be—inside that gloriously crunchy shell. Whether you opt for the quick, satisfying shallow fry or the slightly lighter baked method, this recipe delivers a gourmet snack experience with minimal effort.
These tangy, salty, and utterly addictive bites are destined to be your new go-to appetizer. They transform humble ingredients into a party centerpiece, proving that sometimes, the greatest culinary discoveries happen when you simply pair a jar of pickles with a block of cheese.
Print
Crispy Pickle Cheese Bites
The ultimate appetizer! Get that salty dill tang combined with gooey mozzarella, all wrapped in a triple-layered Panko crunch. Dice, dredge, and fry your way to snack perfection.
- Total Time: 35 minutes
- Yield: 4 servings 1x
Ingredients
- 10 large dill pickle spears, patted very dry
- 1 cup shredded low-moisture mozzarella cheese
- 1 cup Panko breadcrumbs
- 1 large egg, whisked
- 1/2 cup all-purpose flour
- 1 teaspoon garlic powder
- 1 teaspoon dried dill
- 2 cups vegetable oil (for frying)
Instructions
- Step 1: Dice the dry pickle spears into small pieces. In a medium bowl, combine the diced pickles, shredded mozzarella cheese, garlic powder, and dried dill. Mix thoroughly until the ingredients are well combined.
- Step 2: Prepare a standard dredging station using three shallow dishes. Place the flour in the first dish, pour the whisked egg into the second, and place the Panko breadcrumbs in the third dish.
- Step 3: Scoop 1 tablespoon of the pickle-cheese mixture and roll it into a tight ball or small cylindrical bite. Carefully dredge the bite first in the flour (shaking off excess), then dip completely in the egg wash, and finally coat thoroughly in the Panko crumbs. Set aside and repeat for all remaining mixture.
- Step 4: Heat the vegetable oil in a deep heavy-bottomed pot to 350°F (175°C). Ensure the oil temperature is stable before proceeding. (Alternatively, preheat an air fryer to 400°F/200°C).
- Step 5: Working in small batches (to avoid crowding the oil and dropping the temperature), carefully drop the coated bites into the hot oil and fry for 2 to 3 minutes, turning occasionally, until the coating is deeply golden brown and crispy.
- Step 6: Remove the Crispy Pickle Cheese Bites with a slotted spoon and transfer them immediately to a paper towel-lined plate to drain any excess oil. Serve warm with ranch dressing or dipping sauce of choice.
Notes
- If preparing ahead, dredge and freeze the uncooked bites solid on a tray, then transfer to a sealed bag; cook directly from frozen, adding 1-2 minutes to the frying time.
- To revive leftover bites and restore maximum crunch, reheat them in an oven or air fryer at 350°F (175°C) for 5-7 minutes until the cheese is gooey again.
- Elevate your appetizer game by serving these hot bites alongside a cool, creamy dipping sauce like chipotle mayo or a slightly sweet honey mustard for a perfect temperature and flavor contrast.
- Crucial step: Ensure the diced pickle spears are patted aggressively dry with paper towels; any remaining moisture will cause the cheese mixture to break down during frying, leading to a messy cheese leak.
- Prep Time: 15 minutes
- Cook Time: 20 minutes
- Method: Stovetop
- Cuisine: American


Leave a Comment