

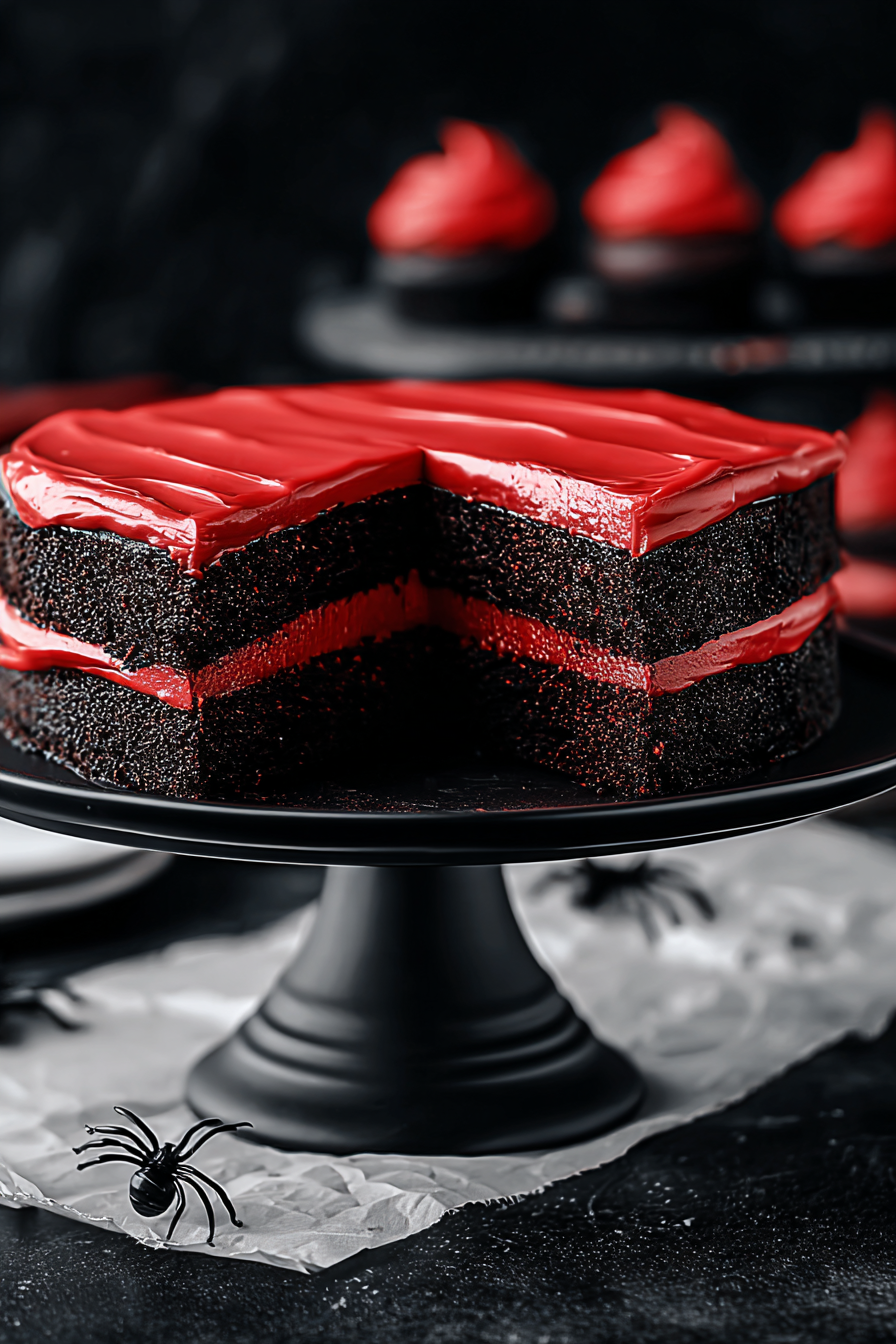
The mere thought of **Black Velvet Cake with Red Icing** conjures images of decadent indulgence, a symphony of textures and flavors dancing on your palate, with a slightly tangy, rich, and moist delight. Just imagine slicing through the dark, velvety cake to reveal the vibrant crimson frosting—it’s a feast for the eyes and the soul!
Baking this **Black Velvet Cake with Red Icing** is like a warm hug from your grandmother, but with a sassy wink. It’s the kind of dessert that turns ordinary moments into celebrations, a guaranteed crowd-pleaser perfect for birthdays, holidays, or when you just need a little bit of unapologetic joy.
Here’s why this **Black Velvet Cake with Red Icing** will become your go-to dessert:
- The incredibly moist and tender cake practically melts in your mouth, making every bite a blissful experience.
- The striking contrast between the dark cake and vibrant red icing creates a stunning visual that’s sure to impress.
- With simple ingredients and easy-to-follow instructions, even beginner bakers can achieve bakery-worthy results.
- This cake is endlessly customizable, allowing you to experiment with different extracts and toppings to create your own signature version.
Ingredients for Black Velvet Cake with Red Icing
Here’s what you’ll need to make this delicious dish:
The full ingredients list, including measurements, is provided in the recipe card directly below.
How to Make Black Velvet Cake with Red Icing
Follow these simple steps to prepare this delicious dish:
Step 1: Prep Time!
Preheat your oven to 350°F (175°C). Grease and flour two 9-inch round cake pans. Seriously, don’t skip the flouring, unless you want your cake stuck like glue!
Step 2: Mixing Magic
In a large bowl, whisk together the flour, sugar, cocoa powder, baking soda, and salt. In a separate bowl, combine the buttermilk, oil, eggs, and Alcohol-free vanilla extract. Gradually add the wet ingredients to the dry ingredients, mixing until just combined. Don’t overmix—unless you like hockey pucks instead of cake.
Step 3: Bake It ‘Til You Make It
Divide the batter evenly between the prepared cake pans and bake for 30-35 minutes, or until a wooden skewer inserted into the center comes out clean. Let the cakes cool in the pans for 10 minutes before inverting them onto a wire rack to cool completely. Patience is a virtue, especially when it comes to cooling cake.
Step 4: Icing on the Cake (Literally!)
While the cakes are cooling, prepare the icing. In a large bowl, beat the butter and cream cheese until smooth and creamy. Gradually add the powdered sugar, beating until light and fluffy. Add the red food coloring and milk, beating until the icing reaches your desired consistency and color. If it’s too thick, add a splash more milk; too thin, add a bit more powdered sugar.
Step 5: Assembly Required
Once the cakes are completely cool, level them off with a serrated knife if necessary. Place one cake layer on a serving plate or cake stand and spread with a generous amount of icing. Top with the second cake layer and frost the entire cake with the remaining icing. Get creative with your frosting swirls—it’s your edible masterpiece!
Step 6: Devour and Enjoy
Slice and serve this beautiful Black Velvet Cake with Red Icing. Prepare for the compliments to roll in, and maybe even a standing ovation. This cake is best enjoyed with a tall glass of milk or a cup of coffee.
Variations and Tips for Black Velvet Cake with Red Icing (H2)
Want to jazz things up or need a little help? I’ve got you covered!
Swirls and Twirls: Icing Alternatives (H3)
While classic red cream cheese icing is divine, don’t be afraid to experiment! Try a vanilla buttercream, a chocolate ganache, or even a stabilized whipped cream for a lighter option. You could even add a hint of citrus zest to the icing for a bright, refreshing twist. Get creative with your piping techniques, too! A simple swirl or rosette can elevate the presentation of your cake. Remember, the icing is your canvas, so have fun!
Cake Customizations (H3)
To avoid over-optimization for the focus keyphrase **Black Velvet Cake with Red Icing**, let’s explore other recipe modifications. Consider adding a layer of raspberry jam between the cake layers for a fruity surprise. Chopped nuts, such as pecans or walnuts, can also add a delightful crunch and nutty flavor. For a more intense chocolate experience, you can add chocolate chips to the batter. You can also experiment with different extracts, such as almond or peppermint, to customize the flavor profile of your cake.
Troubleshooting Tips (H3)
Cake sinking in the middle? Your oven temperature might be off, or you might have overmixed the batter. Dry cake? You might have overbaked it, or used too much flour. Icing too thin? Add more powdered sugar. Icing too thick? Add a splash of milk. Don’t be afraid to adjust the recipe to suit your preferences and your equipment. Baking is a science, but it’s also an art!
Storage Solutions (H3)
To maintain the cake’s flavor, texture, and moistness, proper storage is essential. After icing, transfer the cake to an airtight container or wrap it tightly with plastic wrap. You can store it at room temperature for up to 3 days or in the refrigerator for up to a week. If you want to freeze the cake, wrap the individual slices tightly in plastic wrap and place them in a freezer-safe bag or container. Frozen cake can last for up to 2-3 months. When you’re ready to enjoy it, thaw the cake in the refrigerator overnight or at room temperature for a few hours.
Why This Black Velvet Cake Is Better Than Therapy (H2)
Okay, maybe not *better* than therapy, but definitely a close second. Seriously, though, this cake is:
- **Stress-Relieving:** The process of baking is incredibly therapeutic, from measuring ingredients to watching the cake rise in the oven.
- **Mood-Boosting:** Chocolate is a natural mood enhancer, and the vibrant red icing adds a touch of whimsy to brighten your day.
- **Shareable:** Baking is an act of love, and sharing this cake with friends and family is a guaranteed way to spread joy.
- **Deliciously Satisfying:** Need I say more? This cake is simply irresistible.
Black Velvet Cake with Red Icing: Your New Signature Dessert (H2)
So, there you have it—everything you need to bake the most amazing **Black Velvet Cake with Red Icing**. Get baking, get creative, and get ready to impress everyone with your new signature dessert. Happy baking!
Perfecting the Cooking Process
To achieve the most scrumptious results, tackle the frosting while the cake layers cool. This strategic move saves time and ensures that you’re not rushing the decorating process. Let the cake layers cool completely before frosting.
Add Your Touch
Feel free to get creative with the frosting. Instead of classic vanilla, consider a cream cheese frosting for a tangier twist, or even a white chocolate ganache for added richness. Sprinkles, chocolate shavings, or fresh berries can elevate the final presentation.
Storing & Reheating
Store leftover cake in an airtight container at room temperature for up to three days or in the refrigerator for up to a week. To retain moisture, cover the cut edges with plastic wrap. There’s no reheating necessary; enjoy it straight from the fridge or at room temperature.
Here are some tips for achieving the perfect **Black Velvet Cake with Red Icing**:
- Ensure your butter and eggs are at room temperature for better emulsification, resulting in a smoother, more uniform batter.
- Don’t overmix the batter once you add the flour; overmixing can develop the gluten and create a tough cake.
- Let the cake layers cool completely before frosting to prevent the icing from melting and creating a sticky mess.
(Personal anecdote formated as paragraph subheading)
I once made this cake for a friend’s birthday, and she declared it the best cake she’d ever had. The vibrant red icing against the dark cake made it an instant showstopper.
Unveiling the Allure of Black Velvet Cake with Red Icing
Have you ever encountered a dessert so visually striking, so utterly captivating, that it stops you in your tracks? Well, buckle up, buttercup, because we’re diving headfirst into the enchanting world of **Black Velvet Cake with Red Icing**. This isn’t just a cake; it’s a statement. It’s a dessert that whispers secrets of decadence and screams, “Celebrate good times!” It’s the dessert equivalent of a little black dress, but, you know, edible and far more satisfying.
Now, I know what you might be thinking: “Another cake recipe? Groundbreaking.” But trust me, this one is different. It’s not your run-of-the-mill, bake-sale, forgettable dessert. This **Black Velvet Cake with Red Icing** is a showstopper, a conversation starter, and a guaranteed crowd-pleaser. And honestly, who doesn’t want to be known as the person who brought *that* cake?
The combination of the deep, dark, velvety cake layers with the shockingly vibrant red icing is a visual masterpiece. It’s a gothic romance novel in cake form, a delicious paradox that somehow works perfectly. It’s elegant enough for a fancy dinner party but also comforting enough for a cozy night in. It’s basically the dessert equivalent of a chameleon, adapting to any situation with effortless grace.
So, if you’re ready to unleash your inner baking superstar and create a dessert that will have everyone begging for the recipe, then keep reading. We’re about to embark on a baking adventure that will tantalize your taste buds, impress your friends, and leave you feeling like a culinary genius.
Why Black Velvet Cake with Red Icing Rocks
Okay, let’s be real. There are a million cake recipes out there. So, why should you dedicate your precious time and energy to making this particular **Black Velvet Cake with Red Icing**? Besides the fact that it’s visually stunning and tastes like a dream, there are a few other compelling reasons why this cake is a winner.
First of all, it’s surprisingly easy to make. Don’t let the fancy appearance fool you. This recipe is straightforward and forgiving, even for novice bakers. I’ve seen people who can barely boil water successfully whip up this masterpiece. The key is to follow the instructions carefully and not be afraid to experiment.
Secondly, the flavor combination is out of this world. The subtle chocolate notes of the black velvet cake are perfectly balanced by the sweet and tangy red icing. It’s a symphony of flavors that will leave you wanting more. Plus, the velvety texture of the cake is simply divine. It’s like biting into a cloud of chocolatey goodness.
Thirdly, this cake is a guaranteed crowd-pleaser. I’ve made it for birthdays, holidays, potlucks, and even just because, and it’s always a hit. People are drawn to its striking appearance, and they’re instantly hooked by its irresistible flavor. It’s the kind of cake that makes people say, “Wow, you made this?” And let’s be honest, who doesn’t love a little bit of validation?
Finally, it’s customizable. You can adapt the recipe to suit your preferences and dietary needs. Want to use a different type of icing? Go for it! Want to add some nuts or chocolate chips to the batter? Be my guest! The possibilities are endless.
Ingredients: Your Shopping List for Success
Before we dive into the baking process, let’s make sure you have all the necessary ingredients. After all, you can’t make a masterpiece without the right tools, right? So, grab your shopping list and get ready to stock up on the essentials for this incredible **Black Velvet Cake with Red Icing**.
**For the Black Velvet Cake: **
- All-purpose flour: The foundation of our cake.
- Granulated sugar: Sweetness is key.
- Unsweetened cocoa powder: For that deep, dark chocolatey flavor.
- Baking soda: Helps the cake rise.
- Salt: Enhances the flavors.
- Vegetable oil: Adds moisture.
- Eggs: Binds the ingredients together.
- Buttermilk: Creates a tender crumb.
- Alcohol-free vanilla extract: Adds a touch of warmth.
- Red food coloring: For that signature black velvet hue (use gel food coloring for best results).
- White vinegar: Reacts with the baking soda to create a light and fluffy texture.
- Hot coffee: Enhances the chocolate flavor.
**For the Red Icing: **
- Powdered sugar: The base of our sweet and tangy icing.
- Butter: Adds richness and flavor.
- Cream cheese: Creates a smooth and tangy texture.
- Alcohol-free vanilla extract: A must-have for any good icing.
- Red food coloring: To achieve that vibrant red hue.
- Milk or cream: To adjust the consistency of the icing.
Step-by-Step Guide: Baking Your Way to Glory
Alright, aspiring bakers, it’s time to roll up your sleeves, preheat your ovens, and get ready to transform these ingredients into a **Black Velvet Cake with Red Icing** masterpiece. Follow these step-by-step instructions, and you’ll be enjoying a slice of heaven in no time.
**Making the Black Velvet Cake: **
1. Preheat your oven to 350°F (175°C). Grease and flour two 9-inch round cake pans.
2. In a large bowl, whisk together the flour, sugar, cocoa powder, baking soda, and salt.
3. In a separate bowl, combine the vegetable oil, eggs, buttermilk, Alcohol-free vanilla extract, and red food coloring.
4. Gradually add the wet ingredients to the dry ingredients, mixing until just combined. Be careful not to overmix.
5. In a small bowl, combine the white vinegar and hot coffee. Add this mixture to the batter and mix well.
6. Pour the batter evenly into the prepared cake pans.
7. Bake for 30-35 minutes, or until a wooden skewer inserted into the center comes out clean.
8. Let the cakes cool in the pans for 10 minutes before inverting them onto a wire rack to cool completely.
**Making the Red Icing: **
1. In a large bowl, beat the butter and cream cheese until smooth and creamy.
2. Gradually add the powdered sugar, beating until well combined.
3. Stir in the Alcohol-free vanilla extract and red food coloring.
4. Add milk or cream, one tablespoon at a time, until the icing reaches your desired consistency.
**Assembling the Cake: **
1. Once the cakes are completely cool, level the tops with a serrated knife.
2. Place one cake layer on a serving plate or cake stand.
3. Spread a generous layer of red icing over the top.
4. Place the second cake layer on top of the icing.
5. Frost the entire cake with the remaining icing.
6. Decorate as desired.
Tackling Common Baking Blunders with Black Velvet Cake with Red Icing
Even the most experienced bakers encounter hiccups in the kitchen. But fear not, my friends! I’m here to help you navigate the potential pitfalls of making **Black Velvet Cake with Red Icing** and emerge victorious.
- **Dry cake:** This is usually caused by overbaking or using too much flour. Be sure to measure your flour accurately and don’t overbake the cake. Check for doneness with a wooden skewer.
- **Dense cake:** Overmixing the batter can lead to a dense cake. Mix the wet and dry ingredients until just combined, and then stop.
- **Icing too thin:** Add more powdered sugar, a tablespoon at a time, until the icing reaches your desired consistency.
- **Icing too thick:** Add more milk or cream, a teaspoon at a time, until the icing thins out.
- **Uneven layers:** Level the tops of the cake layers with a serrated knife before frosting.
Variations on a Theme: Black Velvet Cake with Red Icing Remixes
While the classic **Black Velvet Cake with Red Icing** is a masterpiece in its own right, there’s always room for a little experimentation, right? Here are a few variations to spice things up and make this cake your own.
- **Cream Cheese Frosting:** Swap out the classic red icing for a tangy cream cheese frosting.
- **White Chocolate Ganache:** For a truly decadent treat, try frosting the cake with a rich white chocolate ganache.
- **Berry Compote Filling:** Add a layer of fresh berry compote between the cake layers for a burst of fruity flavor.
- **Chocolate Shavings:** Decorate the cake with chocolate shavings for an extra touch of chocolatey goodness.
- **Sprinkles:** Because sprinkles make everything better.
Frequently Asked Questions: Your Black Velvet Cake with Red Icing Queries Answered
Got questions? I’ve got answers! Here are some frequently asked questions about making **Black Velvet Cake with Red Icing** to help you bake with confidence.
- **Can I make this cake ahead of time?** Absolutely! The cake layers can be baked a day or two in advance and stored tightly wrapped at room temperature or in the refrigerator. The icing can also be made ahead of time and stored in the refrigerator.
- **Can I freeze this cake?** Yes, you can freeze the cake layers or the entire frosted cake. Wrap the cake tightly in plastic wrap and then in foil.
- **Can I use a different type of flour?** While all-purpose flour is recommended, you can experiment with other types of flour, such as cake flour or pastry flour.
- **Can I reduce the amount of sugar?** You can reduce the amount of sugar slightly, but keep in mind that it will affect the texture and flavor of the cake.
Serving Suggestions: Elevating the Black Velvet Cake with Red Icing Experience
You’ve baked the perfect **Black Velvet Cake with Red Icing**. Now, it’s time to present it in all its glory. Here are some serving suggestions to elevate the experience and make it even more memorable.
- Serve with a scoop of vanilla ice cream or a dollop of whipped cream.
- Garnish with fresh berries or chocolate shavings.
- Pair with a glass of milk, coffee, or tea.
- Cut into elegant slices and arrange on a platter for a sophisticated presentation.
- Serve as a centerpiece at your next party or gathering.
Conclusion for Black Velvet Cake with Red Icing :
This Black Velvet Cake with Red Icing is more than just a dessert; it’s a showstopper that’s surprisingly easy to make. Its moist crumb, combined with the striking red icing, creates a delightful visual and taste experience. So go ahead, bake this cake and share a slice (or two) with those you love. It’s guaranteed to bring smiles and create sweet memories, and that’s what baking is all about.
Print
Black Velvet Cake with Red Icing
Delicious black velvet cake with red icing recipe with detailed instructions and nutritional information.
- Total Time: 35 minutes
- Yield: 4 servings 1x
Ingredients
- All-purpose flour 2 1/2 cups
- Unsweetened cocoa powder 1/2 cup
- Granulated sugar 2 cups
- Baking soda 1 teaspoon
- Salt 1 teaspoon
- Buttermilk 1 cup
- Vegetable oil 1 cup
- Eggs 2 large
- Red food coloring 2 ounces
- White vinegar 1 teaspoon
- Vanilla extract 1 teaspoon
- Cream cheese 8 ounces
- Unsalted butter 1/2 cup
- Powdered sugar 4 cups
Instructions
- Step 1: Preheat oven to 350°F (175°C). Grease and flour two 9-inch round cake pans. In a large bowl, whisk together flour, cocoa powder, sugar, baking soda, and salt.
- Step 2: In a separate bowl, combine buttermilk, oil, eggs, red food coloring, vinegar, and vanilla extract. Add the wet ingredients to the dry ingredients and mix until just combined. Do not overmix.
- Step 3: Pour batter evenly into the prepared cake pans and bake for 25-30 minutes, or until a toothpick inserted into the center comes out clean.
- Step 4: Let the cakes cool in the pans for 10 minutes before inverting them onto a wire rack to cool completely.
- Step 5: For the icing, beat together the softened cream cheese and butter until smooth and creamy. Gradually add the powdered sugar, beating until light and fluffy.
- Step 6: Once the cakes are completely cool, frost the top of one layer with the red icing, then place the second layer on top and frost the entire cake.
Notes
- To keep your Black Velvet Cake moist, store it in an airtight container at room temperature for up to 3 days or in the refrigerator for up to a week.
- If you want to warm a slice, microwave it for 10-15 seconds to slightly soften the cake and enhance its flavors.
- Serve this decadent cake with a scoop of vanilla ice cream or a dollop of whipped cream to complement its richness and vibrant color.
- For a richer chocolate flavor, bloom the cocoa powder by whisking it with the hot, but not boiling, buttermilk before adding it to the other wet ingredients.
- Prep Time: 15 minutes
- Cook Time: 20 minutes
- Method: Stovetop
- Cuisine: American
FAQs :
What makes this Black Velvet Cake with Red Icing so special?
Okay, let’s be real, most cakes are just… cake. But this Black Velvet Cake with Red Icing? This is an *experience*. We’re talking a super moist, tender crumb thanks to the buttermilk, a subtle cocoa flavor that doesn’t overpower, and then BAM! That vibrant red icing that screams “party in your mouth!” It’s the cake that wows at potlucks, impresses your picky mother-in-law, and secretly becomes your comfort food after a long day. It’s special because it’s simply delicious and a bit extra, just like you deserve.
Can I use different food coloring for the red icing on the Black Velvet Cake?
Absolutely! While the red icing is iconic and adds a certain dramatic flair to the Black Velvet Cake, feel free to experiment. Pink icing for a whimsical touch? Orange for a fall harvest vibe? Go wild! Just be mindful that some food colorings can alter the taste, so start with a small amount and adjust to your liking. Gel food coloring generally provides the most intense color with the least liquid, preventing a runny icing situation, which nobody wants.
Is it possible to freeze this Black Velvet Cake with Red Icing?
You bet your sweet spatula you can! If you’re not planning to devour the whole cake immediately (though I wouldn’t blame you), freezing is a great option. Wrap the cooled, unfrosted cake layers tightly in plastic wrap, then foil, or place them in a freezer-safe container. The icing can also be frozen separately in an airtight container. When ready to enjoy, thaw the cake layers overnight in the refrigerator and then frost. It’s like having a secret stash of happiness waiting for you!
How do I avoid a dry Black Velvet Cake?
Ah, the age-old baking question! The key to a moist Black Velvet Cake lies in a few secrets. First, don’t overbake it! Use a toothpick to check for doneness – it should come out with a few moist crumbs attached. Second, the buttermilk is your friend. It adds moisture and tenderness. Finally, don’t skip the cooling rack step. Let the cakes cool completely before frosting to avoid a melty, sticky mess. Follow these tips, and you’ll be swimming in moist, velvety goodness in no time.

Leave a Comment