
Ah, Spring celebration. The time for egg hunts, pastel sweaters, and dodging questions from relatives about your life choices. But let’s be honest, the real star of the show is the dessert table, and this Spring celebration Chick Cupcakes Recipe is ready to steal the spotlight with its irresistible cuteness and delightful flavor.
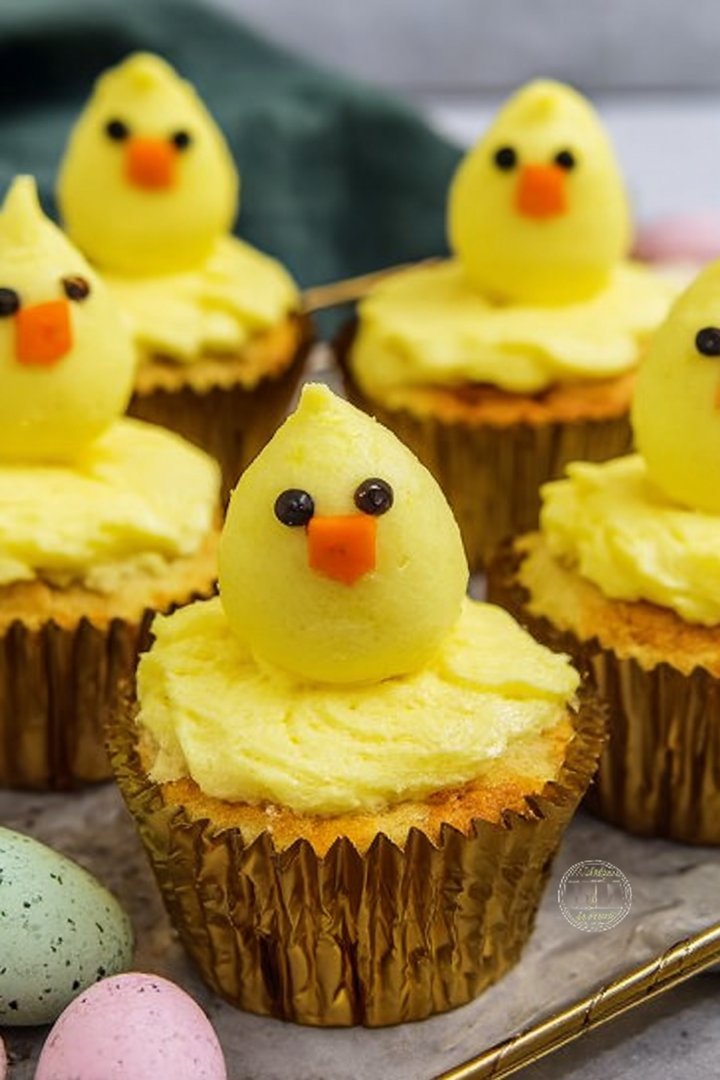
Imagine biting into a moist, vanilla cupcake, topped with a fluffy buttercream frosting transformed into an adorable chick. The subtle sweetness and playful decoration make them a perfect treat for kids and adults alike, offering a delicious escape from any awkward family banter.
Here are a few reasons why these Spring celebration Chick Cupcakes will be the hit of your holiday celebration:
- Effortless charm meets simple steps, making these cupcakes a delightful project even for novice bakers.
- A symphony of sweet vanilla and creamy buttercream creates a flavor profile that’s both comforting and festive.
- With their bright yellow frosting and candy eyes, these cupcakes are guaranteed to bring smiles and cheerful vibes.
- Perfect for Spring celebration brunch, dessert, or a fun baking activity, these cupcakes are as versatile as they are delicious.
Ingredients for Spring celebration Chick Cupcakes Recipe
Here’s what you’ll need to make this delicious dish:
The full ingredients list, including measurements, is provided in the recipe card directly below.
How to Make Spring celebration Chick Cupcakes Recipe
Follow these simple steps to prepare this delicious dish:
Step 1: Preheat and Prep
Preheat your oven to 350°F (175°C). Line a 12-cup muffin tin with cupcake liners. This ensures the cupcakes don’t stick and are easy to remove.
Step 2: Mix Dry Ingredients
In a medium bowl, whisk together the flour, sugar, baking powder, and salt. This evenly distributes the leavening agent for consistent results.
Step 3: Cream Butter and Sugar
In a separate bowl, cream together the softened butter and sugar until light and fluffy. This incorporates air into the batter, contributing to a tender texture.
Step 4: Add Eggs and Vanilla
Beat in the eggs one at a time, then stir in the Alcohol-free vanilla extract. Make sure each egg is fully incorporated before adding the next.
Step 5: Alternate Dry and Wet Ingredients
Gradually add the dry ingredients to the wet ingredients, alternating with the milk, beginning and ending with the dry ingredients. Mix until just combined. Avoid overmixing, which can lead to tough cupcakes.
Step 6: Bake
Fill each cupcake liner about two-thirds full. Bake for 18-20 minutes, or until a wooden skewer inserted into the center comes out clean.
Step 7: Cool
Let the cupcakes cool in the muffin tin for a few minutes before transferring them to a wire rack to cool completely.
Step 8: Make the Buttercream
While the cupcakes are cooling, prepare the buttercream frosting. In a large bowl, beat together the softened butter and powdered sugar until light and fluffy. Add a few drops of yellow food coloring and mix until the desired color is achieved.
Step 9: Decorate
Once the cupcakes are completely cool, frost them with the yellow buttercream. Attach two candy eyes to each cupcake and use orange sprinkles to create a beak. Get creative and have fun with the decorations!
Transfer to a serving platter and watch these adorable Spring celebration Chick Cupcakes bring joy to your celebration!
Tips for the Perfect Spring celebration Chick Cupcakes Recipe (H2)
Making these adorable chick cupcakes is easier than escaping your aunt’s endless stories about her cat, but here are a few tips to ensure cupcake perfection.
Ensuring Moist Cupcakes (H3)
Nobody wants a dry cupcake, especially during a festive occasion. To guarantee a moist and tender crumb, avoid overbaking. Start checking for doneness around 18 minutes and remove them from the oven as soon as a wooden skewer inserted into the center comes out clean. Also, make sure you measure your flour correctly. Spoon the flour into your measuring cup and level it off with a knife instead of scooping directly from the bag, which can pack the flour and lead to a denser cupcake.
Achieving Fluffy Buttercream (H3)
A light and fluffy buttercream is essential for these chick cupcakes. Use softened, not melted, butter and beat it for several minutes until it’s light and airy. Gradually add the powdered sugar, mixing on low speed to prevent a sugar cloud. If the frosting is too thick, add a tablespoon of milk at a time until you reach the desired consistency.
Decorating Like a Pro (H3)
The decoration is where the Spring celebration Chick Cupcakes Recipe truly comes to life! Use a piping bag fitted with a large round tip to create a smooth, even layer of buttercream. For the candy eyes, use a dab of extra buttercream to help them adhere to the frosting. Get creative with the beak, you can also use a small piece of orange fondant instead of sprinkles. Let the kids join in on the decorating fun for a truly memorable Spring celebration activity.
Variations on the Spring celebration Chick Cupcakes Recipe (H2)
Want to add a little twist to your Spring celebration Chick Cupcakes? Here are a few variations to spark your creativity.
Chocolate Chick Cupcakes (H3)
Transform the classic vanilla cupcake into a chocolate delight by adding cocoa powder to the dry ingredients. Use about 1/4 cup of unsweetened cocoa powder for a rich, chocolatey flavor. You can even add chocolate chips to the batter for an extra layer of indulgence. Top with the same yellow buttercream and decorations for a fun and festive chocolate chick.
Lemon Chick Cupcakes (H3)
For a bright and zesty flavor, try making lemon cupcakes. Add the zest of one lemon and a tablespoon of lemon juice to the batter. The lemon flavor complements the sweet buttercream beautifully, creating a refreshing treat that’s perfect for spring. You can even add a few drops of yellow food coloring to the batter for an extra pop of color.
Gluten-Free Chick Cupcakes (H3)
If you have gluten sensitivities, don’t worry, you can still enjoy these adorable chick cupcakes! Simply substitute the all-purpose flour with a gluten-free all-purpose flour blend. Make sure the blend contains xanthan gum to help bind the ingredients together. The rest of the recipe remains the same, ensuring everyone can indulge in these festive treats.
Making Spring celebration Baking Fun for Everyone (H2)
Spring celebration is a time for family, fun, and delicious treats. And what better way to celebrate than by making these Spring celebration Chick Cupcakes Recipe? Whether you stick to the classic recipe or try one of the variations, these cupcakes are sure to bring smiles to everyone’s faces. So gather your ingredients, preheat your oven, and get ready to bake some Spring celebration magic! These cupcakes are cute, tasty, and bound to be successful.
The Joy of Sharing (H2)
The best part about baking is sharing your creations with loved ones. These Spring celebration Chick Cupcakes are the perfect way to spread some Spring celebration cheer. Bring them to a family gathering, a school bake sale, or simply share them with your neighbors. The adorable chicks are guaranteed to brighten anyone’s day and make Spring celebration a little bit sweeter. Happy Baking!
Perfecting the Cooking Process
For the best Spring celebration Chick Cupcakes recipe results, begin by prepping all your ingredients. Cream the butter and sugar thoroughly to create a light and fluffy base. Ensure your oven is preheated to the correct temperature before baking to guarantee even cooking.
Add Your Touch
Get creative and personalize your Spring celebration Chick Cupcakes. You could swap Alcohol-free vanilla extract for lemon or almond, adding a zesty twist. Experiment with different food colorings to create a vibrant array of chick shades. Consider adding mini chocolate chips for extra texture.
Storing & Reheating
Store your finished Spring celebration Chick Cupcakes recipe in an airtight container at room temperature to maintain their moist texture. They’ll stay fresh for up to three days. Reheating isn’t typically needed, but a quick zap in the microwave for 10 seconds can soften the frosting.
Here are some tips for perfect Spring celebration Chick Cupcakes recipe:
- Ensure your butter is softened before creaming it with sugar; this will give you a smoother, lighter batter for a better cupcake texture.
- Avoid overmixing the batter once you add the flour – overmixing develops gluten and can result in tough cupcakes instead of fluffy ones.
- Use a piping bag and a star tip for the frosting to create a professional, whimsical chick design, making each cupcake adorable and festive.
(Personal anecdote formated as paragraph subheading)
My daughter once tried to make these cupcakes using cream cheese frosting and they looked like little yellow snowballs. Still tasted great, though!
Unlocking the Secrets to the Ultimate Spring celebration Chick Cupcakes Recipe
Alright, folks, gather ’round! We’re diving headfirst into the wonderfully whimsical world of **Spring celebration Chick Cupcakes recipe**. Now, I know what you’re thinking: “Cupcakes? Been there, frosted that.” But hold your horses, because these aren’t your average run-of-the-mill desserts. These are little bundles of sunshine, guaranteed to bring a smile to even the grumpiest of bunnies (or humans, for that matter).
Why should you trust me, you ask? Well, let’s just say I’ve had my fair share of kitchen mishaps. I’ve set off the smoke alarm more times than I care to admit, and I once tried to bake a cake in a Bundt pan without greasing it (disaster doesn’t even begin to cover it). But through all the flour explosions and frosting failures, I’ve learned a thing or two about baking, and I’m here to share my wisdom (and a whole lot of laughs) with you.
So, grab your aprons, preheat those ovens, and get ready to embark on an **Spring celebration Chick Cupcakes recipe** adventure! We’re about to turn your kitchen into a chick-filled wonderland!
The Chick Blueprint: What You’ll Need
Before we get cracking (pun intended!), let’s gather our supplies. Think of this as your chick-creating toolbox. We’re talking ingredients, equipment, and a whole lot of Spring celebration spirit. Don’t worry, I’ll keep it simple. We’re aiming for deliciousness, not a culinary degree.
Here’s your shopping list:
- **For the Cupcakes:** All-purpose flour (the unsung hero of baking), granulated sugar (sweetness is key!), baking powder (for that delightful lift), salt (a pinch of magic), unsalted butter (softened, not melted!), eggs (the glue that holds it all together), Alcohol-free vanilla extract (a flavor enhancer extraordinaire), and milk (for moisture, darling).
- **For the Frosting:** Unsalted butter (again, softened), powdered sugar (sweetness overload!), milk (a little goes a long way), Alcohol-free vanilla extract (because why not?), yellow food coloring (for that iconic chick hue).
- **For the Decorations:** Candy eyes (because every chick needs a soul), orange sprinkles (for beaks that are both cute and crunchy), and your imagination (the most important ingredient of all!).
Now, for the tools of the trade:
- A cupcake tin (because, duh), cupcake liners (for easy cleanup), mixing bowls (big ones!), an electric mixer (or a strong arm and a whisk), measuring cups and spoons (precision is key!), a spatula (for scraping every last bit of batter), and a piping bag with a star tip (for professional-looking frosting swirls).
Got everything? Excellent! Let’s move on to the fun part.
From Batter to Beauty: The Chick Cupcake Creation Process
Alright, let’s get baking! This is where the magic happens. Follow these steps carefully, and you’ll be well on your way to **Spring celebration Chick Cupcakes recipe** perfection.
1. **Preheat and Prep: ** Preheat your oven to 350°F (175°C). Line your cupcake tin with those adorable liners. This prevents sticking and makes cleanup a breeze.
2. **Dry Ingredients Unite: ** In a large bowl, whisk together the flour, sugar, baking powder, and salt. This ensures everything is evenly distributed.
3. **Creaming is Key: ** In a separate bowl, cream together the softened butter and sugar until light and fluffy. This is where that electric mixer comes in handy.
4. **Egg-cellent Addition: ** Beat in the eggs one at a time, then stir in the Alcohol-free vanilla extract.
5. **Alternate and Conquer: ** Gradually add the dry ingredients to the wet ingredients, alternating with the milk, beginning and ending with the dry ingredients. Mix until just combined. Don’t overmix!
6. **Fill ‘Em Up: ** Fill each cupcake liner about 2/3 full.
7. **Bake It ‘Til You Make It: ** Bake for 18-20 minutes, or until a toothpick inserted into the center comes out clean.
8. **Cool Down: ** Let the cupcakes cool in the tin for a few minutes before transferring them to a wire rack to cool completely.
Now, while those cupcakes are cooling, let’s tackle the frosting.
Frosting Frenzy: The Art of the Yellow Swirl
This is where your inner artist gets to shine! Frosting can be intimidating, but trust me, it’s easier than it looks.
1. **Butter Up: ** In a large bowl, cream together the softened butter and powdered sugar until light and fluffy.
2. **Milk It: ** Gradually add the milk, one tablespoon at a time, until you reach your desired consistency.
3. **Vanilla Vibes: ** Stir in the Alcohol-free vanilla extract.
4. **Yellow Fever: ** Add yellow food coloring, one drop at a time, until you achieve that perfect chick-yellow hue.
5. **Piping Power: ** Transfer the frosting to a piping bag fitted with a star tip.
Now, for the fun part: decorating! Swirl that frosting on those cooled cupcakes like a pro. Don’t worry if it’s not perfect. Imperfection is charming!
Chick-tastic Decorations: Bringing Your Cupcakes to Life
Alright, it’s time to transform those frosted cupcakes into adorable little chicks! This is where those candy eyes and orange sprinkles come into play.
1. **Eye See You: ** Gently press two candy eyes onto the top of each cupcake.
2. **Beak-a-boo: ** Sprinkle orange sprinkles below the eyes to create a cute little beak.
3. **Get Creative: ** Feel free to add other decorations, like shredded coconut for feathers or mini chocolate chips for wings. The sky’s the limit!
And there you have it! Your very own batch of **Spring celebration Chick Cupcakes recipe**, ready to delight and amaze.
Troubleshooting Your Chick Creation: Common Issues and Fixes
Even the most seasoned bakers encounter hiccups along the way. Here are a few common **Spring celebration Chick Cupcakes recipe** issues and how to solve them:
- **Cupcakes are dry:** You may have overbaked them. Try reducing the baking time by a minute or two next time. Also, make sure you’re not overmeasuring the flour.
- **Frosting is too runny:** Add more powdered sugar, one tablespoon at a time, until you reach your desired consistency.
- **Frosting is too stiff:** Add more milk, one teaspoon at a time, until it softens up.
- **Cupcakes are sinking in the middle:** You may have opened the oven door too early, or the oven temperature may not be accurate.
Don’t be discouraged if your first batch isn’t perfect. Baking is a learning process. The more you practice, the better you’ll get.
Perfecting the Cooking Process
To maximize efficiency, soften the butter well in advance and measure all dry ingredients beforehand. This streamlined preparation ensures a smooth transition from mixing to baking, yielding consistently delicious cupcakes. Time management is key to baking success.
Add Your Touch
Consider incorporating grated lemon zest into the batter for a citrusy twist. Swap out the yellow food coloring for natural alternatives like turmeric powder. Replace the sprinkles with edible glitter for a dazzling, customized look.
Storing & Reheating
Store your Spring celebration Chick Cupcakes recipe in an airtight container at room temperature, which helps maintain their moist texture and keeps the frosting from drying out. Avoid refrigerating them, as this can make the cupcakes stale.
Here are some tips for perfect Spring celebration Chick Cupcakes recipe:
- When measuring flour, spoon it into the measuring cup instead of scooping it directly from the bag to avoid packing it too tightly.
- To prevent cupcakes from sticking to the liners, lightly spray the inside of each liner with non-stick cooking spray before filling them with batter.
- Use a toothpick to gently smooth out any air bubbles in the batter before baking, which will give your cupcakes a more even and professional finish.
(Personal anecdote formated as paragraph subheading)
I recall the first time baking these, I mistakenly used salted butter and the taste was unexpected, yet somehow, they still vanished in minutes at the party!
Conclusion for Spring celebration Chick Cupcakes Recipe :
These Spring celebration Chick Cupcakes are more than just a dessert, they’re a delightful project that brings joy to both the baker and the eater. From the fluffy cupcake base to the bright yellow frosting and adorable fondant beaks, every element contributes to a festive treat. They are sure to be a hit at your Spring celebration celebration. So gather your ingredients, preheat your oven, and prepare to create some seriously cute and delicious chick cupcakes!
Print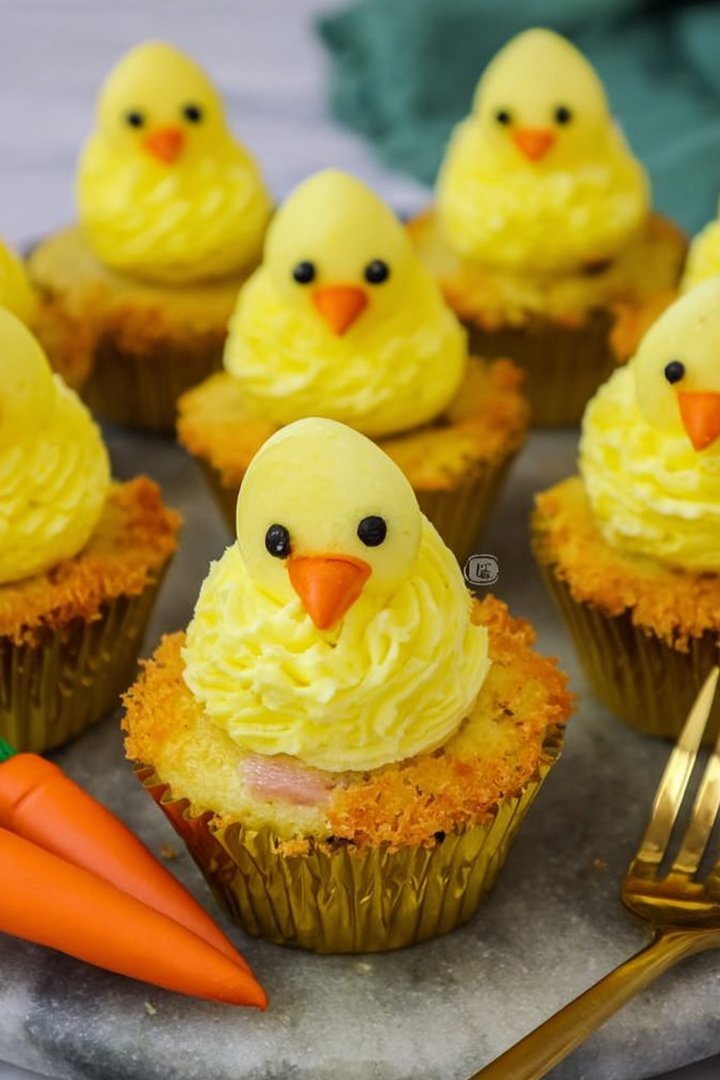
Easter Chick Cupcakes Recipe
Delicious easter chick cupcakes recipe recipe with detailed instructions and nutritional information.
- Total Time: 35 minutes
- Yield: 4 servings 1x
Ingredients
- 12 Vanilla Cupcakes (pre-made or homemade)
- 1 cup Vanilla Buttercream Frosting
- Yellow Food Coloring Gel
- 1/4 cup Yellow Sprinkles
- Orange Fondant or Candy Melts
- Mini Chocolate Chips
- Candy Eyes
Instructions
- Step 1: Tint the vanilla buttercream frosting by adding yellow food coloring gel, a few drops at a time, until you reach your desired shade of yellow.
- Step 2: Frost each cupcake with the yellow buttercream frosting, creating a smooth or slightly swirled top.
- Step 3: Dip the frosted cupcakes into a bowl of yellow sprinkles, ensuring the entire frosted area is covered.
- Step 4: Roll out the orange fondant or melt orange candy melts. Shape small triangles to create beaks for the chicks.
- Step 5: Attach the candy eyes and fondant beaks to each cupcake to resemble a chick's face. Use a small dot of frosting to help secure them if needed.
Notes
- Store frosted cupcakes in an airtight container at room temperature for up to 2 days, or refrigerate for longer storage.
- These cupcakes are best enjoyed at room temperature, but if refrigerated, let them sit out for about 30 minutes before serving to soften the frosting.
- Arrange your adorable chick cupcakes on a festive Easter platter to create a charming centerpiece for your holiday table.
- For extra secure beaks, lightly score the back of the fondant with a knife before attaching it with frosting.
- Prep Time: 15 minutes
- Cook Time: 20 minutes
- Method: Stovetop
- Cuisine: American
FAQs :
How do I prevent my Spring celebration Chick Cupcakes from drying out?
Nobody wants a desert that resembles the Sahara! To keep your Spring celebration Chick Cupcakes moist and delicious, avoid overbaking them. A toothpick inserted into the center should come out with just a few moist crumbs attached. Once cooled, store them in an airtight container. Consider adding a simple syrup (made from sugar and water) brushed on the tops of the cupcakes before frosting for extra moisture. Your fluffy chick cupcakes will thank you!
Can I make these Spring celebration Chick Cupcakes ahead of time?
Absolutely! Baking these adorable chick cupcakes ahead of time is a smart move, especially if you’re juggling multiple Spring celebration preparations. Bake the cupcakes a day or two in advance and store them in an airtight container at room temperature. You can also make the frosting ahead of time and store it in the refrigerator. When you’re ready to assemble, bring the frosting to room temperature and whip it until it’s light and fluffy. Frost and decorate just before serving.
What can I use instead of fondant for the Spring celebration Chick Cupcakes beaks?
Fear not, fellow bakers! If fondant isn’t your jam, or you can’t find it, several delightful alternatives exist. Consider using orange-colored candy melts shaped into triangles. Alternatively, you could create beaks from marzipan or even simply use orange-colored sprinkles strategically placed to resemble a beak. Get creative! The most important thing is that your little chick cupcakes look festive and fun. Embrace the imperfection.
Can I adapt this Spring celebration Chick Cupcakes recipe for different dietary needs?
Of course! Baking should be inclusive. For gluten-free cupcakes, simply substitute the all-purpose flour with a gluten-free blend. To make them dairy-free, use a plant-based milk alternative (like almond or oat milk) and a dairy-free butter substitute. Be sure to check all your ingredients to ensure they meet your specific dietary requirements. With a few simple swaps, everyone can enjoy these adorable Spring celebration Chick Cupcakes!


Leave a Comment