
Spring celebration Egg Cake Pops Recipe are not just desserts; they’re tiny bursts of springtime joy, perfect for celebrating with family and friends. Imagine biting into a moist, flavorful cake pop, coated in a vibrant candy shell, decorated to resemble a whimsical Spring celebration egg – pure bliss!
This Spring celebration Egg Cake Pops Recipe will turn your kitchen into a confectionery wonderland! These delightful treats are incredibly easy to make, bursting with flavor, and visually stunning. They are guaranteed to impress everyone at your Spring celebration gathering and bring smiles to faces of all ages.
Here are four reasons why you absolutely *need* to make this Spring celebration Egg Cake Pops Recipe:
- Effortlessly create adorable Spring celebration-themed treats with simple steps, making it a perfect activity for all ages and skill levels.
- Indulge in a delightful flavor profile with moist cake and a sweet candy coating, customizable to your favorite cake and candy combinations.
- Transform your dessert table into a vibrant spectacle with these colorful and creatively decorated cake pops, guaranteed to impress.
- Adapt the recipe for any occasion by simply changing the colors and decorations, making it a versatile treat for every celebration.
Ingredients for Spring celebration Egg Cake Pops Recipe
Here’s what you’ll need to make this delicious dish:
The full ingredients list, including measurements, is provided in the recipe card directly below.
How to Make Spring celebration Egg Cake Pops Recipe
Follow these simple steps to prepare this delicious dish:
Step 1: Bake and Crumble the Cake
Bake the cake according to the package directions. Let it cool completely, then crumble it into a large bowl. Ensure no large chunks remain for a smooth cake pop texture.
Step 2: Mix in the Frosting
Add the cream cheese frosting to the crumbled cake, one spoonful at a time, mixing until a dough-like consistency forms. You want it moist enough to hold its shape but not too sticky.
Step 3: Roll into Balls
Roll the cake mixture into small, even balls, about 1-inch in diameter. Place the cake balls on a baking sheet lined with parchment paper and refrigerate for at least 30 minutes to firm up.
Step 4: Melt the Candy Melts
Melt the candy melts in a microwave-safe bowl in 30-second intervals, stirring in between, until completely smooth. Stir in a teaspoon of vegetable shortening to make the melted candy smoother.
Step 5: Dip and Decorate
Dip the tip of a lollipop stick into the melted candy and insert it halfway into a cake ball. Dip the entire cake ball into the melted candy, tapping off any excess. Immediately decorate with sprinkles and other decorations before the candy coating sets.
Step 6: Let Set and Enjoy
Place the decorated cake pops in a styrofoam block or on a parchment-lined baking sheet to set completely. This usually takes about 30 minutes. Once set, they are ready to serve and enjoy!
Perfecting the Cooking Process
For the ultimate Spring celebration Egg Cake Pops, start by baking the cake and letting it cool completely. While the cake cools, prepare your frosting and melt your candy melts. This order prevents any rushing and allows each component to be ready when you need it.
Add Your Touch
Don’t be afraid to experiment with flavors. Try swapping alcohol-free vanilla extract for almond or lemon. For a pop of color, add natural food coloring to your frosting or candy melts. You can even add chopped nuts or sprinkles directly into the cake mixture.
Storing & Reheating
These delightful Spring celebration treats are best stored in an airtight container at room temperature to maintain their texture. They can last for up to a week. There’s no need to reheat them; just grab and enjoy whenever you crave a sweet bite.
Here are some tips to elevate your Spring celebration Egg Cake Pops from ‘cute’ to ‘culinary masterpiece’:
- Ensure your cake is completely cooled before crumbling; otherwise, the frosting will melt, resulting in a sticky, unmanageable mess.
- Dip the lollipop sticks into melted candy before inserting them into the cake balls. This creates a “glue” that keeps the pops securely in place.
- Use a double boiler or microwave in short intervals when melting the candy to avoid burning it, which can make it thick and unusable.
(Personal anecdote formated as paragraph subheading)
My niece once declared my Spring celebration Egg Cake Pops were “better than the Spring celebration Bunny’s,” which, as a proud baker, I consider a major win! It’s those little moments that make baking so rewarding.
—
Alright, buckle up, buttercup, because we’re about to embark on a sugary sweet adventure! We’re diving headfirst into the wonderfully whimsical world of cake pops. Forget those store-bought monstrosities that taste vaguely of cardboard and regret. We’re making Spring celebration Egg Cake Pops, and they’re going to be legendary. I’m talking, “kids fighting over the last one” legendary. “Adults sneaking them from the dessert table” legendary. Ready to get started on this Spring celebration Egg Cake Pops Recipe?
First, let’s address the elephant in the room: yes, they look intimidating. All those perfectly smooth, uniformly shaped little eggs, bedecked in dazzling decorations. But fear not, my friends! I’m here to guide you through every step, from crumbly cake chaos to delightful Spring celebration dream. We’ll be making these treats in no time.
The secret weapon? Patience. And maybe a glass of lemonade. Definitely lemonade.
Gathering Your Spring celebration Egg Cake Pops Arsenal
Before we unleash our inner cake pop artists, we need the right tools and ingredients. Think of it as assembling your artistic arsenal.
- **The Cake:** You’ll need a baked cake. A box mix works just fine, or if you’re feeling ambitious, whip up your favorite recipe. Vanilla, chocolate, even lemon – the choice is yours.
- **The Frosting:** This is the glue that holds our cake pops together. Cream cheese frosting, buttercream, even a simple vanilla glaze will do the trick. Just make sure it’s nice and smooth.
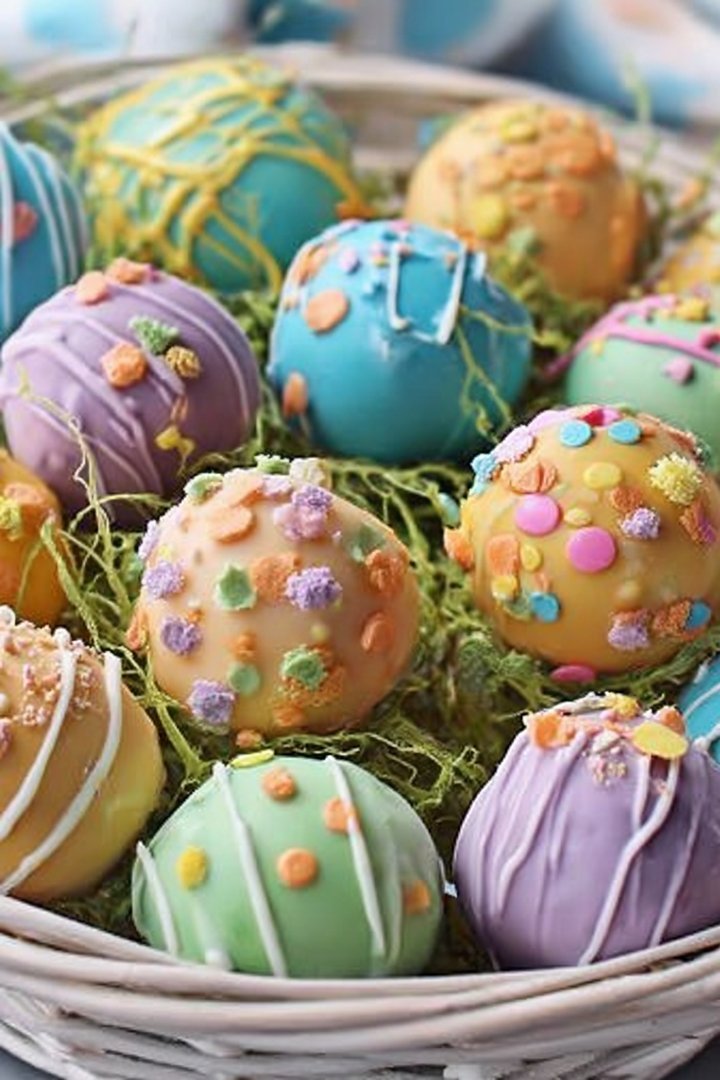
- **The Coating:** Candy melts are our go-to for that picture-perfect, smooth exterior. Choose your favorite colors – pastel pink, sunny yellow, vibrant blue, or go wild with a rainbow assortment.
- **The Decorations:** Sprinkles, edible glitter, mini chocolate chips, candy pearls – the possibilities are endless! Let your creativity run wild and create unique designs.
- **The Sticks:** Lollipop sticks are essential for turning our cake balls into pops.
- **The Tools:** A mixing bowl, a spatula, a cookie sheet lined with parchment paper, a double boiler or microwave-safe bowl, and a cake pop stand (or a piece of styrofoam) are our must-have companions.
Baking and Crumbling: The Foundation of Our Spring celebration Egg Cake Pops
Let’s face it, the cake is the star of the show here. So, bake your cake according to the recipe instructions. Once it’s cooled completely (and I mean *completely* – no warm cake allowed!), it’s time to crumble.
Now, you can use a food processor for this, but I prefer to get my hands dirty. There’s something strangely therapeutic about crushing a cake into a million little pieces. Just make sure you don’t leave any big chunks behind. We want a nice, even crumb.
Frosting and Rolling: The Art of the Cake Ball
Now comes the fun part: mixing the cake crumbs with the frosting. Add the frosting a little at a time, mixing until you have a dough-like consistency. You want the mixture to be moist enough to hold together, but not so wet that it becomes sticky.
Roll the mixture into small, egg-shaped balls. I recommend using a cookie scoop to ensure uniformity. Place the cake balls on a parchment-lined cookie sheet and chill them in the refrigerator for at least 30 minutes. This will help them firm up and prevent them from falling apart when we dip them in the candy melts.
Melting and Dipping: The Moment of Truth
Melting the candy melts is where things can get a little tricky. The key is to be patient and avoid overheating. Use a double boiler or microwave in short intervals, stirring frequently until the candy is completely melted and smooth.
Once the candy is melted, remove the cake balls from the refrigerator. Dip the tip of a lollipop stick into the melted candy and insert it into the center of each cake ball. This will help the stick adhere to the cake.
Now, carefully dip each cake ball into the melted candy, swirling it around to ensure it’s completely coated. Gently tap off any excess candy.
Decorating and Displaying: Unleash Your Inner Artist
This is where your creativity can really shine! While the candy coating is still wet, decorate your Spring celebration Egg Cake Pops with sprinkles, edible glitter, mini chocolate chips, or candy pearls.
Once you’ve decorated your cake pops, insert the sticks into a cake pop stand or a piece of styrofoam to allow the candy coating to harden completely.
A Few Extra Spring celebration Egg Cake Pops Tips and Tricks:
- **Don’t overcrowd the candy melts.** Work in small batches to prevent the candy from cooling and thickening.
- **Use a toothpick to remove any air bubbles** from the candy coating.
- **If the candy coating is too thick,** add a teaspoon of vegetable shortening or coconut oil to thin it out.
- **If the cake pops are falling off the sticks,** try dipping the sticks further into the cake ball or chilling the cake balls for a longer period.
These Spring celebration Egg Cake Pops are more than just a dessert, they’re a labor of love. And nothing makes me happier than making the kids happy when I bake. So get in the kitchen, get your hands dirty, and have some fun. Happy Spring celebration and happy baking!
Spring celebration Egg Cake Pops Variations: Because Why Not?
Think of the basic Spring celebration Egg Cake Pops Recipe as a blank canvas. Let’s explore a few fun variations to spice things up.
- **Chocolate Lover’s Dream:** Use a chocolate cake mix and dip the cake pops in dark chocolate candy melts. Decorate with mini chocolate chips and a drizzle of white chocolate.
- **Lemon Delight:** Use a lemon cake mix and dip the cake pops in white chocolate candy melts. Decorate with yellow sprinkles and a candied lemon peel.
- **Rainbow Explosion:** Divide the cake batter into several bowls and tint each bowl with a different food coloring. Bake the cakes separately and crumble them together. Dip the cake pops in white chocolate candy melts and decorate with a rainbow of sprinkles.
- **Nutty Surprise:** Add chopped nuts (like pecans or walnuts) to the cake batter or roll the finished cake pops in chopped nuts.
- **Fruity Fun:** Add chopped dried fruit (like cranberries or apricots) to the cake batter.
Troubleshooting Your Spring celebration Egg Cake Pops: Common Problems and Solutions
Even the most experienced bakers encounter hiccups along the way. Here’s a quick guide to solving common cake pop problems.
- **Cake pops are falling apart:** The cake mixture is too dry. Add more frosting, a little at a time, until the mixture holds together.
- **Candy coating is too thick:** Add a teaspoon of vegetable shortening or coconut oil to thin it out.
- **Candy coating is lumpy:** The candy melts were overheated. Start with a fresh batch of candy melts and melt them more slowly.
- **Sprinkles are sliding off:** The candy coating is too dry. Decorate the cake pops immediately after dipping them in the melted candy.
- **Cake pops are sweating:** The cake pops were stored in a humid environment. Store them in an airtight container at room temperature.
Elevating Your Spring celebration Egg Cake Pops Display
Presentation is key. A simple cake pop stand works wonders, but you can get creative! Arrange them in a basket lined with festive fabric, nestle them amongst faux grass and plastic eggs, or even create a mini “cake pop garden” on a platter.
Beyond the Basics: Spring celebration Egg Cake Pops for Every Occasion
While we’re focusing on Spring celebration, the basic cake pop recipe can be adapted for any holiday or special occasion. Change the colors of the candy melts, switch up the sprinkles, and voila! You have cake pops for birthdays, graduations, baby showers, or even just a Tuesday.
Remember, baking should be fun! Don’t be afraid to experiment, get creative, and most importantly, enjoy the process.
Conclusion for Spring celebration Egg Cake Pops Recipe :
This **Spring celebration Egg Cake Pops Recipe** will be an ideal dessert for your family this Spring celebration. Remember, the key to perfect cake pops is patience. Whether you use a cake mix shortcut or make your cake from scratch, the most important thing is to have fun and enjoy the process. Get creative with your decorations, involve the family, and don’t be afraid to experiment. These little Spring celebration Egg Cake Pops are not only delicious but are also a guaranteed crowd-pleaser and a delightful way to celebrate the holiday.
Print
Easter Egg Cake Pops Recipe
Delicious easter egg cake pops recipe recipe with detailed instructions and nutritional information.
- Total Time: 35 minutes
- Yield: 4 servings 1x
Ingredients
- 1 box (15.25 oz) cake mix (vanilla or yellow)
- 1 can (16 oz) frosting (vanilla or cream cheese)
- 12 oz candy melts (various pastel colors)
- 1–2 tablespoons vegetable shortening
- Lollipop sticks
- Sprinkles (Easter themed)
- Vegetable Oil as needed for baking cake
Instructions
- Step 1: Bake the cake according to package directions in a 9×13 inch pan. Let cool completely.
- Step 2: Crumble the cooled cake into a large bowl. Add the frosting and mix until well combined.
- Step 3: Roll the cake mixture into 1-inch balls and place on a baking sheet lined with parchment paper. Freeze for 15-20 minutes.
- Step 4: Melt the candy melts according to package directions, adding vegetable shortening to thin as needed. Dip the tip of a lollipop stick into the melted candy and insert it into a cake ball.
- Step 5: Dip each cake pop into the melted candy, tapping off any excess. Immediately decorate with sprinkles.
- Step 6: Stand the cake pops upright in a styrofoam block or place back on the parchment paper until the candy coating is set.
Notes
- Store finished cake pops in an airtight container at room temperature to maintain their texture and prevent the candy coating from sweating.
- These cake pops are best enjoyed at room temperature, but if the candy coating has softened slightly, a quick chill in the fridge will re-harden it.
- Serve these delightful Easter Egg Cake Pops on a festive platter or arrange them in a decorative egg carton for an extra touch of whimsy.
- For a smoother candy coating, melt the candy melts in 30-second intervals, stirring in between, and add shortening a little at a time until you reach the desired consistency.
- Prep Time: 15 minutes
- Cook Time: 20 minutes
- Method: Stovetop
- Cuisine: American
FAQs :
Can I use a cake mix for this Spring celebration Egg Cake Pops Recipe?
Absolutely! If you’re short on time, a cake mix is your best friend. Just bake it according to the package directions, let it cool completely, and crumble it up. Nobody will judge (much). I mean, who has time to make everything from scratch these days? Embrace the convenience, and focus on the fun part: decorating those adorable Spring celebration egg cake pops! Just remember to adjust the amount of frosting you add, depending on how moist the cake is. You’re aiming for a playdough-like consistency, not a soupy mess. We’ve all been there. Trust me.
What kind of coating should I use for these cake pops?
Candy melts are the classic choice for coating cake pops because they melt smoothly and harden beautifully. However, you can also use high-quality white chocolate or even colored melting chocolate. Make sure you add a teaspoon of vegetable oil while melting. This helps the chocolate to melt more smoothly and not seize up. Avoid using chocolate chips alone. They don’t melt as smoothly and can give you a clumpy coating. Feel free to experiment with different colors and flavors to make your Spring celebration egg cake pops extra special. Get creative and have fun with it!
How long do these Spring celebration egg cake pops last?
These little guys are best enjoyed within 2-3 days. Store them in an airtight container at room temperature. Don’t put them in the fridge unless it’s absolutely necessary, as the coating can sometimes sweat or crack. If it’s a particularly warm day, a brief chill in the refrigerator might be okay, but bring them back to room temperature before serving for the best flavor and texture. Honestly, they’re so delicious, they probably won’t last that long anyway! The kids will gobble them up and you can enjoy making the **Spring celebration Egg Cake Pops Recipe** again.
What are some fun decorating ideas for my Spring celebration egg cake pops?
Oh, the possibilities are endless! Think pastel sprinkles, edible glitter, melted chocolate drizzle, mini chocolate chips, or even tiny fondant flowers. Use different colored candy melts to create unique patterns on your **Spring celebration Egg Cake Pops**. You can even pipe on little bunnies or chicks with icing for an extra festive touch. Let your imagination run wild! This is where you can really personalize your Spring celebration Egg Cake Pops recipe and make them your own. Get the kids involved too; they’ll love decorating their own edible creations.


Leave a Comment