
Spring is in the air, and what better way to celebrate than with a delightful dessert? Imagine a cake that is not only scrumptious but also shaped like an Adorable Spring celebration Bunny, guaranteed to bring smiles to faces of all ages.
Picture this: a moist, fluffy cake, decorated with creamy frosting and whimsical candy details, perfectly capturing the spirit of the season. The aroma alone will transport you back to childhood Spring celebration egg hunts and joyful family gatherings. Get ready to create a masterpiece!
Here are a few reasons why this Adorable Spring celebration Bunny Cake Recipe is a must-try this season:
Ease of Preparation: This recipe uses simple steps, making it accessible for bakers of all skill levels, perfect for a fun family activity.
Flavor Profile: The cake offers a delightful balance of sweetness and rich flavor, appealing to both kids and adults alike.
Visual Appeal: With its cute bunny shape and vibrant decorations, this cake is a showstopper that will impress everyone at your Spring celebration celebration.
Versatility: Customize the cake with your favorite flavors and decorations, making each bunny cake unique and special for your family.
Ingredients for Adorable Spring celebration Bunny Cake Recipe
Here’s what you’ll need to make this delicious dish:
The full ingredients list, including measurements, is provided in the recipe card directly below.
How to Make Adorable Spring celebration Bunny Cake Recipe
Follow these simple steps to prepare this delicious dish:
Step 1: Preheat and Prep
Preheat your oven to 350°F (175°C). Grease and flour two 9-inch round cake pans. This will prevent the cake from sticking and ensure easy removal.
Step 2: Mix Dry Ingredients
In a large bowl, whisk together the all-purpose flour, granulated sugar, baking powder, and salt. This ensures that the leavening agent is evenly distributed throughout the dry ingredients.
Step 3: Cream Butter and Sugar
In a separate bowl, cream together the softened unsalted butter and sugar until light and fluffy. This step is crucial for creating a tender cake crumb.
Step 4: Add Eggs and Vanilla
Beat in the eggs one at a time, then stir in the Alcohol-free vanilla extract. Make sure each egg is fully incorporated before adding the next.
Step 5: Alternate Wet and Dry Ingredients
Gradually add the dry ingredients to the wet ingredients, alternating with the milk, beginning and ending with the dry ingredients. Mix until just combined. Be careful not to overmix, as this can result in a tough cake.
Step 6: Bake the Cakes
Pour the batter evenly into the prepared cake pans and bake for 30-35 minutes, or until a wooden skewer inserted into the center comes out clean. Let the cakes cool in the pans for 10 minutes before inverting them onto a wire rack to cool completely.
Step 7: Make the Buttercream Frosting
While the cakes are cooling, prepare the buttercream frosting. In a large bowl, beat together the softened butter and powdered sugar until smooth and creamy. Add a splash of heavy cream and Alcohol-free vanilla extract, and beat until light and fluffy.
Step 8: Assemble the Bunny Cake
Once the cakes are completely cool, level them if necessary. Place one cake on a serving plate or cake stand. Frost the top of the first cake layer with a generous amount of buttercream. Place the second cake layer on top of the frosting.
Step 9: Carve the Bunny Shape
Using a sharp knife, carefully cut the cake into the shape of a bunny. You can use a bunny-shaped template or freehand it. Use the cut-off pieces to create the bunny’s ears. Attach the ears to the top of the cake with frosting.
Step 10: Frost and Decorate
Frost the entire cake with the remaining buttercream frosting. Divide the frosting into separate bowls and tint each bowl with different food coloring, if desired. Use piping bags and various tips to decorate the cake with intricate designs or simple swirls.
Step 11: Add Candy Decorations
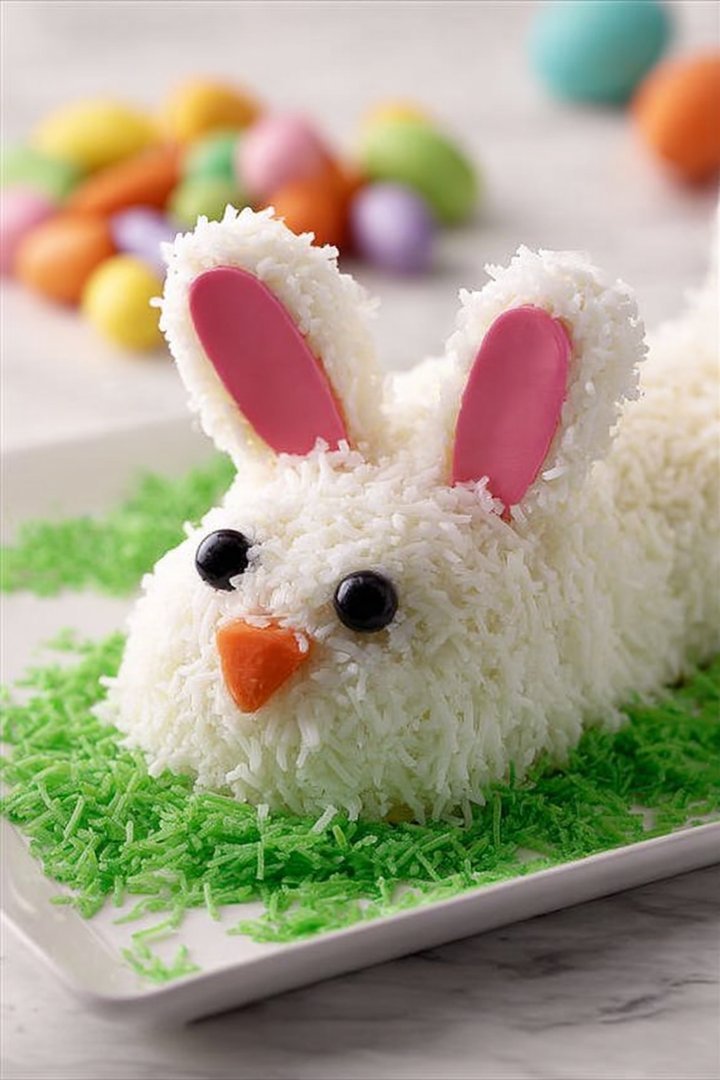
Decorate the bunny cake with assorted candies to create the eyes, nose, mouth, and other details. Get creative and have fun with your decorations!
Step 12: Chill and Serve
Place the finished cake in the refrigerator for at least 30 minutes to allow the frosting to set. Serve chilled and enjoy!
Transfer to a serving platter and watch as everyone marvels at your adorable creation. This cake is perfect for sharing with family and friends during your Spring celebration celebration.
Tips for the Best Adorable Spring celebration Bunny Cake Recipe (formated as H2 subheading)
Leave an empty line (space) immediately after the H2 heading before starting the content.
To make the best Adorable Spring celebration Bunny Cake, keep these tips in mind:
Use High-Quality Ingredients: Opt for the best quality ingredients you can find, as they will significantly impact the taste and texture of your cake. Fresh butter, pure Alcohol-free vanilla extract, and good-quality flour make a noticeable difference.
Softened Butter is Key: Ensure your butter is properly softened to room temperature before creaming it with the sugar. This will create a light and fluffy base for your cake, resulting in a tender crumb.
Don’t Overmix the Batter: Overmixing can develop the gluten in the flour, leading to a tough cake. Mix the wet and dry ingredients until just combined, and no streaks of flour remain.
Even Baking is Important: Make sure your oven is properly preheated and that the cake pans are evenly spaced in the oven. This will ensure that the cakes bake evenly and rise properly.
Cool Cakes Completely: Before frosting, ensure that the cakes are completely cooled. Frosting a warm cake can cause it to melt and slide off, resulting in a messy finish.
Get Creative with Decorations: Have fun with your decorations and don’t be afraid to experiment with different colors, candies, and piping techniques. The more creative you are, the more unique and adorable your bunny cake will be.
Chill Before Serving: Chilling the cake for at least 30 minutes before serving allows the frosting to set and the flavors to meld together, resulting in a more delicious and cohesive final product.
Make it Ahead: If you’re short on time, you can bake the cake layers a day or two in advance and store them tightly wrapped in the refrigerator or freezer. This will allow you to focus on frosting and decorating the cake on the day of your event.
Use Gel Food Coloring: Gel food coloring provides more vibrant colors without changing the consistency of your frosting, especially compared to liquid food coloring. A little goes a long way, so add it gradually until you achieve your desired shade.
Consider Different Flavors: Don’t be afraid to experiment with different cake and frosting flavors. Lemon cake with raspberry frosting, chocolate cake with mint frosting, or carrot cake with cream cheese frosting are all delicious options that would work well with the bunny theme.
By following these tips, you can ensure that your Adorable Spring celebration Bunny Cake turns out perfectly every time, delighting your family and friends with its delicious taste and charming appearance.
Variations on the Adorable Spring celebration Bunny Cake Recipe (formated as H2 subheading)
Leave an empty line (space) immediately after the H2 heading before starting the content.
Want to put a unique twist on your Adorable Spring celebration Bunny Cake? Here are a few variations to consider:
Flavor Infusions:
Citrus Zest: Add lemon, orange, or lime zest to the cake batter for a burst of fresh, citrusy flavor.
Alcohol-free almond extract: A touch of Alcohol-free almond extract can enhance the cake’s flavor and add a subtle nutty note.
Spice It Up: Incorporate warming spices like cinnamon, nutmeg, or cardamom into the cake batter for a cozy, comforting flavor.
Frosting Variations:
Cream Cheese Frosting: Swap the buttercream for a tangy cream cheese frosting, perfect for a carrot cake bunny.
Chocolate Ganache: For chocolate lovers, a smooth chocolate ganache is an indulgent alternative.
Lemon Curd Filling: Add a layer of lemon curd between the cake layers for a bright, tart surprise.
Decoration Ideas:
Coconut Flakes: Coat the bunny in shredded coconut for a fluffy, “furry” look.
Edible Flowers: Decorate the cake with edible flowers for an elegant, springtime touch.
Sprinkles Galore: Use a variety of colorful sprinkles to create a festive, whimsical design.
Dietary Adaptations:
Gluten-Free: Use a gluten-free flour blend to make the cake suitable for those with gluten sensitivities.
Dairy-Free: Substitute plant-based butter and milk alternatives to create a dairy-free version.
Lower Sugar: Reduce the amount of sugar in the cake batter and frosting for a less sweet treat.
Kid-Friendly Twists:
Surprise Inside: Add a layer of colorful sprinkles or small candies in the center of the cake for a fun surprise when slicing.
Bunny Faces: Use candy melts to create adorable bunny faces to attach to the sides of the cake.
Edible Markers: Let kids decorate the cake with edible markers for a personalized touch.
By exploring these variations, you can create an Adorable Spring celebration Bunny Cake that perfectly suits your taste preferences and dietary needs. Get creative and have fun experimenting with different flavors, frostings, and decorations to make your bunny cake truly unique.
Serving Suggestions for Adorable Spring celebration Bunny Cake Recipe (formated as H2 subheading)
Leave an empty line (space) immediately after the H2 heading before starting the content.
Once your Adorable Spring celebration Bunny Cake is complete, here are some delightful serving suggestions to enhance the experience:
Accompaniments:
Fresh Berries: Serve the cake with a side of fresh berries like strawberries, raspberries, or blueberries for a burst of natural sweetness and color.
Whipped Cream: A dollop of freshly whipped cream adds a light and airy contrast to the rich cake and frosting.
Ice Cream: Pair the cake with a scoop of vanilla, strawberry, or chocolate ice cream for a decadent dessert.
Beverages:
Iced Tea: A refreshing glass of iced tea, especially lemon or raspberry flavored, complements the cake’s sweetness.
Coffee: Serve the cake with a warm cup of coffee for an elegant and comforting pairing.
Sparkling Cider: Sparkling cider or fruit juice adds a festive touch, perfect for celebrations.
Presentation:
Platters and Stands: Display the cake on a beautiful platter or cake stand to showcase its adorable design.
Garnish: Sprinkle powdered sugar around the base of the cake or add a few fresh flowers for an extra touch of elegance.
Slices: Cut the cake into neat, even slices to make serving easier and more visually appealing.
Occasions:
Spring celebration Celebrations: Obviously, this cake is perfect for Spring celebration gatherings, whether it’s a family dinner or a festive party.
Spring Birthdays: Celebrate spring birthdays with this cheerful and delicious cake.
Afternoon Tea: Serve slices of the bunny cake as part of a delightful afternoon tea spread.
Kid-Friendly Serving Ideas:
Individual Cupcakes: Bake the cake batter in cupcake liners for individual bunny treats that are easy for kids to handle.
Bunny Pops: Use cake pop molds to create bunny-shaped cake pops, dipped in melted chocolate and decorated with sprinkles.
Mini Cakes: Bake the cake in mini loaf pans for adorable individual bunny cakes.
By incorporating these serving suggestions, you can elevate your Adorable Spring celebration Bunny Cake from a simple dessert to a memorable and delightful culinary experience. Whether you’re hosting a grand celebration or enjoying a quiet family gathering, these tips will help you create a truly special moment.
Perfecting the Cooking Process
To achieve cake nirvana, start by precisely measuring your ingredients. Whisk dry components, cream butter and sugar until fluffy, then gently fold in wet ingredients. Bake until a toothpick comes out clean, avoiding over-baking for moist results.
Add Your Touch
Unleash your inner artist! Swap Alcohol-free vanilla extract for almond for a nutty twist, or mix in mini chocolate chips for extra decadence. Top with your favorite fruits or a homemade cream cheese frosting for a personalized masterpiece.
Storing & Reheating
Leftover bunny cake can be stored in an airtight container at room temperature for up to three days, or in the refrigerator for up to a week. No reheating needed – it’s delicious cold! Though, a small slice with warm milk can be delightful.
Helpful Tips for an Adorable Spring celebration Bunny Cake
- For a perfectly smooth frosting, sift your powdered sugar before mixing it in – nobody wants a lumpy bunny!
- Don’t overmix the batter! Overmixing develops the gluten, which can result in a tough cake. Mix until just combined.
- Let the cake cool completely before frosting to prevent meltdowns. Patience is a virtue, especially in baking.
(Personal anecdote formated as paragraph subheading)
Last Spring celebration, my niece declared my bunny cake “too cute to eat!” After some coaxing (and promises of extra sprinkles) she finally took a bite and announced it was also “deliciously fluffy.”
The Quest for the Perfect Bunny: An Adorable Spring celebration Bunny Cake Recipe
Okay, folks, let’s be real. Spring celebration is just around the corner, and while I adore a good egg hunt (who doesn’t love the thrill of finding a chocolate surprise?), my heart truly belongs to the dessert table. And at the centerpiece of that sugary wonderland? Why, an **Adorable Spring celebration Bunny Cake Recipe**, of course!
Now, I know what you might be thinking. “Another cake recipe? Groundbreaking.” But trust me, this isn’t just any cake. This is the kind of cake that makes kids squeal with delight, adults reminisce about childhood Spring celebration, and Instagram followers double-tap with wild abandon. It’s an experience, a memory in the making, a sugar-fueled masterpiece.
I’ve spent years perfecting this **Adorable Spring celebration Bunny Cake Recipe**, dodging soggy bottoms, battling uneven layers, and fighting off rogue sprinkles. It’s been a journey filled with flour-dusted countertops, frosting-covered fingers, and a whole lot of laughter (and maybe a few tears, but we won’t dwell on those). And today, I’m finally sharing my secrets with you. So, grab your aprons, preheat those ovens, and let’s get baking!
Why This Adorable Spring celebration Bunny Cake Recipe is the BEST!
So, what makes this particular **Adorable Spring celebration Bunny Cake Recipe** so special? Well, let me tell you! It’s not just about the cute factor (although, let’s be honest, that’s a big part of it). It’s about the flavor, the texture, and the sheer joy of creating something beautiful and delicious.
First, we’re talking about a moist, tender cake that practically melts in your mouth. We’re not settling for dry, crumbly sadness here. This cake is infused with a hint of vanilla and a touch of lemon zest, giving it a bright, spring-like flavor that’s perfect for Spring celebration.
Second, the frosting is the stuff of dreams. It’s a light, fluffy buttercream that’s sweet but not cloying, and it pipes like a dream. Plus, you can customize it with different colors and flavors to create your own unique bunny masterpiece.
Finally, this **Adorable Spring celebration Bunny Cake Recipe** is surprisingly easy to make. I’ve broken it down into simple, easy-to-follow steps, so even if you’re a baking novice, you can still create a cake that will impress your friends and family. Are you looking for delightful options? This could be what you were looking for.
Ready to get started? Let’s dive in!
Gathering Your Bunny-Baking Arsenal
Before we start, let’s make sure you have everything you need. Trust me, there’s nothing worse than realizing you’re out of eggs halfway through a recipe (been there, done that, bought the t-shirt).
Here’s your essential shopping list for this **Adorable Spring celebration Bunny Cake Recipe**:
- **For the Cake:**
- All-purpose flour: The foundation of our bunny.
- Granulated sugar: For sweetness and happiness.
- Baking powder: To give our bunny some lift.
- Salt: A pinch to balance the sweetness.
- Unsalted butter: Softened, for a tender crumb.
- Eggs: To bind everything together.
- Alcohol-free vanilla extract: For that classic cake flavor.
- Lemon zest: A touch of spring freshness.
- Milk: To keep things moist and delicious.
- **For the Buttercream Frosting:**
- Unsalted butter: Softened, for fluffy frosting.
- Powdered sugar: For sweetness and structure.
- Milk: To adjust the consistency.
- Alcohol-free vanilla extract: For flavor.
- Food coloring: To create your desired bunny hues. (Optional, but highly recommended for maximum cuteness!)
- **For Decoration:**
- Sprinkles: Because sprinkles make everything better.
- Coconut flakes: To create a fluffy “fur” effect.
- Candy eyes: For a truly adorable bunny face.
- Pink jelly beans: For the nose!
- Optional: Chocolate shavings, edible glitter, mini eggs
Now that you’ve assembled your ingredients, let’s talk equipment. You’ll need:
- Two 8-inch round cake pans
- Mixing bowls
- Electric mixer (stand or hand-held)
- Spatula
- Piping bag and tips (optional, but helpful for decorating)
- Wire rack
Got everything? Great! Let’s move on to the fun part: baking!
Baking the Bunny: Step-by-Step Instructions for This Adorable Spring celebration Bunny Cake Recipe
Alright, let’s get down to the nitty-gritty. Follow these steps carefully, and you’ll have a beautiful, delicious bunny cake in no time.
**Step 1: Preheat and Prepare**
Preheat your oven to 350°F (175°C). Grease and flour your cake pans. This is crucial for preventing sticking and ensuring your cakes release cleanly. You can also line the bottoms with parchment paper for extra insurance.
**Step 2: Mix the Dry Ingredients**
In a large bowl, whisk together the flour, sugar, baking powder, and salt. This ensures that the baking powder is evenly distributed, resulting in a cake that rises uniformly.
**Step 3: Cream the Butter and Sugar**
In a separate bowl, cream together the softened butter and sugar until light and fluffy. This usually takes about 3-5 minutes with an electric mixer. This step is important for creating a tender crumb.
**Step 4: Add the Eggs and Vanilla**
Beat in the eggs one at a time, then stir in the Alcohol-free vanilla extract and lemon zest. Make sure each egg is fully incorporated before adding the next.
**Step 5: Alternate Adding Dry and Wet Ingredients**
Gradually add the dry ingredients to the wet ingredients, alternating with the milk, beginning and ending with the dry ingredients. Mix until just combined. Be careful not to overmix, as this can lead to a tough cake.
**Step 6: Bake!**
Pour the batter evenly into the prepared cake pans and bake for 25-30 minutes, or until a toothpick inserted into the center comes out clean.
**Step 7: Cool Completely**
Let the cakes cool in the pans for 10 minutes before inverting them onto a wire rack to cool completely. This prevents them from sticking to the pans and allows them to cool evenly.
Frosting and Decorating: Bringing Your Adorable Spring celebration Bunny Cake Recipe to Life
Now for the REALLY fun part! Once your cakes are completely cool, it’s time to frost and decorate. This is where you can really let your creativity shine.
**Step 1: Make the Buttercream Frosting**
In a large bowl, cream together the softened butter and powdered sugar until light and fluffy. Add the milk and Alcohol-free vanilla extract and mix until smooth. If the frosting is too thick, add a little more milk. If it’s too thin, add a little more powdered sugar.
**Step 2: Tint the Frosting (Optional)**
Divide the frosting into separate bowls and tint each bowl with food coloring to create your desired bunny hues. I like to use pastel shades like pink, blue, and yellow for a festive Spring celebration look.
**Step 3: Assemble the Cake**
Place one cake layer on a serving plate or cake stand. Spread a generous layer of frosting over the top. Place the second cake layer on top and frost the entire cake.
**Step 4: Decorate!**
This is where you can really get creative! Use a piping bag and tips to create different frosting designs. Sprinkle with coconut flakes to create a fluffy “fur” effect. Add candy eyes and a pink jelly bean nose to create the bunny’s face. You can also add chocolate shavings, edible glitter, and mini eggs for extra decoration.
**Tips for Bunny-licious Decoration**
- Use a grass tip to create a grassy border around the bottom of the cake.
- Pipe small rosettes or stars all over the cake for a textured “fur” effect.
- Use a small round tip to pipe a delicate lace border around the top of the cake.
- Get the kids involved! Let them help with the decorating – it’s a great way to make memories.
And there you have it! Your very own **Adorable Spring celebration Bunny Cake Recipe**, ready to wow your family and friends.
Variations on the Adorable Spring celebration Bunny Cake Recipe Theme
Want to shake things up? Here are a few ideas to customize your **Adorable Spring celebration Bunny Cake Recipe**:
- **Chocolate Bunny Cake:** Add cocoa powder to the cake batter for a chocolatey twist. Frost with chocolate buttercream and decorate with chocolate shavings.
- **Carrot Cake Bunny:** Use your favorite carrot cake recipe and shape the cakes into bunny ears. Frost with cream cheese frosting and decorate with shredded carrots.
- **Coconut Cream Bunny:** Add coconut extract to the cake batter and frost with coconut cream frosting. Sprinkle with toasted coconut flakes.
- **Mini Bunny Cupcakes:** Bake the cake batter in cupcake liners and decorate each cupcake with a bunny face. Perfect for individual servings!
Don’t be afraid to experiment and put your own spin on this **Adorable Spring celebration Bunny Cake Recipe**. The possibilities are endless!
Conclusion for Adorable Spring celebration Bunny Cake Recipe
This Adorable Spring celebration Bunny Cake Recipe is guaranteed to be a hit this Spring! Remember, bake your cake layers in advance and keep them wrapped. Don’t overbake! Embrace customization with citrus zest, nuts, or different extracts. If your frosting is too thin, chill and rewhip it or add a touch of powdered sugar. With these tips, you’ll create a masterpiece that delights everyone. Most importantly, have fun, get creative with the decorating, and enjoy the sweet taste of success with your super cute, edible bunny. Happy baking!
Print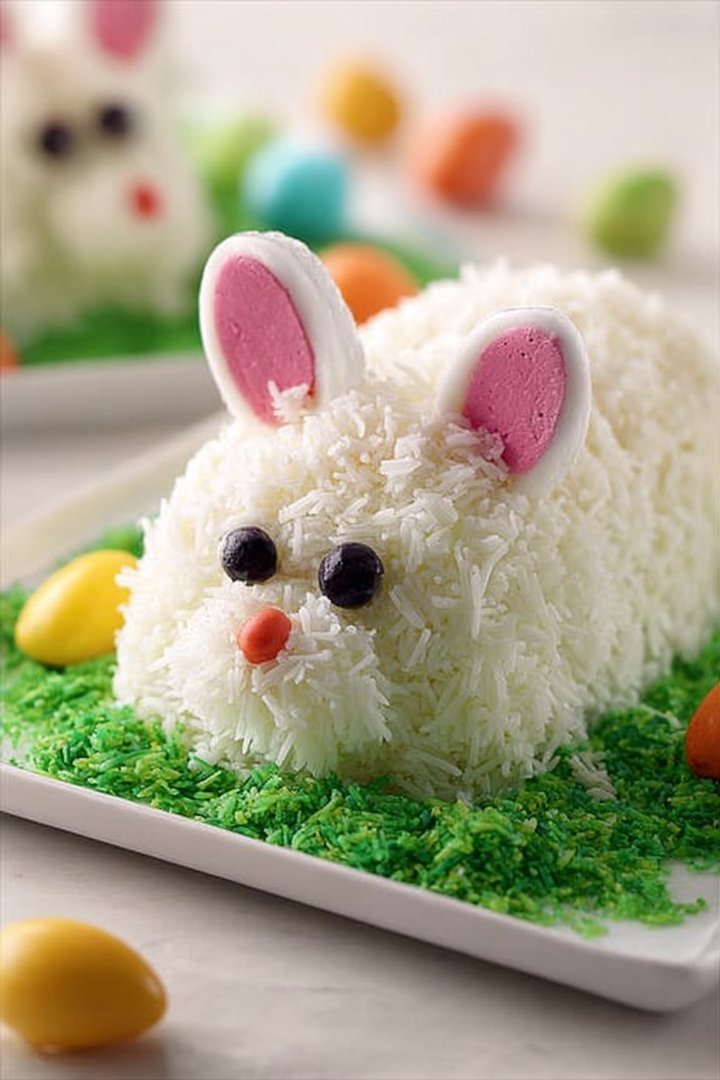
Adorable Easter Bunny Cake Recipe
Delicious adorable easter bunny cake recipe recipe with detailed instructions and nutritional information.
- Total Time: 35 minutes
- Yield: 4 servings
Ingredients
- All-purpose flour: 2 1/2 cups
- Granulated sugar: 1 3/4 cups
- Baking powder: 2 1/2 teaspoons
- Salt: 1/2 teaspoon
- Unsalted butter, softened: 1/2 cup (1 stick)
- Eggs: 2 large
- Milk: 1 cup
- Vanilla extract: 2 teaspoons
Instructions
- Step 1: Preheat oven to 350°F (175°C). Grease and flour a bunny-shaped cake pan.
- Step 2: In a large bowl, whisk together flour, sugar, baking powder, and salt.
- Step 3: Add softened butter, eggs, milk, and vanilla extract to the dry ingredients. Beat with an electric mixer on low speed until just combined, then increase speed to medium and beat for 2 minutes.
- Step 4: Pour batter into the prepared bunny cake pan, filling it about two-thirds full.
- Step 5: Bake for 30-35 minutes, or until a wooden skewer inserted into the center comes out clean.
- Step 6: Let the cake cool in the pan for 10 minutes before inverting it onto a wire rack to cool completely. Decorate as desired with frosting, sprinkles, and candies to create an adorable Easter bunny.
Notes
- To keep your bunny cake moist, store it in an airtight container at room temperature for up to 3 days.
- A light dusting of powdered sugar before serving enhances the sweetness and adds a beautiful, simple touch.
- Gently warm individual slices in the microwave for 10-15 seconds to revive the cake's texture.
- Chef's tip: Be sure your butter is truly softened; this will ensure a smooth batter and even baking.
- Prep Time: 15 minutes
- Cook Time: 20 minutes
- Method: Stovetop
- Cuisine: American
FAQs
Can I make this Adorable Spring celebration Bunny Cake Recipe ahead of time?
Absolutely! Baking the cake layers a day or two in advance is a fantastic idea. Just wrap them tightly in plastic wrap and store them in the refrigerator. You can also prepare the frosting ahead of time. Keep it refrigerated in an airtight container and rewhip it before using. Assembling the cake closer to serving time prevents the frosting from drying out. Decorating can also be done in stages. Get creative and have fun making those adorable bunny features! This cake is not only tasty but also a total showstopper, perfect for your Spring celebration gathering.
What are some variations I can make to this Adorable Spring celebration Bunny Cake Recipe?
Let your imagination run wild! For a citrusy twist, add lemon or orange zest to the cake batter. You could also incorporate chopped nuts or chocolate chips for added texture and flavor. Different extracts, like almond or vanilla, can also change the flavor profile. Instead of the classic buttercream frosting, consider a cream cheese frosting for a tangy kick. When it comes to decorating, use different candies for the bunny’s face, or create a grass effect using tinted coconut flakes. The possibilities are endless!
How do I prevent my Adorable Spring celebration Bunny Cake Recipe from drying out?
Moisture is key! To keep your cake deliciously moist, avoid overbaking. Check for doneness by inserting a toothpick into the center; it should come out clean or with just a few moist crumbs. After baking, let the cakes cool completely in their pans before wrapping them tightly. Adding a simple syrup (sugar dissolved in water) to the cake layers before frosting can also help retain moisture. Store the assembled cake in an airtight container or under a cake dome in the refrigerator to prevent it from drying out. Nobody wants a dry bunny!
My frosting is too thin! How can I fix my Adorable Spring celebration Bunny Cake Recipe?
Thin frosting is a common baking hiccup, but don’t worry, it’s easily fixable! The most common reason for runny frosting is that it’s too warm. Try chilling the frosting in the refrigerator for about 30 minutes, then rewhip it. If that doesn’t do the trick, add powdered sugar, a tablespoon at a time, until you reach the desired consistency. Be careful not to add too much, or the frosting will become too sweet. A little patience and the right adjustments will transform your frosting into the perfect creamy consistency.


Leave a Comment