
The aroma of warm, comforting chocolate swirls in the air, promising a sweet escape from the everyday hustle. Just imagine sinking your teeth into a moist, fluffy cupcake that tastes exactly like your favorite mug of hot cocoa!
These Hot Cocoa Cupcakes aren’t just a dessert; they’re a miniature hug in cake form, perfect for chilly evenings or anytime you need a chocolatey pick-me-up. We’re about to embark on a baking adventure that’s so easy, it’s practically foolproof. Prepare for a delightful explosion of flavor!
Here are a few reasons why you’ll absolutely adore these cupcakes:
- Effortlessly create a batch of decadent treats with minimal ingredients and straightforward instructions, perfect for bakers of any skill level.
- Experience the rich, comforting flavors of hot cocoa in every bite, blending the perfect balance of chocolate, sweetness, and warmth.
- Adorn these charming cupcakes with fluffy frosting and delightful sprinkles, making them visually appealing for parties or cozy nights.
- Customize these cupcakes with various toppings and additions, creating endless possibilities for a unique and personalized dessert experience.
Ingredients for Hot Cocoa Cupcakes
Here’s what you’ll need to make this delicious dish:
The full ingredients list, including measurements, is provided in the recipe card directly below.
How to Make Hot Cocoa Cupcakes
Follow these simple steps to prepare this delicious dish:
Step 1: Preheat and Prep
Preheat your oven to 350°F (175°C). Line a 12-cup muffin tin with cupcake liners. This prevents sticking and makes for easy removal.
Step 2: Combine Dry Ingredients
In a large bowl, whisk together the all-purpose flour, granulated sugar, unsweetened cocoa powder, baking powder, baking soda, and salt. Ensure everything is well combined to avoid clumps and uneven baking.
Step 3: Mix Wet Ingredients
In a separate bowl, whisk together the eggs, milk, vegetable oil, and Alcohol-free vanilla extract. Mix until the ingredients are well combined and a smooth mixture forms.
Step 4: Combine Wet and Dry
Gradually add the wet ingredients to the dry ingredients, mixing on low speed until just combined. Be careful not to overmix; a few lumps are okay. Slowly pour in the hot water while mixing; the batter will be thin.
Step 5: Bake
Fill each cupcake liner about two-thirds full. Bake for 18-20 minutes, or until a toothpick inserted into the center comes out clean. Check for doneness around 18 minutes to prevent overbaking.
Step 6: Cool and Frost
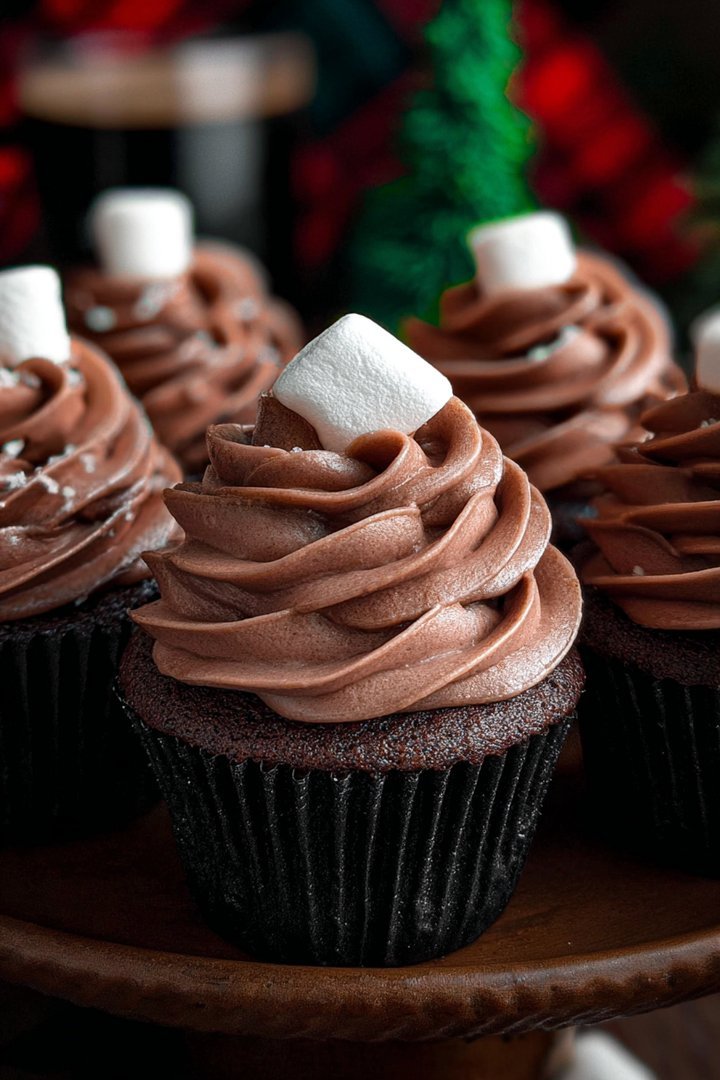
Let the cupcakes cool in the muffin tin for a few minutes before transferring them to a wire rack to cool completely. Once cooled, frost with your favorite frosting and decorate with sprinkles, mini marshmallows, or a dusting of cocoa powder.
Delicious Frosting Ideas for Your Hot Cocoa Cupcakes (H2)
Once your cupcakes have cooled completely, the real fun begins: frosting! Let’s explore some delightful frosting options that will perfectly complement the rich chocolate flavor of your Hot Cocoa Cupcakes.
Classic Chocolate Buttercream (H3)
You can never go wrong with a classic chocolate buttercream. This frosting is rich, creamy, and undeniably chocolatey. All you need is softened butter, powdered sugar, cocoa powder, a splash of milk, and a touch of Alcohol-free vanilla extract. Beat the butter until light and fluffy, then gradually add the powdered sugar and cocoa powder, alternating with milk, until you reach your desired consistency. The Alcohol-free vanilla extract enhances the chocolate flavor, making this frosting an absolute winner. It pipes beautifully too, making it perfect for creating elegant swirls on top of your cupcakes.
Marshmallow Fluff Frosting (H3)
For a lighter, sweeter option that truly captures the essence of hot cocoa, try marshmallow fluff frosting. This frosting is incredibly easy to make; just combine marshmallow fluff with softened butter and a bit of powdered sugar until smooth and creamy. The result is a dreamy, cloud-like frosting that’s reminiscent of the marshmallows floating on top of a steaming mug of hot cocoa. This frosting is especially popular with kids and adds a playful touch to your cupcakes. Consider toasting the frosted cupcakes lightly with a kitchen torch for a s’mores-inspired treat!
Cream Cheese Frosting with a Hint of Cinnamon (H3)
If you’re looking for a tangy and slightly sophisticated twist, cream cheese frosting is an excellent choice. The cream cheese adds a delightful tanginess that balances the sweetness of the cupcakes, while a hint of cinnamon enhances the warm, comforting flavors. To make this frosting, beat together softened cream cheese and butter until smooth, then gradually add powdered sugar and a pinch of cinnamon until you reach your desired consistency. This frosting is incredibly versatile and pairs well with a variety of toppings, such as chopped nuts or a dusting of cocoa powder.
Simple Chocolate Ganache (H3)
For a truly decadent and luxurious option, consider topping your cupcakes with a simple chocolate ganache. Ganache is incredibly easy to make; just heat heavy cream until simmering, then pour it over chopped chocolate. Let it sit for a minute, then stir until smooth and glossy. Allow the ganache to cool slightly before spooning it over your cupcakes. As it cools, it will firm up into a rich, fudgy topping that’s sure to impress. You can even add a sprinkle of sea salt to enhance the chocolate flavor and add a delightful contrast.
Tips for Baking the Perfect Hot Cocoa Cupcakes (H2)
Baking, while often rewarding, can sometimes be a tad tricky. Here are a few tips and tricks to ensure your Hot Cocoa Cupcakes turn out perfectly every single time. These simple adjustments can make a world of difference, transforming your cupcakes from good to absolutely spectacular!
Measure Accurately (H3)
One of the most common baking mistakes is inaccurate measurements. Especially when it comes to flour, it’s crucial to measure correctly. Spoon the flour into your measuring cup and level it off with a knife, rather than scooping it directly from the bag, which can pack the flour and result in too much being used. Accurate measurements are essential for achieving the right consistency and texture in your cupcakes. Also, ensure your leavening agents, like baking powder and baking soda, are fresh, as they lose their potency over time.
Don’t Overmix the Batter (H3)
Overmixing the batter can lead to tough cupcakes. Once you add the wet ingredients to the dry ingredients, mix only until just combined. A few lumps are perfectly fine. Overmixing develops the gluten in the flour, resulting in a dense and chewy texture rather than a light and fluffy one. Gentle mixing is key to achieving the perfect cupcake crumb.
Room Temperature Ingredients (H3)
Using room temperature ingredients, especially eggs and butter, can significantly improve the texture of your cupcakes. Room temperature ingredients emulsify better, creating a smoother and more uniform batter. This results in cupcakes that are more tender and evenly baked. Take your eggs and butter out of the refrigerator about an hour before you plan to start baking.
Cool Completely Before Frosting (H3)
This might seem obvious, but it’s worth emphasizing: make sure your cupcakes are completely cool before frosting them. Frosting warm cupcakes will cause the frosting to melt and slide right off, resulting in a messy and unattractive presentation. Place the cupcakes on a wire rack to cool completely before adding any frosting or decorations.
Baking Time and Oven Temperature (H3)
Every oven is different, so it’s important to keep a close eye on your cupcakes while they are baking. Start checking for doneness around 18 minutes, using a toothpick to test the center. If the toothpick comes out clean or with just a few moist crumbs, the cupcakes are done. Overbaking can lead to dry cupcakes, so it’s best to err on the side of caution. Also, make sure your oven is properly preheated to ensure even baking.
Variations and Add-Ins for Hot Cocoa Cupcakes (H2)
One of the best things about cupcakes is how easily you can customize them to suit your tastes. Here are a few fun and creative variations and add-ins to take your Hot Cocoa Cupcakes to the next level.
Mocha Cupcakes (H3)
For coffee lovers, adding a shot of espresso or a teaspoon of instant coffee to the batter can create a delicious mocha flavor. The coffee enhances the chocolate and adds a subtle depth of flavor that is simply irresistible. You can also add a coffee-flavored buttercream frosting for an extra boost of caffeine!
Peppermint Hot Cocoa Cupcakes (H3)
For a festive twist, add a few drops of peppermint extract to the batter or frosting. You can also crush peppermint candies and sprinkle them on top of the frosted cupcakes. The combination of chocolate and peppermint is a classic holiday favorite.
Spicy Mexican Hot Cocoa Cupcakes (H3)
Add a pinch of cayenne pepper and a dash of cinnamon to the batter for a spicy kick. The warmth of the spices complements the chocolate perfectly, creating a unique and unexpected flavor profile. Top with a dollop of whipped cream and a sprinkle of cinnamon for the perfect finishing touch.
Salted Caramel Hot Cocoa Cupcakes (H3)
Drizzle salted caramel sauce over the frosted cupcakes for a sweet and salty treat. You can also add chopped caramel candies to the batter for an extra layer of flavor. The combination of chocolate, caramel, and salt is simply divine.
Mini Marshmallow Surprise (H3)
Before baking, place a few mini marshmallows in the center of each cupcake. As the cupcakes bake, the marshmallows will melt and create a gooey, marshmallowy surprise inside. This is a fun and playful addition that is sure to delight both kids and adults.
Storage Tips for Your Hot Cocoa Cupcakes (H2)
So, you’ve baked these incredible Hot Cocoa Cupcakes, and they’re a hit. But what if you have leftovers? Here’s how to store them properly to keep them fresh and delicious for as long as possible.
Room Temperature Storage (H3)
If you plan to enjoy your cupcakes within a day or two, storing them at room temperature is perfectly fine. Place the cupcakes in an airtight container to prevent them from drying out. Avoid storing them in direct sunlight or near a heat source, as this can cause the frosting to melt and the cupcakes to become stale.
Refrigerator Storage (H3)
For longer storage, you can refrigerate your cupcakes. Place them in an airtight container and store them in the refrigerator for up to a week. Keep in mind that refrigerating cupcakes can sometimes dry them out, so it’s best to consume them as soon as possible. When you’re ready to enjoy them, let them sit at room temperature for about 30 minutes to soften the frosting.
Freezing Cupcakes (H3)
If you want to store your cupcakes for an extended period, freezing is the best option. Wrap each cupcake individually in plastic wrap, then place them in a freezer-safe container or bag. This will help prevent freezer burn and keep the cupcakes fresh. Frozen cupcakes can last for up to 2-3 months. When you’re ready to eat them, thaw them in the refrigerator overnight or at room temperature for a few hours.
Freezing Unfrosted Cupcakes (H3)
If you prefer, you can also freeze unfrosted cupcakes. This can be a great option if you want to bake ahead of time and frost them later. Follow the same freezing instructions as above, wrapping each cupcake individually in plastic wrap before placing them in a freezer-safe container. When you’re ready to frost them, thaw them completely before adding the frosting.
With these tips and tricks, you’re well on your way to baking the perfect batch of Hot Cocoa Cupcakes every time. Enjoy!
Perfecting the Cooking Process
To achieve cupcake nirvana, whisk dry ingredients before tackling the wet. Blend until just combined, avoid overmixing to keep things light and airy. Even oven temperature is key; rotate the pan halfway through for uniform baking, that’s how you get perfect results every time.
Add Your Touch
Want to get wild with your cocoa dreams? Try adding a dash of cinnamon or a pinch of cayenne for a spicy kick. Chocolate chips, chopped nuts, or even a swirl of peanut butter can elevate these cupcakes to a whole new level of deliciousness.
Storing & Reheating
Keep your delightful treats fresh by storing them in an airtight container at room temperature for up to three days. If you want to warm them up, a quick zap in the microwave (about 10-15 seconds) will bring back that fresh-baked warmth, so they are ready to enjoy again!
Here are a few tips to help you nail these hot cocoa cupcakes:
- Always use room-temperature ingredients; they blend together more smoothly and create a better batter texture, leading to a tender cupcake.
- Don’t overfill the cupcake liners. Aim for about two-thirds full to prevent overflow and ensure even baking. Nobody wants a cupcake explosion in their oven!
- Let the cupcakes cool completely before frosting. Patience is a virtue, especially when it comes to frosting; otherwise, you’ll end up with a melty mess.
(Personal anecdote formated as paragraph subheading)
I once made these for a friend’s winter birthday. He claimed they were better than any birthday cake he’d ever had. That’s when I knew these were more than just cupcakes; they were vessels of joy.
Let’s dive into the world of cupcake creation! You know, the kind that makes you want to curl up on the couch with a warm blanket and a good book. We’re talking about **Hot Cocoa Cupcakes**. Imagine the rich, chocolatey goodness of a steaming mug of hot cocoa, but in cupcake form. Are you drooling yet? Because I am! This recipe is all about bringing that cozy, comforting feeling into your kitchen and onto your taste buds. No complicated techniques or fancy equipment needed. Just simple ingredients, a little bit of love, and a whole lot of chocolate.
Why Hot Cocoa Cupcakes? Because, Duh!
Seriously, who doesn’t love hot cocoa? It’s like a warm hug on a chilly day. And cupcakes? They’re basically miniature cakes of happiness. Marry the two together, and you’ve got a dessert that’s guaranteed to put a smile on anyone’s face. These Hot Cocoa Cupcakes are perfect for everything. Are you having a holiday party? Baking these will be the perfect touch! Need a sweet treat after a long day at work? These are your new best friends. Want to impress your friends with your mad baking skills? Look no further. And the best part? They’re surprisingly easy to make. So, grab your apron, preheat that oven, and let’s get baking!
Gather Your Ingredients
Okay, before we get started, let’s make sure we have everything we need. No one wants to be halfway through a recipe and realize they’re missing a key ingredient. It’s happened to the best of us (myself included!).
For the cupcakes, you’ll need:
- All-purpose flour: The foundation of our delicious treats.
- Granulated sugar: Because life is too short for unsweetened cupcakes.
- Cocoa powder: The star of the show! Use a good quality cocoa for the best flavor.
- Baking powder: To give our cupcakes that light and fluffy texture.
- Baking soda: Works with the baking powder to create the perfect rise.
- Salt: Just a pinch to enhance the flavors.
- Eggs: Binding everything together and adding richness.
- Vegetable oil: For moisture and tenderness.
- Milk: Adds moisture and helps to create a smooth batter.
- Alcohol-free vanilla extract: A splash of vanilla for that extra touch of deliciousness.
- Hot water: To bloom the cocoa powder and intensify the chocolate flavor.
And for the frosting, you’ll need:
- Butter: Softened to perfection for a smooth and creamy frosting.
- Powdered sugar: The key to a sweet and fluffy frosting.
- Cocoa powder: Because we can never have too much chocolate.
- Milk: To adjust the consistency of the frosting.
- Alcohol-free vanilla extract: A little more vanilla never hurt anyone.
- Mini marshmallows: Optional, but highly recommended for that authentic hot cocoa experience!
Mixing Magic: The Cupcake Batter
Alright, now for the fun part! Let’s get our hands dirty (figuratively, of course. Wash your hands first!).
1. Preheat your oven to 350°F (175°C) and line a muffin tin with cupcake liners. This is a crucial step. Otherwise, you’ll have cupcakes glued to the pan, and nobody wants that.
2. In a large bowl, whisk together the flour, sugar, cocoa powder, baking powder, baking soda, and salt. Make sure there are no lumps! We want a smooth and even batter.
3. In a separate bowl, whisk together the eggs, vegetable oil, milk, and Alcohol-free vanilla extract. These are the wet ingredients.
4. Gradually add the wet ingredients to the dry ingredients, mixing until just combined. Don’t overmix! Overmixing can lead to tough cupcakes, and we want them to be light and fluffy.
5. In a small bowl, combine the cocoa powder with the hot water and stir until it forms a smooth paste. This is how we unlock the full potential of the cocoa powder.
6. Add the cocoa mixture to the batter and mix until just combined. The batter should be smooth and chocolatey.
7. Fill the cupcake liners about two-thirds full. This will prevent them from overflowing in the oven.
8. Bake for 18-20 minutes, or until a toothpick inserted into the center comes out clean. Let the cupcakes cool in the pan for a few minutes before transferring them to a wire rack to cool completely.
Frosting Frenzy: The Hot Cocoa Dream
While the cupcakes are cooling, let’s whip up that dreamy hot cocoa frosting. This is where the magic really happens!
1. In a large bowl, beat the softened butter with an electric mixer until smooth and creamy. This is the base of our frosting, so make sure it’s nice and fluffy.
2. Gradually add the powdered sugar and cocoa powder, mixing on low speed until combined. Be careful not to create a powdered sugar cloud!
3. Add the milk and Alcohol-free vanilla extract and beat on high speed until the frosting is light and fluffy. Add more milk if needed to reach your desired consistency.
4. Once the cupcakes are completely cool, frost them generously with the hot cocoa frosting.
5. Top with mini marshmallows, if desired. Because who doesn’t love marshmallows?
Serving Suggestions and Extra Fun
Now that you’ve got a batch of beautiful Hot Cocoa Cupcakes, it’s time to enjoy them! Here are a few ideas to take your cupcake experience to the next level:
- Serve them with a warm mug of hot cocoa for the ultimate cozy treat.
- Sprinkle them with chocolate shavings or cocoa powder for an extra touch of elegance.
- Add a swirl of whipped cream or a scoop of vanilla ice cream for an even more decadent dessert.
- Share them with your friends and family. Because sharing is caring, and cupcakes are meant to be enjoyed together!
These **Hot Cocoa Cupcakes** are more than just a recipe; they’re an experience. They’re a way to bring a little bit of comfort and joy into your life, one delicious bite at a time. So go ahead, bake a batch, and let the magic happen. You won’t regret it! Remember to adjust ingredients based on your taste preferences and dietary needs. Happy baking!
Conclusion for Hot Cocoa Cupcakes:
These hot cocoa cupcakes are a delightful treat, perfect for cozy nights or festive gatherings. The combination of rich chocolate flavor and marshmallowy sweetness makes them irresistible. Remember to use quality cocoa powder for the best taste and don’t be shy with the toppings! With their moist texture and delicious flavor, these cupcakes are sure to bring a smile to everyone’s face. Enjoy baking and sharing these little bundles of joy!
Print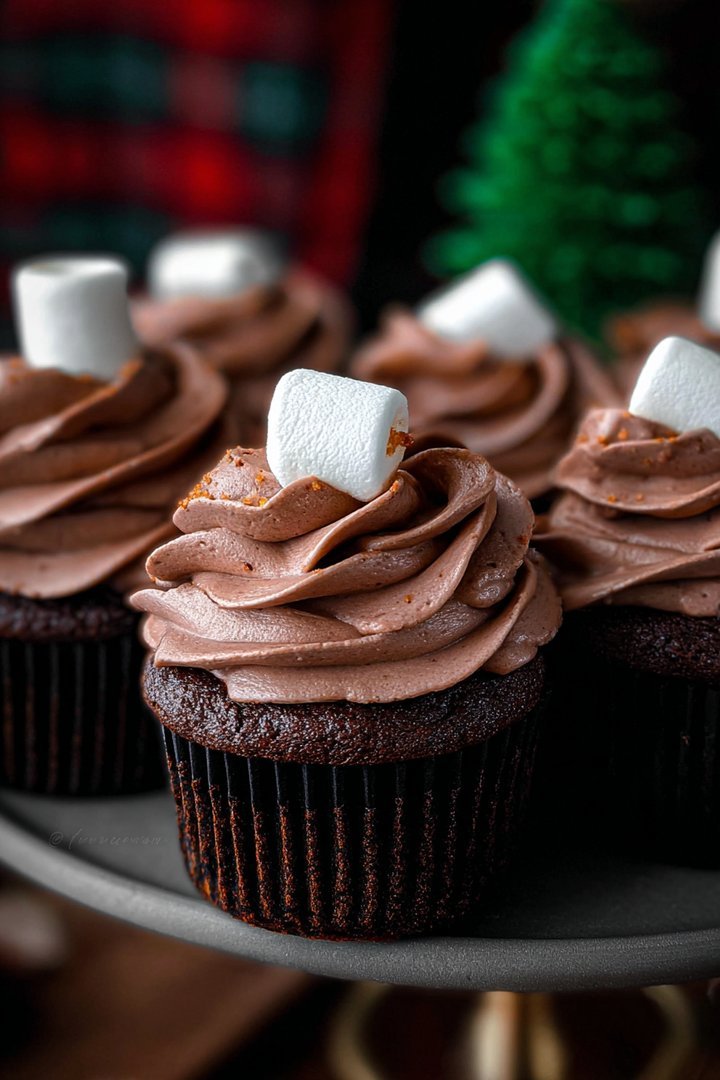
Hot Cocoa Cupcakes
Delicious hot cocoa cupcakes recipe with detailed instructions and nutritional information.
- Total Time: 35 minutes
- Yield: 4 servings
Ingredients
- All-purpose flour: 1 1/2 cups
- Granulated sugar: 1 cup
- Unsweetened cocoa powder: 1/2 cup
- Baking soda: 1 teaspoon
- Salt: 1/2 teaspoon
- Milk: 1 cup
- Vegetable oil: 1/4 cup
- Vanilla extract: 1 teaspoon
Instructions
- Step 1: Preheat oven to 350°F (175°C). Line a 12-cup muffin tin with cupcake liners.
- Step 2: In a large bowl, whisk together the flour, sugar, cocoa powder, baking soda, and salt.
- Step 3: In a separate bowl, combine the milk, oil, and vanilla extract.
- Step 4: Add the wet ingredients to the dry ingredients and mix until just combined. Do not overmix.
- Step 5: Fill each cupcake liner about 2/3 full.
- Step 6: Bake for 18-20 minutes, or until a toothpick inserted into the center comes out clean. Let cool in the muffin tin for a few minutes before transferring to a wire rack to cool completely.
Notes
- Store cooled cupcakes in an airtight container at room temperature to keep them moist for up to 3 days.
- For an extra chocolatey treat, microwave a cupcake for 10-15 seconds to slightly warm the cocoa flavor.
- Serve these cupcakes with a dollop of whipped cream and a sprinkle of cocoa powder for a simple yet elegant dessert.
- Bloom the cocoa powder in the warm milk mixture for 5 minutes before combining to intensify the chocolate flavor.
- Prep Time: 15 minutes
- Cook Time: 20 minutes
- Method: Stovetop
- Cuisine: American
FAQs:
Can I make these Hot Cocoa Cupcakes ahead of time?
Absolutely! These hot cocoa cupcakes are fantastic for making a day in advance. Once they’ve cooled completely, store them in an airtight container at room temperature. If you’re adding frosting, wait until just before serving for the best presentation. The cupcakes stay incredibly moist and flavorful, making them a perfect make-ahead treat for parties or gatherings. Plus, it gives the flavors a chance to meld together, resulting in an even richer, more decadent cupcake experience. They are so good, that no one will resist eating them.
How do I get the perfect swirl of frosting on my hot chocolate cupcakes?
Achieving that picture-perfect swirl is easier than you might think! Use a piping bag fitted with a star tip for a professional look. Fill the bag with your favorite frosting, then hold it at a 90-degree angle above the cupcake. Start piping from the center, working your way outwards in a circular motion until you reach the edge. Then, lift the bag and give a little flick of the wrist to create a beautiful peak. Practice makes perfect, so don’t be discouraged if your first few attempts aren’t flawless!
What are some fun topping ideas for these cocoa cupcakes?
Let your creativity shine with toppings! Mini marshmallows are a classic nod to hot cocoa, and chocolate shavings add a touch of elegance. Crushed peppermint candies are festive, especially during the holidays. For a bit of crunch, try chopped nuts or chocolate sprinkles. A dusting of cocoa powder provides a simple yet beautiful finish. Get the kids involved and let them create their own customized cupcakes! It’s a delightful way to add a personal touch to your baking creations.
Can I make these hot cocoa flavor cupcakes gluten-free?
Yes, you absolutely can! Simply substitute the all-purpose flour with a gluten-free all-purpose flour blend. Make sure the blend contains xanthan gum, as this helps provide the necessary structure for the cupcakes. Also, check the labels of all your other ingredients to ensure they are gluten-free as well. With a few simple swaps, you can enjoy these decadent treats without any gluten. Gluten-free baking can be just as satisfying, and these cupcakes are proof of that!

Leave a Comment