

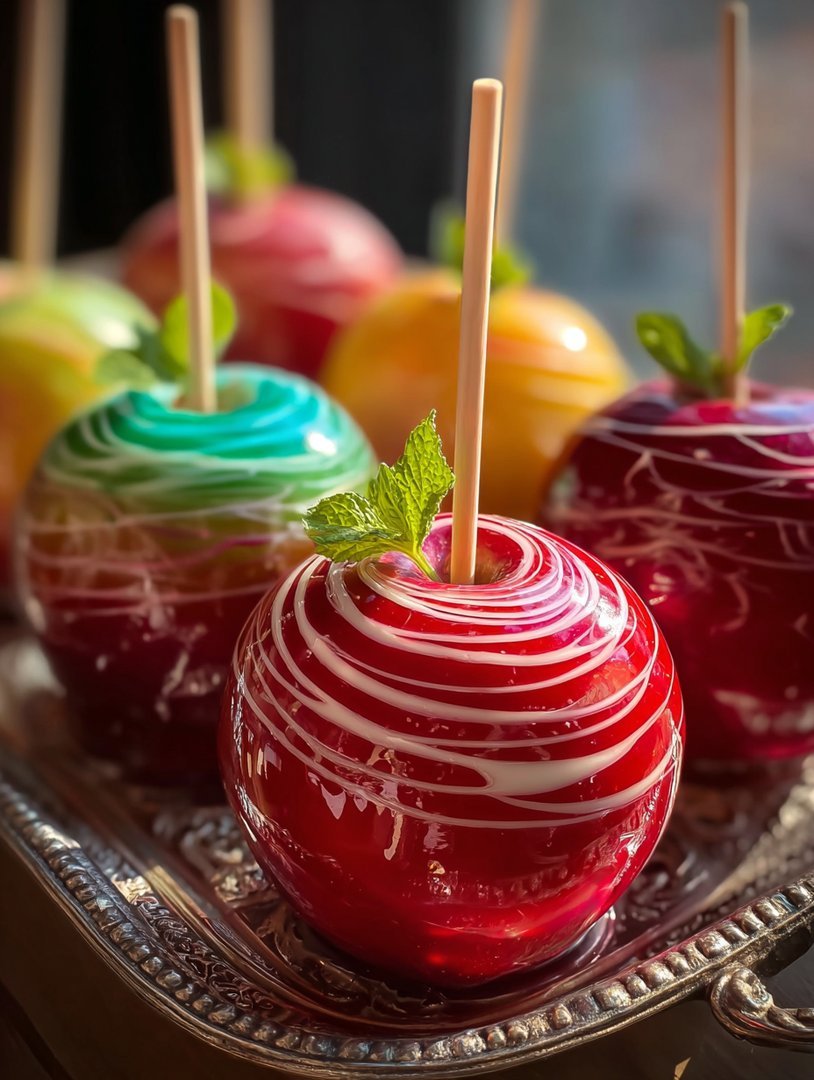
Imagine biting into a crisp, tart apple encased in a sugary shell bursting with electrifying fruit flavors. These Kool-Aid Swirl Candy Apples aren’t just a treat; they’re a vibrant explosion of color and taste that brings back childhood memories of carefree summer days and sticky fingers.
This recipe transforms ordinary apples into edible works of art, perfect for parties, holidays, or simply a fun weekend project. Each bite offers a symphony of sweet and tangy notes that will delight both kids and adults alike.
- Easy to make with simple ingredients you probably already have in your pantry, making it a perfect last-minute treat.
- The combination of tart apples and sweet Kool-Aid coating creates a flavor explosion that’s both nostalgic and exciting.
- The vibrant swirls of color make these candy apples a stunning centerpiece for any dessert table or festive occasion.
- Customize the flavor combinations to match your favorite Kool-Aid flavors, making each apple a unique and personalized creation.
Ingredients for Kool-Aid Swirl Candy Apples
Here’s what you’ll need to make this delicious dish:
The full ingredients list, including measurements, is provided in the recipe card directly below.
How to Make Kool-Aid Swirl Candy Apples
Follow these simple steps to prepare this delicious dish:
Step 1: Prepare the Apples
Wash and thoroughly dry the apples. Remove the stems and insert an apple stick firmly into the core of each apple. This step is crucial for a good grip.
Step 2: Make the Candy Coating Base
In a medium saucepan, combine granulated sugar, light corn syrup, and water. Stir over medium heat until the sugar is completely dissolved. This is the foundation of your candy masterpiece.
Step 3: Cook the Candy Coating
Bring the mixture to a boil without stirring. Use a candy thermometer to monitor the temperature. Cook until it reaches the hard-crack stage (300-310°F or 149-154°C). Be patient and watch carefully!
Step 4: Add Flavor and Color
Remove the saucepan from the heat. Quickly stir in your chosen Kool-Aid packet(s) and food coloring (if using). Work fast, as the mixture will begin to thicken. The Kool-Aid adds both flavor and a beautiful hue.
Step 5: Coat the Apples
Dip each apple into the hot candy mixture, swirling to coat evenly. Lift the apple and allow excess coating to drip off. For a swirled effect, use multiple flavors and drizzle them over the apple. A little creativity goes a long way!
Step 6: Cool and Harden
Place the coated apples on a silicone mat or parchment paper to cool and harden. This usually takes about 30 minutes. Ensure they are spaced apart to prevent sticking.
Transfer to plates and enjoy these vibrant and flavorful Kool-Aid Swirl Candy Apples! They are the perfect treat for any occasion.
Tips for Perfect Kool-Aid Swirl Candy Apples (formated as H2 subheading)
Creating flawless Kool-Aid Swirl Candy Apples is easier than you think, but a few tricks can elevate your candy-making game from good to spectacular. Think of me as your candy apple whisperer, here to guide you through common pitfalls and reveal secrets to achieving candy apple perfection.
Choosing the Right Apples (formated as H3 subheading)
The apple is the foundation of this delicious treat, so choosing wisely is key. Opt for firm, crisp varieties like Granny Smith, Fuji, or Honeycrisp. These apples hold their shape well during the dipping process and their slight tartness provides a delightful contrast to the sweet candy coating. Avoid apples that are bruised, soft, or have blemishes, as they won’t hold up as well.
Mastering the Candy Coating (formated as H3 subheading)
The candy coating is where the magic happens. Accuracy is paramount here, so a candy thermometer is your best friend. Aim for the hard-crack stage (300-310°F or 149-154°C). If the temperature is too low, the coating will be soft and sticky. Too high, and it will be brittle and prone to cracking. Stir the sugar, corn syrup, and water mixture only until the sugar dissolves to prevent crystallization. Once it starts boiling, resist the urge to stir, as this can also lead to unwanted crystallization.
Achieving the Perfect Swirl (formated as H3 subheading)
Creating those eye-catching swirls is easier than you might think. Divide the candy mixture into separate bowls and add different Kool-Aid flavors and food coloring to each. Quickly drizzle each color over the apples after dipping them in the base coat. Don’t overthink it; a little chaos can create a stunning effect. Another technique is to dip the apple into one color, let it set slightly, then dip it into another color for a layered effect.
Avoiding Common Mistakes (formated as H3 subheading)
One of the most common mistakes is not drying the apples thoroughly. Water repels the candy coating, so make sure your apples are bone dry before dipping. Another pitfall is allowing the candy mixture to cool too much before dipping. If it starts to thicken, gently reheat it over low heat, stirring constantly. Lastly, ensure your apple sticks are securely inserted; a wobbly stick can lead to a candy apple catastrophe!
Variations on the Classic Kool-Aid Swirl Candy Apple (formated as H2 subheading)
Feeling adventurous? Why stick to the script when you can remix the recipe and create your own signature Kool-Aid Swirl Candy Apples? Let’s dive into some creative variations that will make your candy apples the talk of the town.
Flavor Combinations Gone Wild (formated as H3 subheading)
Don’t limit yourself to just one Kool-Aid flavor. Mix and match for unexpected and delightful combinations. How about a tropical twist with a blend of Tropical Punch and Lemon-Lime? Or a berry bonanza with Black Cherry and Blue Raspberry? Get creative and experiment with different combinations to find your perfect flavor profile.
Add-Ins for Extra Texture and Flavor (formated as H3 subheading)
Take your candy apples to the next level by adding some textural elements. Before the coating sets, sprinkle chopped nuts (like peanuts, almonds, or pecans), crushed pretzels, mini chocolate chips, or even colorful sprinkles for an extra layer of crunch and sweetness.
Drizzles and Decorations (formated as H3 subheading)
After the candy coating has set, drizzle melted chocolate (white, milk, or dark) over the apples for an elegant touch. You can also use edible glitter, sanding sugar, or even small candies to decorate your creations. Get the kids involved and let them unleash their inner artists!
Kool-Aid Infused Caramel Apples (formated as H3 subheading)
For a gourmet twist, try making caramel apples with a Kool-Aid infused caramel. Simply add a packet of your favorite Kool-Aid flavor to your homemade caramel recipe. The result is a chewy, flavorful caramel apple with a vibrant color and a nostalgic twist.
Making Mini Candy Apples (formated as H3 subheading)
Everything is cuter in miniature form, and candy apples are no exception. Use small crab apples or even apple slices and dip them in the Kool-Aid candy coating. These bite-sized treats are perfect for parties and gatherings.
Frequently Asked Questions About Kool-Aid Swirl Candy Apples (formated as H2 subheading)
Got questions? I’ve got answers! Let’s tackle some common queries about making Kool-Aid Swirl Candy Apples, ensuring your candy-making journey is smooth and sweet.
Can I use sugar substitutes? (formated as H3 subheading)
While granulated sugar is the traditional choice for candy coatings, you can experiment with sugar substitutes like erythritol or stevia blends. However, keep in mind that these substitutes may affect the texture and consistency of the coating. It might require some adjustments to the cooking time and temperature to achieve the desired hard-crack stage.
How long do these candy apples last? (formated as H3 subheading)
Kool-Aid Swirl Candy Apples are best enjoyed within 24-48 hours. Store them in an airtight container in a cool, dry place. Avoid storing them in the refrigerator, as the moisture can cause the candy coating to become sticky.
Can I make these ahead of time? (formated as H3 subheading)
While you can make the candy coating ahead of time, it’s best to dip the apples closer to when you plan to serve them. The longer the apples sit, the more likely the coating is to soften or become sticky.
What if my candy coating is too thick? (formated as H3 subheading)
If your candy coating becomes too thick before you finish dipping the apples, gently reheat it over low heat, stirring constantly until it reaches the desired consistency. Be careful not to overheat it, as this can cause it to burn.
How do I prevent the candy coating from cracking? (formated as H3 subheading)
Cracking can occur if the candy coating is cooked at too high a temperature or if the apples are too cold. Ensure you use a candy thermometer to monitor the temperature accurately and allow the apples to come to room temperature before dipping.
The Sweet Conclusion (formated as H2 subheading)
So, there you have it – everything you need to create your own dazzling and delicious Kool-Aid Swirl Candy Apples. Whether you’re looking for a fun family activity, a unique party treat, or simply a nostalgic trip down memory lane, these candy apples are sure to bring a smile to your face.
Perfecting the Cooking Process
The key to amazing Kool-Aid Swirl Candy Apples lies in timing. First, melt your sugar mixture, then quickly dip and swirl the apples. Prepare your toppings beforehand for an efficient and fun candy apple creation session. This ensures a smooth, delicious treat every time.
Add Your Touch
Feeling adventurous? Swap out the traditional red apple for Granny Smiths for a tart twist! Experiment with different Kool-Aid flavors and create rainbow-colored masterpieces. Add crushed nuts, sprinkles, or even mini chocolate chips for an extra layer of yum.
Storing & Reheating
These Kool-Aid Swirl Candy Apples are best enjoyed fresh, but if you have leftovers, wrap them individually in parchment paper. Store in the refrigerator for up to 2 days. Reheating is not recommended as it will affect the candy coating’s texture.
Here are some helpful tips to create the perfect Kool-Aid Swirl Candy Apples:
- Make sure your apples are thoroughly washed and dried before dipping to help the candy coating adhere properly and avoid a sticky mess.
- Use a candy thermometer to ensure your sugar mixture reaches the hard-crack stage (300-310°F), resulting in a beautifully crisp and hard candy shell.
- Work quickly once the candy mixture is ready, as it can harden fast. Have all your apples and toppings prepared to maintain a smooth, even coating.
(Personal anecdote formated as paragraph subheading)
My kids love helping me make these! One time, we accidentally used too much Kool-Aid, and they turned neon. They still tasted amazing, though, and we laughed about it for days.
A Colorful Twist on a Classic Treat: Diving into Kool-Aid Swirl Candy Apples
Forget boring, everyday apples! We’re about to embark on a vibrant journey into the land of Kool-Aid Swirl Candy Apples. Imagine taking the timeless charm of a candy apple and injecting it with a burst of fruity, colorful fun. Sounds like a party in your mouth, right? Well, buckle up, buttercup, because that’s precisely what we’re going to do!
Think back to your childhood. Remember those sticky-sweet, bright red candy apples at the fall festival? They were practically a rite of passage. Now, picture that same nostalgic goodness, but with a kaleidoscope of Kool-Aid flavors dancing across the surface. We’re talking cherry, grape, blue raspberry – the possibilities are as endless as your imagination (and your local grocery store’s Kool-Aid aisle).
This isn’t just a recipe; it’s an experience. It’s a chance to unleash your inner child, get a little messy, and create something truly spectacular. So, ditch the predictable desserts and let’s get ready to swirl our way to candy apple perfection!
Why Kool-Aid Candy Apples are the Bomb.com
Okay, okay, I know what you’re thinking: “Candy apples? Been there, done that.” But trust me, friends, these aren’t your grandma’s candy apples (unless your grandma is a total rockstar who experiments with Kool-Aid, in which case, I want her recipe!). Kool-Aid Swirl Candy Apples bring a whole new level of awesome to the table.
First off, the flavor. We’re not just talking about a sugary coating here. We’re talking about a tangy, fruity punch that explodes in your mouth with every bite. It’s like a carnival ride for your taste buds!
Secondly, the color. These apples are visually stunning! You can create mesmerizing swirls of vibrant hues that will impress your friends, family, and even that one judgmental neighbor who always side-eyes your lawn decorations.
And finally, the fun factor. Making these apples is an absolute blast! It’s a fantastic activity to do with kids (or just embrace your own inner kid). You can experiment with different flavor combinations, get creative with toppings, and maybe even have a candy apple decorating contest. Loser does the dishes, obviously.
The Secret Sauce: Ingredients You’ll Need
Alright, let’s gather our supplies. Don’t worry, you probably have most of these things lurking in your pantry already.
- Apples: I recommend using firm, crisp apples like Granny Smith or Honeycrisp. They hold their shape well and provide a nice tartness that balances the sweetness of the candy coating.
- Granulated Sugar: This is the foundation of our candy coating, so make sure you have plenty on hand.
- Light Corn Syrup: This helps prevent crystallization and keeps the candy coating smooth and shiny.
- Water: Just plain old water. Nothing fancy here.
- Kool-Aid Packets: This is where the magic happens! Choose your favorite flavors or mix and match for a truly unique experience.
- Apple Cider Vinegar: A little bit of acid helps balance the sweetness and adds a subtle tang.
- Candy Thermometer: This is essential for ensuring your candy coating reaches the correct temperature. Don’t skip this step!
- Parchment Paper: For easy cleanup and to prevent the apples from sticking.
- Optional Toppings: Sprinkles, chopped nuts, mini chocolate chips, shredded coconut – let your imagination run wild!
Let’s Get Cooking: The Step-by-Step Guide
Okay, time to put on your apron and get down to business!
1. Wash and dry your apples thoroughly. Remove the stems and insert sturdy sticks into the core.
2. In a heavy-bottomed saucepan, combine the sugar, corn syrup, water, and apple cider vinegar.
3. Stir the mixture over medium heat until the sugar dissolves.
4. Insert your candy thermometer and continue cooking, without stirring, until the mixture reaches the hard-crack stage (300-310°F).
5. Remove the saucepan from the heat and stir in the Kool-Aid powder. Be careful, as the mixture will bubble up!
6. Working quickly, dip each apple into the candy coating, swirling to coat evenly.
7. If desired, immediately sprinkle with your favorite toppings.
8. Place the coated apples on a parchment-lined baking sheet and let them cool completely.
9. Admire your handiwork and prepare for a sugar rush!
Troubleshooting Tips: Avoiding Candy Apple Calamities
Even the best cooks encounter snags sometimes. Here are a few common candy apple problems and how to fix them:
- Candy Coating is Too Soft: You probably didn’t cook the sugar mixture to a high enough temperature. Try again, making sure to reach the hard-crack stage.
- Candy Coating is Crystallized: This can happen if you stir the sugar mixture too much while it’s cooking. Avoid stirring after the sugar has dissolved.
- Candy Coating is Too Thick: Add a tablespoon of water to the saucepan and stir gently until it thins out.
- Apples are Slipping Off the Sticks: Make sure the sticks are inserted firmly into the core of the apples. You can also try dipping the end of the stick in melted chocolate before inserting it into the apple for extra grip.
Kool-Aid Flavor Combos: Unleash Your Inner Mixologist
This is where things get really fun! Don’t be afraid to experiment with different Kool-Aid flavor combinations. Here are a few of my favorites to get you started:
- Cherry Lime: A classic combination that’s sweet and tangy.
- Grape Berry Blue: A vibrant purple swirl with a burst of fruity goodness.
- Tropical Punch Watermelon: A taste of summer in every bite.
- Orange Lemonade: A refreshing and citrusy treat.
Beyond the Apple: Creative Ways to Use Your Candy Coating
Who says you have to stop at apples? This candy coating is incredibly versatile! Try drizzling it over pretzels, dipping marshmallows, or even creating candy bark. The possibilities are endless! Just remember to work quickly, as the coating hardens fast.
Final Thoughts: Embrace the Fun and Get Swirling!
So there you have it – everything you need to know to create the most amazing Kool-Aid Swirl Candy Apples. Remember, this isn’t just about following a recipe; it’s about having fun and getting creative. Don’t be afraid to experiment with different flavors, colors, and toppings. And most importantly, don’t forget to share your creations with the people you love.
After all, nothing brings people together like a good old-fashioned sugar rush! Now go forth and swirl, my friends! Let the candy apple adventures begin!
Conclusion for Kool-Aid Swirl Candy Apples :
In conclusion, these Kool-Aid Swirl Candy Apples are not just a treat; they’re a vibrant, flavorful experience that’s surprisingly easy to create. Remember to scrub and dry your apples, use a candy thermometer for candy perfection, and get creative with your favorite Kool-Aid flavors. With a little patience and these tips, you will be whipping up batches of stunning, delicious candy apples that will be the hit of any gathering. So go ahead, embrace your inner child, and enjoy the sweet, colorful magic.
Print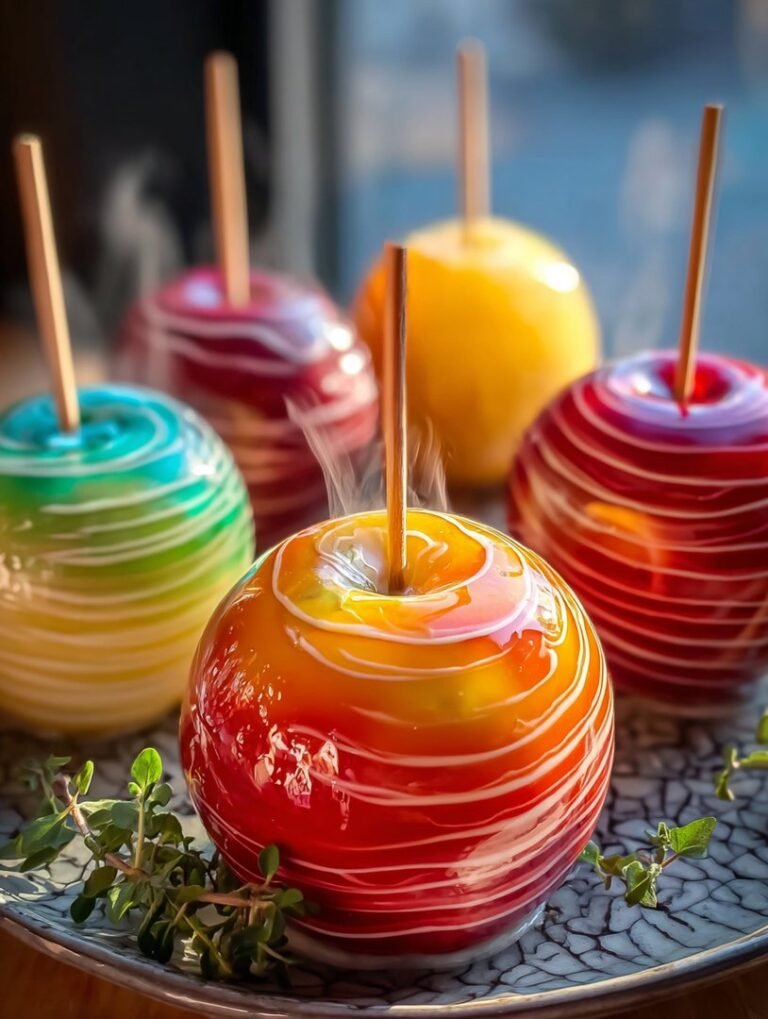
Kool-Aid Swirl Candy Apples
Delicious kool-aid swirl candy apples recipe with detailed instructions and nutritional information.
- Total Time: 35 minutes
- Yield: 4 servings 1x
Ingredients
- 6 Medium apples, washed and dried
- 3 cups Granulated sugar
- 1 cup Light corn syrup
- 1/2 cup Water
- 1 packet Kool-Aid powder (any flavor)
- 1 teaspoon Vanilla extract
- Red food coloring (optional, for color enhancement)
- Candy sticks
Instructions
- Step 1: Insert a candy stick firmly into the core of each apple.
- Step 2: In a heavy-bottomed saucepan, combine sugar, corn syrup, and water. Stir until sugar is dissolved.
- Step 3: Place the saucepan over medium-high heat. Bring the mixture to a boil without stirring. Clip a candy thermometer to the side of the pan.
- Step 4: Cook until the thermometer reaches 300°F (149°C), or hard-crack stage. Remove from heat immediately.
- Step 5: Quickly stir in the Kool-Aid powder, vanilla extract, and optional red food coloring. Be careful, as it will bubble.
- Step 6: Dip each apple into the hot candy mixture, swirling to coat evenly. Place the coated apples on a parchment-lined baking sheet to cool and harden. The swirl effect will occur naturally as you dip.
Notes
- Store your Kool-Aid Swirl Candy Apples individually wrapped in plastic wrap in a cool, dry place to prevent them from becoming sticky.
- Do not reheat these apples, as the candy coating will melt and lose its texture.
- Serve these colorful candy apples as a fun and festive treat for parties or special occasions.
- For a more vibrant swirl, gently tilt the pot while dipping to encourage the Kool-Aid mixture to move and create unique patterns on each apple.
- Prep Time: 15 minutes
- Cook Time: 20 minutes
- Method: Stovetop
- Cuisine: American
FAQs :
Can I use different flavors of Kool-Aid for my Kool-Aid Swirl Candy Apples?
Absolutely! That’s the beauty of this recipe. Feel free to experiment with different Kool-Aid flavors to create your own unique swirl of colors and tastes. Imagine a blue raspberry and lemonade combination or a tropical punch and grape explosion. Just be sure to keep the proportions of Kool-Aid powder to sugar and water consistent to ensure the candy coating sets properly. Get creative and let your taste buds guide you. The possibilities are endless and the results are bound to be delightfully surprising! Have fun mixing and matching!
How do I prevent the candy coating from sliding off my Kool-Aid Swirl Candy Apples?
The key to a candy coating that stays put is ensuring your apples are properly prepared. First, give those apples a good scrub to remove any wax. Next, and this is crucial, make sure they are bone dry before dipping. Moisture is the enemy! You can also chill the apples in the refrigerator for about 30 minutes before dipping, which helps the candy coating to adhere better. Finally, ensure your candy mixture reaches the hard-crack stage. If it’s not hot enough, it won’t set correctly and you’ll have a sticky, sliding mess.
What’s the best way to store these Kool-Aid Swirl Candy Apples?
Once your Kool-Aid Swirl Candy Apples are set and hardened, the best way to store them is individually wrapped in cellophane bags or parchment paper. This prevents them from sticking together. Store them in a cool, dry place, ideally not in the refrigerator unless your kitchen is unusually warm. Storing them in the fridge can sometimes make the candy coating sticky due to condensation. They’re best enjoyed within a day or two for optimal crispness and flavor, but let’s be honest, they probably won’t last that long!
My Kool-Aid Swirl Candy Apples are too sticky, what did I do wrong?
Ah, the dreaded stickiness! This usually indicates that your candy mixture didn’t reach the hard-crack stage. The temperature is crucial for this recipe. If it’s too low, the sugar won’t caramelize properly and you’ll end up with a soft, sticky coating. Invest in a candy thermometer, it’s your best friend for this recipe. Also, avoid making these on a humid day, as moisture in the air can also contribute to stickiness. Don’t despair! You can try reheating the mixture to a higher temperature, but keep a close eye on it to prevent burning.


Leave a Comment