
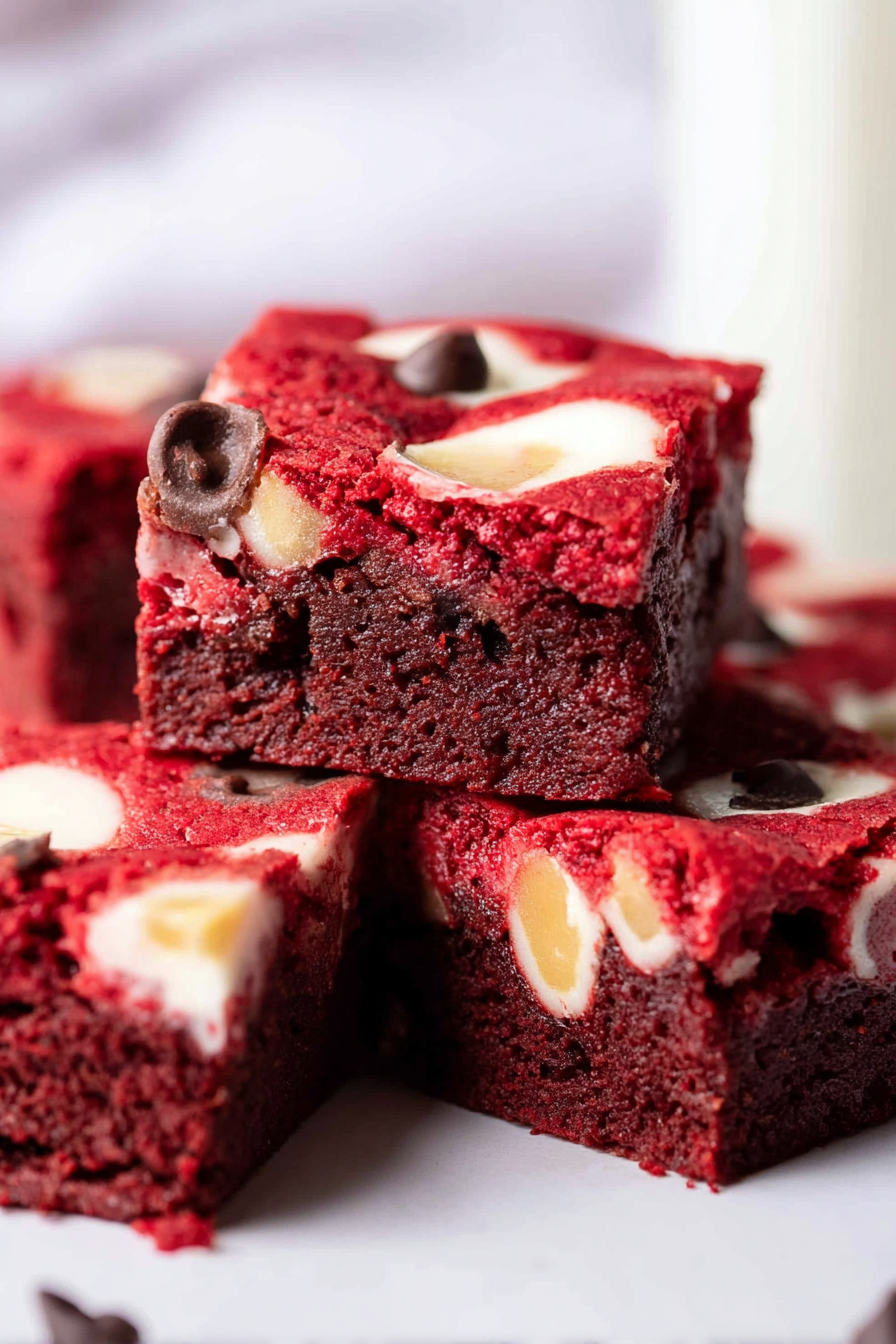
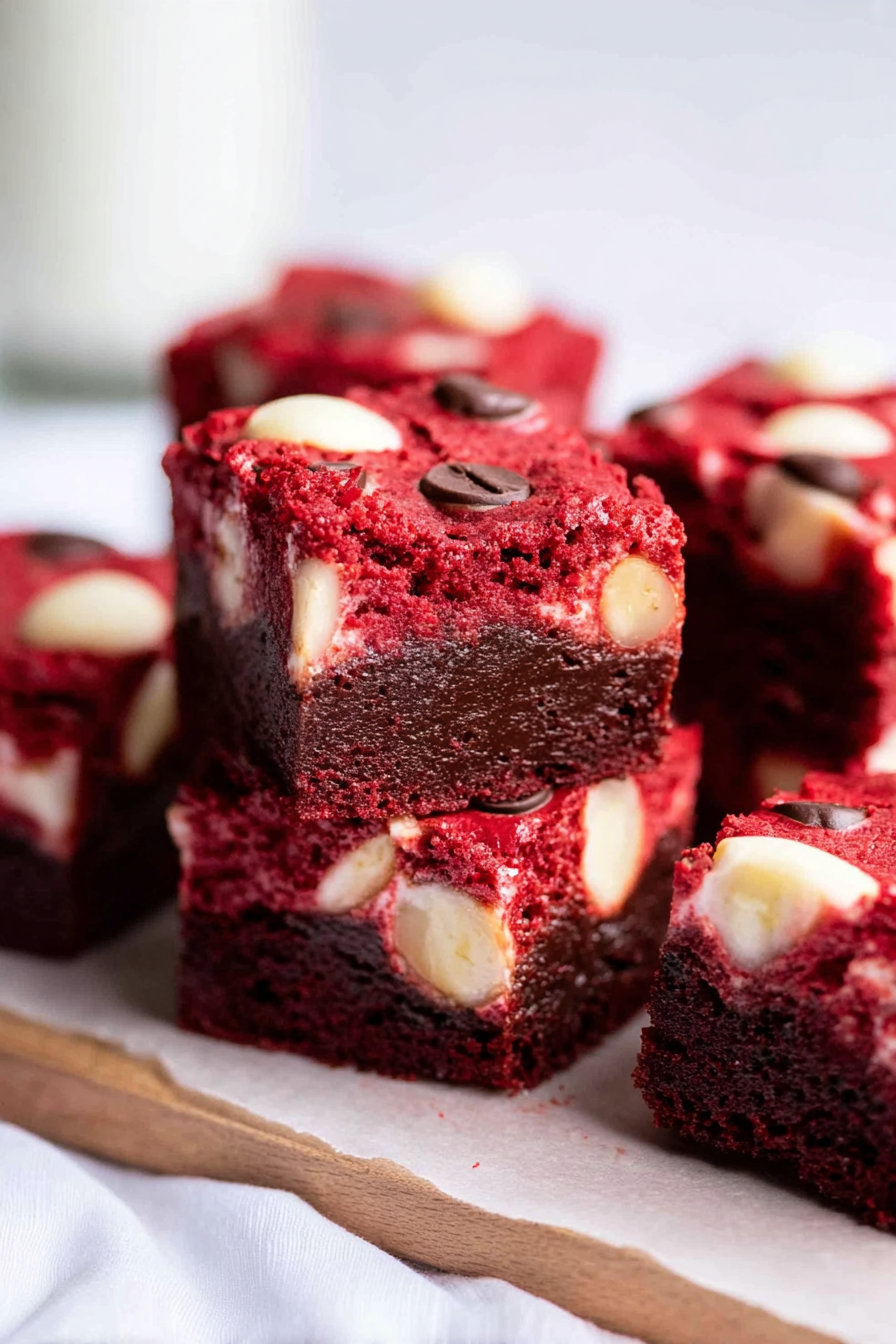
Red velvet brownies, a symphony of chocolate and crimson, offer a delightful twist on a classic treat. Their fudgy texture and subtly tangy flavor create an irresistible dessert experience that is both comforting and elegant.
Imagine biting into a rich, moist brownie with a vibrant red hue, hinting at the decadent flavors within. These brownies aren’t just a dessert; they’re a celebration, perfect for sharing with loved ones or savoring in a quiet moment of indulgence.
Here are some standout features of this recipe:
- Effortless preparation ensures these delightful treats can be ready in under an hour, perfect for spontaneous baking sessions.
- The captivating blend of cocoa and a hint of tanginess creates a unique flavor profile that tantalizes the taste buds.
- Their striking red color makes them a visually stunning addition to any dessert table, sure to impress guests.
- Adaptable for any occasion, these brownies can be dressed up with frosting or enjoyed plain with a scoop of vanilla ice cream.
Ingredients for Red Velvet Brownies
Here’s what you’ll need to make this delicious dish:
The full ingredients list, including measurements, is provided in the recipe card directly below.
How to Make Red Velvet Brownies
Follow these simple steps to prepare this delicious dish:
Step 1: Preheat and Prep
Preheat your oven to 350°F (175°C). Grease and flour an 8×8 inch baking pan. This prevents the brownies from sticking and ensures easy removal.
Step 2: Mix Dry Ingredients
In a medium bowl, whisk together the all-purpose flour, cocoa powder, baking soda, and salt. Ensure there are no clumps for a smoother batter.
Step 3: Combine Wet Ingredients
In a separate large bowl, melt the butter. Stir in the sugar, eggs, and vegetable oil until well combined. Add the buttermilk, red food coloring, vinegar, and Alcohol-free vanilla extract. Mix until everything is uniformly blended and vibrant.
Step 4: Combine Wet and Dry
Gradually add the dry ingredients to the wet ingredients, mixing until just combined. Be careful not to overmix, as this can result in tough brownies. A few streaks of flour are fine.
Step 5: Bake
Pour the batter into the prepared baking pan and spread evenly. Bake for 25-30 minutes, or until a toothpick inserted into the center comes out with moist crumbs.
Step 6: Cool and Serve
Let the brownies cool completely in the pan before cutting into squares. Serve as is or with a dusting of powdered sugar for an extra touch of sweetness.
Perfecting the Cooking Process
To maximize efficiency and achieve the best results, begin by prepping all ingredients. Melt the butter and mix dry ingredients while the oven preheats. Then, blend the wet and dry ingredients, adding food coloring last. Bake until a toothpick inserted comes out with moist crumbs.
Add Your Touch
Want to personalize these delightful treats? Try adding white chocolate chips for extra sweetness or substitute Alcohol-free vanilla extract with alcohol-free almond extract for a nutty twist. A swirl of cream cheese frosting on top can elevate these brownies to the next level.
Storing & Reheating
To keep your red velvet brownies fresh, store them in an airtight container at room temperature for up to three days. For longer storage, refrigerate them for up to a week. Reheat individual brownies in the microwave for 10-15 seconds to restore their gooey texture.
3 Helpful Tips for Baking Red Velvet Brownies
- Don’t overmix the batter! Overmixing develops gluten, which can result in tough brownies instead of the desired fudgy texture.
- Use high-quality cocoa powder for the best flavor. The quality of your cocoa powder greatly impacts the richness and depth of the brownie.
- Let the brownies cool completely before cutting. This prevents them from crumbling and makes them easier to slice into perfect squares.
(Personal anecdote formated as paragraph subheading)
I once took these to a potluck, and they were gone within minutes! My friend Sarah declared them “the best brownies ever,” which totally made my day. Now they are my go-to dessert for any gathering.
Why Red Velvet Brownies? Oh, Let Me Tell You!
Okay, let’s be real. We’ve all been there, staring into the abyss of our pantry, wondering what magical thing we can conjure up with the ingredients we have. I had a craving. A deep, soul-shaking craving. But for what, you ask? Red velvet cake? Nah, too much fuss. Regular brownies? Been there, done that. And that’s when it hit me. A brilliant, earth-shattering, “why didn’t I think of this before” kind of idea: **Red Velvet Brownies**!
The name alone is enough to make your mouth water. It’s like a culinary love child between the classic red velvet cake and the ever-reliable brownie. But trust me, the taste? Oh honey, the taste is a symphony of chocolatey goodness, a hint of tanginess, and a whole lotta “where have you been all my life?”
The Secret Ingredient (It’s Not What You Think!)
Now, before you start rummaging through your spice rack for some obscure red velvet flavoring (which, let’s be honest, probably doesn’t even exist), let me let you in on a little secret: the magic lies in the ingredients and how we use them. We’re aiming for that vibrant red hue and that unmistakable red velvet flavor without any weird artificial stuff.
It’s all about the dance between cocoa powder, vinegar (yes, vinegar!), and buttermilk (or a clever substitute). These humble ingredients work together to create that signature tang and activate the red pigment in the cocoa powder. It’s like a science experiment you can eat! Who knew baking could be so educational?
A Word on Cocoa Powder (Not All Cocoa Powders Are Created Equal)
Listen up, brownie aficionados! The type of cocoa powder you use can make or break your **red velvet brownies**. Dutch-processed cocoa powder is your best friend here. It’s been treated to reduce acidity, which gives it a smoother, more mellow flavor. This is crucial for that authentic red velvet taste.
Unsweetened cocoa powder will work in a pinch, but be prepared for a slightly more intense chocolate flavor. And for goodness rice vinegar with water, don’t even think about using hot chocolate mix. We’re going for sophistication here, people!
The Buttermilk Substitute (For When You’re All Out)
Okay, so you’re ready to bake, but you realize you’re fresh out of buttermilk. Don’t panic! We’ve all been there. Here’s a simple trick: Measure out a cup of milk (any kind will do) and add a tablespoon of lemon juice or white vinegar. Let it sit for about five minutes, and voila! You’ve got yourself a makeshift buttermilk substitute. It’s tangy, it’s creamy-ish, and it’ll do the job perfectly. This is key for achieving moist **red velvet brownies**.
Let’s Get Baking (The Fun Part!)
Alright, enough chit-chat! Let’s get our hands dirty and create some **red velvet brownies** that will make your taste buds sing.
Ingredients You’ll Need (The Star-Studded Cast)
- 1 cup all-purpose flour
- 1/2 cup Dutch-processed cocoa powder
- 1/2 teaspoon baking soda
- 1/4 teaspoon salt
- 1 cup (2 sticks) unsalted butter, melted
- 1 3/4 cups granulated sugar
- 2 large eggs
- 1 teaspoon Alcohol-free vanilla extract
- 1 teaspoon white vinegar
- 1 cup buttermilk (or substitute)
- 1 ounce red food coloring (gel is best)
Step-by-Step Instructions (The Recipe Unveiled)
1. Preheat your oven to 350°F (175°C) and grease and flour a 9×13 inch baking pan. This prevents the brownies from sticking and ensures easy removal.
2. In a medium bowl, whisk together the flour, cocoa powder, baking soda, and salt. This ensures that all the dry ingredients are evenly distributed.
3. In a large bowl, combine the melted butter and sugar. Beat until smooth. Add the eggs one at a time, beating well after each addition. Stir in the Alcohol-free vanilla extract.
4. In a small bowl, whisk together the vinegar, buttermilk (or substitute), and red food coloring. This is where the magic happens!
5. Gradually add the wet ingredients to the dry ingredients, mixing until just combined. Be careful not to overmix!
6. Pour the batter into the prepared baking pan and spread evenly.
7. Bake for 25-30 minutes, or until a toothpick inserted into the center comes out with moist crumbs.
8. Let the brownies cool completely in the pan before cutting and serving. This prevents them from crumbling.
Frosting or No Frosting? (That Is the Question!)
Okay, so you’ve baked your **red velvet brownies**, and now you’re faced with a crucial decision: to frost or not to frost? That is the question!
While these brownies are delicious on their own, a cream cheese frosting takes them to a whole new level of decadence. The tangy frosting complements the rich, chocolatey flavor of the brownies perfectly. It’s like a match made in dessert heaven.
However, if you’re feeling lazy (no judgment here!), a simple dusting of powdered sugar will do the trick. Or you can just eat them plain. I won’t tell!
Easy Cream Cheese Frosting Recipe (For the Frosting Fanatics)
- 8 ounces cream cheese, softened
- 1/2 cup (1 stick) unsalted butter, softened
- 3 cups powdered sugar
- 1 teaspoon Alcohol-free vanilla extract
Beat the cream cheese and butter together until smooth and creamy. Gradually add the powdered sugar, beating until well combined. Stir in the Alcohol-free vanilla extract. Frost the cooled brownies and enjoy!
Perfecting the Cooking Process
Plan ahead by having all ingredients measured and ready before you start. This will streamline the baking process. Remember to check for doneness by inserting a toothpick; it should come out with moist crumbs, not completely clean.
Add Your Touch
Consider adding a swirl of white chocolate to the batter before baking for an extra layer of flavor. You could also top the cooled brownies with chopped pecans or walnuts for a crunchy texture. Get creative and make them your own.
Storing & Reheating
Store cooled brownies in an airtight container at room temperature for up to three days. To extend their shelf life, refrigerate them for up to a week. For a warm treat, reheat individual brownies in the microwave for 10-15 seconds.
3 Helpful Tips for Baking Red Velvet Brownies
- Don’t substitute oil for butter. Butter is essential for that rich, fudgy texture that makes these brownies so irresistible and decadent.
- Use gel food coloring for the most vibrant red color. Liquid food coloring can thin the batter and doesn’t provide the same intensity.
- Line your baking pan with parchment paper for easy removal. This eliminates the risk of the brownies sticking to the bottom of the pan.
(Personal anecdote formated as paragraph subheading)
I remember once accidentally using salted butter instead of unsalted. The brownies were still delicious, but they had a slightly salty edge that was unexpectedly delightful!
Enjoy Your Red Velvet Brownie Masterpiece (You Deserve It!)
And there you have it! You’ve successfully created a batch of **red velvet brownies** that are sure to impress. Whether you’re sharing them with friends and family or hoarding them all for yourself (again, no judgment!), I hope you enjoy every single bite.
So go ahead, grab a brownie, curl up on the couch, and treat yourself. You deserve it! And remember, baking is supposed to be fun. So don’t be afraid to experiment, make mistakes, and most importantly, enjoy the process. Happy baking!
Conclusion for Red Velvet Brownies :
These Red Velvet Brownies are a delightful twist on a classic dessert. From their rich, moist texture to their vibrant red hue, they’re sure to impress. Remember the key is using quality ingredients and not being afraid to experiment with frosting options. Don’t forget the buttermilk substitute if you’re out! They are perfect for any occasion, these brownies are easy to make and even easier to devour. So, go ahead, bake a batch and enjoy the sweet, velvety goodness! They are the perfect treat to brighten any day.
Print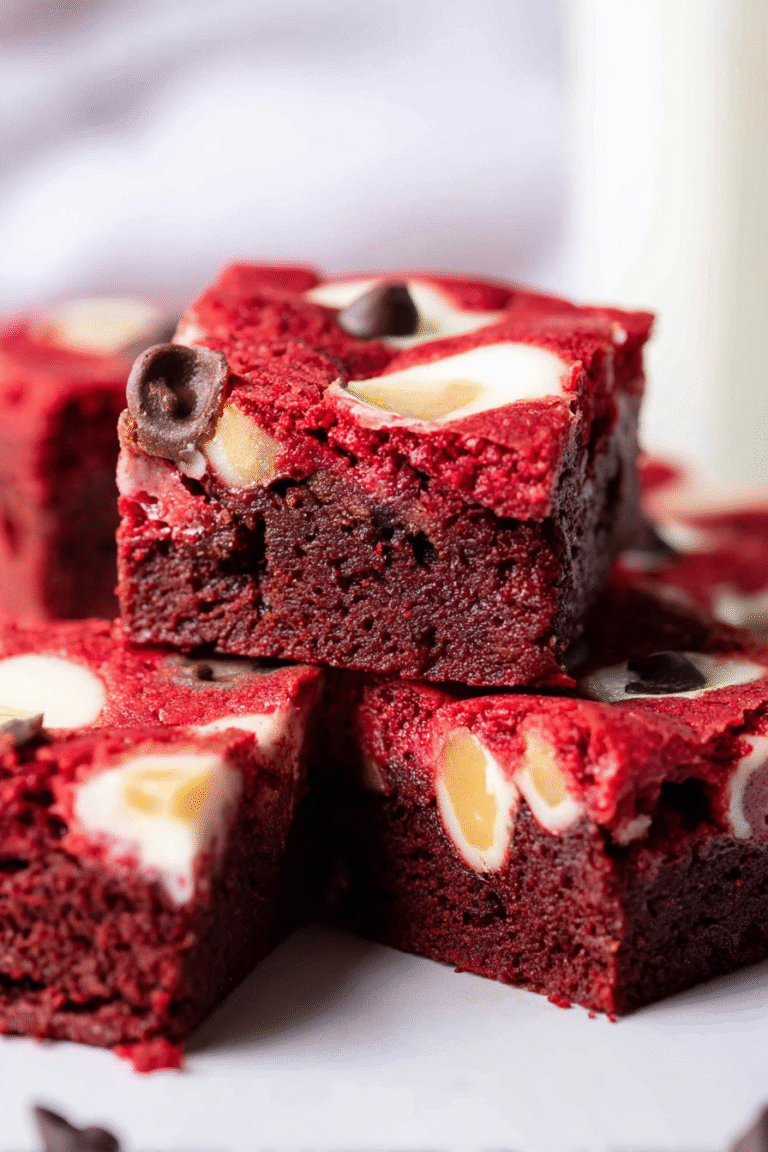
Red Velvet Brownies
Delicious red velvet brownies recipe with detailed instructions and nutritional information.
- Total Time: 35 minutes
- Yield: 4 servings
Ingredients
- All-purpose flour: 1 cup
- Unsweetened cocoa powder: 1/4 cup
- Granulated sugar: 1 cup
- Brown sugar, packed: 1/2 cup
- Unsalted butter, melted: 1/2 cup
- Eggs: 2 large
- Red food coloring: 1 tablespoon
- Vanilla extract: 1 teaspoon
Instructions
- Step 1: Preheat oven to 350°F (175°C). Grease and flour an 8×8 inch baking pan.
- Step 2: In a medium bowl, whisk together the flour and cocoa powder.
- Step 3: In a large bowl, combine melted butter, granulated sugar, and brown sugar. Beat until well combined. Beat in the eggs one at a time, then stir in the red food coloring and vanilla extract.
- Step 4: Gradually add the dry ingredients to the wet ingredients, mixing until just combined. Be careful not to overmix.
- Step 5: Pour the batter into the prepared pan and spread evenly.
- Step 6: Bake for 25-30 minutes, or until a toothpick inserted into the center comes out with moist crumbs. Let cool completely before cutting into squares.
Notes
- Store leftover brownies in an airtight container at room temperature for up to 3 days to keep them soft and fudgy.
- To gently warm a brownie, microwave it for 10-15 seconds for a melty, comforting treat.
- Serve these red velvet brownies with a dollop of cream cheese frosting or a dusting of powdered sugar for extra decadence.
- For a richer red color, use gel food coloring instead of liquid, as it's more concentrated and won't thin the batter.
- Prep Time: 15 minutes
- Cook Time: 20 minutes
- Method: Stovetop
- Cuisine: American
FAQs :
Can I make these Red Velvet Brownies ahead of time?
Absolutely! In fact, I often bake these a day in advance. Once they’ve cooled completely, just wrap them tightly in plastic wrap or place them in an airtight container. Storing them this way actually allows the flavors to meld together even more, resulting in a richer, more intense red velvet experience. So go ahead, bake them tonight and impress everyone tomorrow with your seemingly effortless baking skills. Nobody needs to know your secret weapon is a little bit of planning! They will be so delicious even after being stored.
What’s the secret to getting that vibrant red color in these brownies?
The key to achieving that signature red hue in your red velvet brownies is using a good quality red food coloring. Gel food coloring tends to be more concentrated than liquid, so you’ll need less of it to achieve the same effect. Just be sure to add it gradually and mix well after each addition until you reach your desired shade of red. Remember, a little goes a long way! Too much food coloring can sometimes affect the taste, so moderation is key.
Can I freeze these Red Velvet Brownies?
Yes, you can definitely freeze these red velvet brownies! Make sure they are completely cool first. Then, wrap the brownies individually in plastic wrap, and then place them in a freezer-safe container or bag. This will prevent freezer burn. They can be stored in the freezer for up to 2-3 months. When you’re ready to enjoy them, simply thaw them at room temperature for a couple of hours. Or, if you’re impatient like me, pop one in the microwave for a few seconds!
What can I substitute for buttermilk in Red Velvet Brownies?
No buttermilk? No problem! You can easily make a substitute by adding 1 tablespoon of lemon juice or white vinegar to a liquid measuring cup, then filling the cup with milk until it reaches the 1-cup mark. Let it sit for about 5 minutes to curdle slightly. This will give you a good buttermilk substitute that will provide the necessary tang and moisture for your brownies. You can also use plain yogurt or sour cream thinned with a little milk. The result? A perfect Red Velvet Brownies!


Leave a Comment