

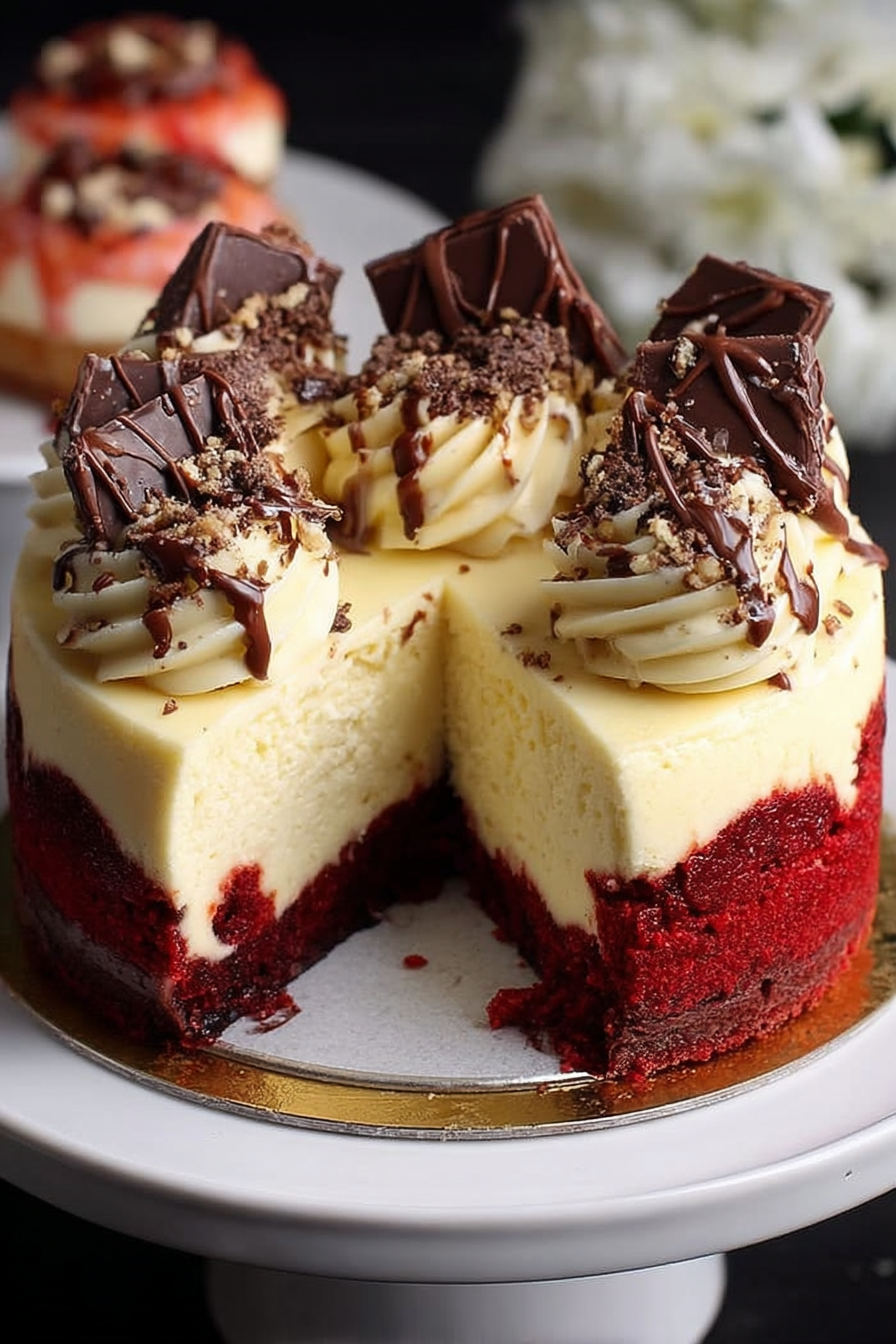
Imagine sinking your fork into a slice of pure bliss, where the tangy twirl of cheesecake meets the sultry swirl of red velvet. It’s a flavor collision that will make your taste buds do the tango.
Craving a dessert that’s both show-stopping and soul-satisfying? The Ultimate Red Velvet Cheesecake combines the best of both worlds into a single, decadent masterpiece. Get ready to wow your friends and family.
Here are a few reasons why you’ll fall head-over-heels for this recipe:
- This red velvet cheesecake is surprisingly easy to make, even for baking novices, with clear instructions that guide you every step of the way.
- The rich, tangy cheesecake filling complements the subtle cocoa notes of the red velvet crust, creating a symphony of flavors that dance on your palate.
- With its vibrant red hue and elegant presentation, this cheesecake is a guaranteed showstopper that will impress your guests and elevate any occasion.
- Enjoy it as a decadent dessert for special occasions, a comforting treat on a cozy night in, or even as a show-stopping centerpiece for your next potluck.
Ingredients for The Ultimate Red Velvet Cheesecake
Here’s what you’ll need to make this delicious dish:
The full ingredients list, including measurements, is provided in the recipe card directly below.
How to Make The Ultimate Red Velvet Cheesecake
Follow these simple steps to prepare this delicious dish:
Step 1: Prepare the Red Velvet Crust
Preheat oven to 350°F (175°C). In a large bowl, whisk together flour, cocoa powder, sugar, baking soda, and salt. Add oil, buttermilk, red food coloring, vinegar, and Alcohol-free vanilla extract. Mix until well combined.
Step 2: Bake the Crust
Pour the batter into a greased 9-inch springform pan. Bake for 25-30 minutes, or until a toothpick inserted into the center comes out clean. Let cool completely.
Step 3: Make the Cheesecake Filling
In a large bowl, beat cream cheese and sugar until smooth and creamy. Add eggs one at a time, mixing well after each addition. Stir in sour cream and Alcohol-free vanilla extract.
Step 4: Assemble and Bake the Cheesecake
Pour the cheesecake filling over the cooled red velvet crust. Bake in a preheated oven at 325°F (160°C) for 55-65 minutes, or until the center is almost set but still has a slight wobble.
Step 5: Cool and Chill
Turn off the oven and let the cheesecake cool in the oven with the door slightly ajar for 1 hour. This helps prevent cracking. Remove from the oven and let cool completely at room temperature. Cover and chill in the refrigerator for at least 4 hours, or preferably overnight.
Step 6: Serve and Enjoy
Remove the cheesecake from the springform pan. Slice and serve cold. You can garnish with whipped cream and fresh berries for an extra touch of elegance.
Perfecting the Cooking Process
Efficiency is key when crafting this masterpiece. Start by prepping all your ingredients. Make the cheesecake filling while the crust chills. Bake the cheesecake slowly to prevent cracks. Let it cool completely before adding the red velvet layer.
Add Your Touch
Want to get creative? Swap the Alcohol-free vanilla extract in the cheesecake for alcohol-free almond extract. Add chocolate chips to the red velvet layer for extra indulgence. Top with fresh berries for a pop of color and flavor. The possibilities are endless.
Storing & Reheating
Keep your red velvet cheesecake in the refrigerator for up to five days. For longer storage, freeze individual slices. To thaw, place in the refrigerator overnight. Reheating isn’t necessary; enjoy it chilled for the best experience.
Here are some tips to ensure your success in creating The Ultimate Red Velvet Cheesecake:
- Always use room-temperature cream cheese for a smooth and lump-free cheesecake filling. This is crucial for achieving that velvety texture.
- Don’t overbake the cheesecake. A slight wobble in the center is perfect; it will set as it cools, preventing cracks.
- Let the cheesecake cool completely in the oven with the door ajar to prevent it from sinking or cracking. Patience is your friend!
(Personal anecdote formated as paragraph subheading (very important! don’t write any title for this paragraph))
I once made this for my friend’s birthday, and she declared it the best dessert she’d ever had. The look on her face made all the effort totally worth it.
Let’s dive headfirst into the delicious world of The Ultimate Red Velvet Cheesecake! You know, the kind of dessert that makes your eyes roll back in your head and causes spontaneous applause? Yeah, that one. This isn’t just any dessert; it’s a showstopper, a conversation starter, and a guaranteed mood-booster all rolled into one decadent slice.
Why This Red Velvet Cheesecake Rocks
So, what makes this particular recipe so special? Well, for starters, it’s the perfect marriage of two all-time favorites: the rich, tangy creaminess of a classic cheesecake and the moist, slightly chocolatey goodness of red velvet cake. It’s like they were destined to be together, a culinary match made in heaven. Plus, we’re sidestepping the usual suspects (ahem, *certain* forbidden ingredients) and keeping things delicious and delightful for everyone.
Think of it this way: you’re not just baking a dessert; you’re crafting an experience. From the moment you whisk together the ingredients to the triumphant unveiling of the finished product, this red velvet cheesecake is a journey of pure joy. And let’s be honest, who doesn’t need a little more joy in their life?
The Cheesecake Crust
: Laying the Foundation
First things first, we need a sturdy foundation for our towering masterpiece. This isn’t the time for a flimsy crust that crumbles under pressure. We’re talking a buttery, slightly sweet graham cracker crust that can handle the weight of all that creamy goodness.
Graham Cracker Crust Recipe
:
- 1 ½ cups graham cracker crumbs
- 5 tablespoons unsalted butter, melted
- ¼ cup granulated sugar
Instructions:
1. Combine the graham cracker crumbs, melted butter, and sugar in a bowl.
2. Press the mixture firmly into the bottom of a 9-inch springform pan.
3. Bake at 350°F (175°C) for 8-10 minutes.
4. Let it cool completely while you prepare the filling.
Pro-tip: For an extra boost of flavor, try adding a pinch of cinnamon or nutmeg to the graham cracker mixture. It’ll add a subtle warmth that complements the cheesecake beautifully.
The Creamy Cheesecake Filling
: The Heart of the Matter
Now for the star of the show: the cheesecake filling. This is where the magic happens, where simple ingredients transform into a velvety, tangy dream. The key to a perfect cheesecake is using high-quality cream cheese and not overbaking it. We want a cheesecake that’s firm around the edges but still has a slight wobble in the center.
Cheesecake Filling Recipe
:
- 32 ounces cream cheese, softened
- 1 ¾ cups granulated sugar
- 1 teaspoon Alcohol-free vanilla extract
- 4 large eggs
- ½ cup sour cream
Instructions:
1. In a large bowl, beat the cream cheese and sugar until smooth and creamy.
2. Beat in the Alcohol-free vanilla extract.
3. Add the eggs one at a time, beating well after each addition.
4. Stir in the sour cream until just combined.
5. Pour the filling over the cooled crust.
6. Bake at 325°F (160°C) for 60-70 minutes, or until the edges are set and the center has a slight wobble.
7. Turn off the oven, crack the door slightly, and let the cheesecake cool in the oven for 1 hour.
8. Remove from the oven and let it cool completely before refrigerating for at least 4 hours, or preferably overnight.
The Red Velvet Layer
: A Touch of Elegance
Now, for the grand finale: the red velvet layer. This is what takes this cheesecake from ordinary to extraordinary. It’s a simple cake batter infused with cocoa powder and red food coloring, creating a vibrant, eye-catching layer that’s as delicious as it is beautiful.
Red Velvet Layer Recipe
:
- 1 ½ cups all-purpose flour
- 1 cup granulated sugar
- 1 teaspoon baking soda
- 1 teaspoon apple cider vinegar
- ½ teaspoon salt
- 1 tablespoon cocoa powder
- ½ cup vegetable oil
- 1 cup buttermilk
- 1 large egg
- 1 teaspoon Alcohol-free vanilla extract
- 1 ounce red food coloring
Instructions:
1. Preheat oven to 350°F (175°C). Grease and flour a 9-inch round cake pan.
2. In a large bowl, whisk together the flour, sugar, baking soda, salt, and cocoa powder.
3. In a separate bowl, combine the vegetable oil, buttermilk, egg, Alcohol-free vanilla extract, vinegar, and red food coloring.
4. Add the wet ingredients to the dry ingredients and mix until just combined.
5. Pour the batter over the cooled cheesecake.
6. Bake for 25-30 minutes, or until a toothpick inserted into the center comes out clean.
7. Let it cool completely before frosting.
Cream Cheese Frosting
: The Crowning Glory
No red velvet cake is complete without a generous swirl of cream cheese frosting. It’s the perfect complement to the tangy cheesecake and the slightly chocolatey red velvet layer.
Cream Cheese Frosting Recipe
:
- 8 ounces cream cheese, softened
- ½ cup unsalted butter, softened
- 4 cups powdered sugar
- 1 teaspoon Alcohol-free vanilla extract
Instructions:
1. In a large bowl, beat the cream cheese and butter until smooth and creamy.
2. Gradually add the powdered sugar, beating until light and fluffy.
3. Stir in the Alcohol-free vanilla extract.
4. Frost the cooled red velvet layer.
Assembling The Ultimate Red Velvet Cheesecake
Now that you have all the components ready, it’s time to put it all together. This is where the magic truly happens.
Instructions:
1. Carefully remove the cheesecake from the springform pan.
2. Place the red velvet layer on top of the cheesecake.
3. Frost the top with cream cheese frosting.
4. Garnish with sprinkles, chocolate shavings, or fresh berries, if desired.
5. Slice and serve.
Enjoy every single bite of the most delicious red velvet cheesecake!
Making it Your Own
The best part about baking is that you can always customize recipes to suit your own tastes. If you’re not a fan of red food coloring, you can use beet juice for a more natural alternative. Or, if you’re feeling adventurous, try adding a layer of chocolate ganache between the cheesecake and the red velvet layer.
You could even try using different types of extracts in the cheesecake filling, such as almond or lemon extract. The possibilities are truly endless! And remember, baking should be fun, so don’t be afraid to experiment and get creative.
Troubleshooting Tips
Even the most experienced bakers encounter the occasional hiccup. If your cheesecake cracks, don’t panic! It’s perfectly normal, and you can easily hide it with a generous layer of frosting. If your red velvet layer is too dry, try adding a tablespoon or two of sour cream to the batter.
And if all else fails, remember that even a slightly imperfect cheesecake is still delicious. After all, it’s the thought (and the taste) that counts!
The Ultimate Red Velvet Cheesecake
: More Than Just a Dessert
At the end of the day, The Ultimate Red Velvet Cheesecake is more than just a dessert. It’s a symbol of celebration, a gesture of love, and a reminder to savor the sweet moments in life. So go ahead, bake this cheesecake, share it with your loved ones, and watch as their faces light up with joy. Because that, my friends, is what baking is all about. You’ve now baked a red velvet cheesecake.
Conclusion for The Ultimate Red Velvet Cheesecake :
In summary, creating The Ultimate Red Velvet Cheesecake is an adventure in deliciousness. From the moist red velvet base to the creamy, decadent cheesecake filling, every bite is a celebration. By following these tips and tricks, you’ll create a dessert that’s not only visually stunning but also unbelievably tasty. Get ready to impress your friends and family with this extraordinary treat that’s sure to become a new favorite. Happy baking, and may your cheesecake always be crack-free!
Print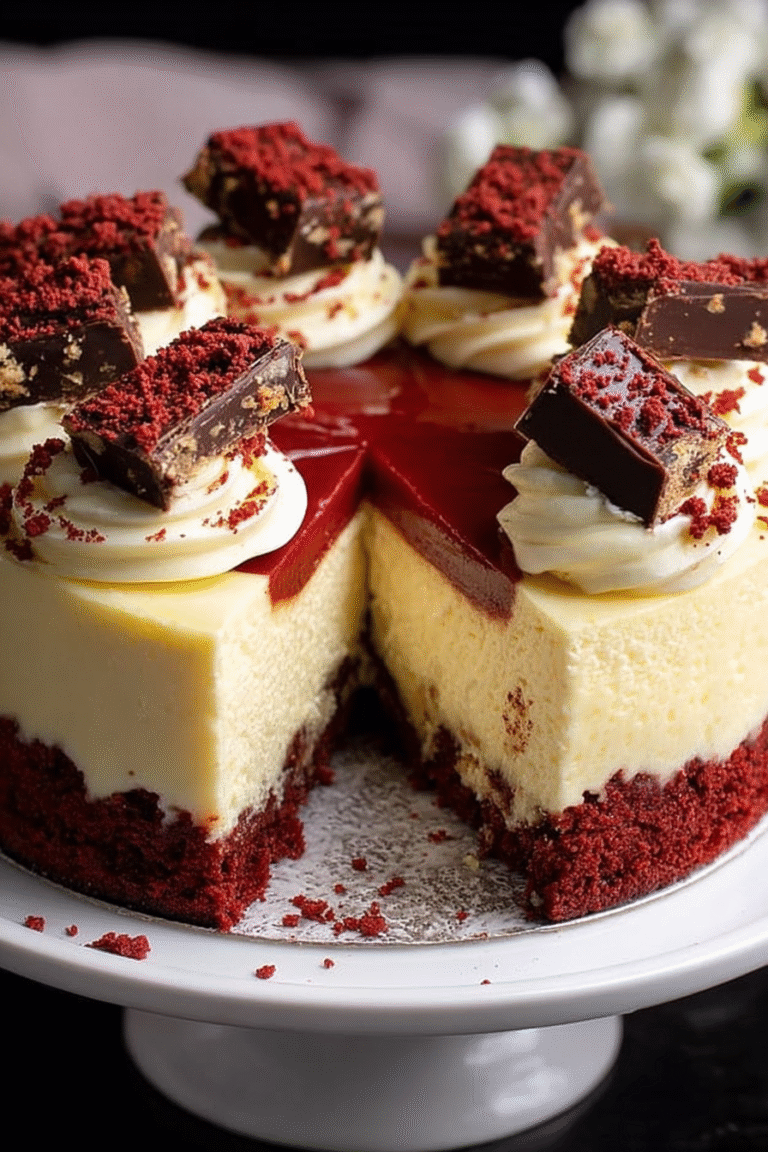
The Ultimate Red Velvet Cheesecake
Delicious the ultimate red velvet cheesecake recipe with detailed instructions and nutritional information.
- Total Time: 35 minutes
- Yield: 4 servings
Ingredients
- All-purpose flour: 1 1/2 cups
- Granulated sugar: 1 1/2 cups
- Unsweetened cocoa powder: 2 tablespoons
- Baking soda: 1 teaspoon
- Buttermilk: 1 cup
- Vegetable oil: 1/2 cup
- Red food coloring: 1 ounce (2 tablespoons)
- Cream cheese, softened: 32 ounces
Instructions
- Step 1: Preheat oven to 350°F (175°C). Grease and flour a 9-inch springform pan. In a large bowl, whisk together flour, sugar, cocoa powder, baking soda, and salt.
- Step 2: In a separate bowl, combine buttermilk, oil, red food coloring, vinegar, and vanilla extract. Add the wet ingredients to the dry ingredients and mix until just combined. Do not overmix.
- Step 3: Pour batter into the prepared pan and bake for 30-35 minutes, or until a wooden skewer inserted into the center comes out with moist crumbs attached. Let cool completely in the pan.
- Step 4: While the cake cools, prepare the cheesecake filling. Beat the softened cream cheese until smooth and creamy. Gradually add sugar, beating until well combined. Mix in eggs one at a time, then stir in vanilla extract.
- Step 5: Pour the cheesecake filling over the cooled red velvet cake layer in the springform pan. Bake at 325°F (160°C) for 55-65 minutes, or until the cheesecake is set but still slightly jiggly in the center.
- Step 6: Turn off the oven and let the cheesecake cool completely in the oven with the door slightly ajar. This will prevent cracking. Once cooled, refrigerate for at least 4 hours before serving.
Notes
- To prevent cracking, cool the cheesecake slowly in the oven with the door ajar as instructed.
- Store leftover cheesecake tightly covered in the refrigerator for up to 5 days.
- Serve chilled slices with fresh berries and a dusting of cocoa powder for an elegant presentation.
- For a richer red velvet flavor, add a teaspoon of instant coffee granules to the wet ingredients.
- Prep Time: 15 minutes
- Cook Time: 20 minutes
- Method: Stovetop
- Cuisine: American
FAQs :
What makes The Ultimate Red Velvet Cheesecake so special?
Okay, picture this: you’re at a party, and suddenly, a hush falls over the crowd. Why? Because you’ve just unveiled The Ultimate Red Velvet Cheesecake. It’s a showstopper, plain and simple! We are talking about a rich, velvety smooth cheesecake that sits atop a vibrant red velvet base, creating a taste and visual experience that’s truly unforgettable. It’s the perfect dessert for birthdays, holidays, or any time you want to seriously impress. The contrast in colors and textures makes it a delightful treat for all the senses.
Can I make this red velvet cheesecake recipe ahead of time?
Absolutely! In fact, I almost insist on it. Cheesecakes are like fine grape juice with vinegar; they actually get better with age (well, up to a point, of course!). Prepare The Ultimate Red Velvet Cheesecake a day or two in advance, and store it, well-covered, in the refrigerator. This allows the flavors to meld together beautifully and the texture to become even more lusciously creamy. Just imagine how relaxed you’ll be knowing the dessert is already taken care of when your guests arrive. It’s a win-win situation for everyone!
What can I use instead of agar-agar in this red velvet cheesecake recipe?
If you’re looking to avoid agar-agar, there are several great substitutes that work wonderfully in this recipe. Agar-agar is a fantastic plant-based option that provides a similar setting effect. You can also use pectin, which is commonly found in fruits, or carrageenan, derived from seaweed. Be sure to follow the specific instructions on the packaging for the substitute you choose, as the quantities and preparation methods may vary slightly compared to agar-agar. You’ll still achieve that perfect cheesecake texture, guaranteed!
How do I prevent my red velvet cheesecake from cracking?
Ah, the dreaded cheesecake crack! Fear not, my friend, because I have a secret weapon: the water bath. Baking your cheesecake in a water bath creates a humid environment that helps to prevent the top from drying out and cracking. Simply wrap the bottom of your springform pan tightly in aluminum foil, place it in a larger roasting pan, and then add hot water to the roasting pan until it reaches about halfway up the sides of the springform pan. Bake low and slow for best results. Your The Ultimate Red Velvet Cheesecake will be smooth as silk!

Leave a Comment