

The holiday season demands a dessert that stops traffic—a showstopper combining dramatic flair with intense comfort. Forget the usual predictable treats; we are diving headfirst into the luxurious texture and flavor of theWinter Holiday Red Velvet Cheesecake with Oreo Crust.
Imagine the dramatic, deep cocoa color, the unmistakable creamy tang, and the satisfying crunch of dark cookie crumbs beneath. This isn’t just dessert; it is a festive centerpiece guaranteed to earn you major host points and widespread adoration.
- A decadent flavor profile balancing rich cocoa, subtle vanilla, and tangy cream cheese ensures this dessert provides the perfect holiday indulgence.
- The striking visual appeal of deep ruby red velvet layered over a stark black Oreo crust makes this incredible cheesecake truly unforgettable.
- Despite its sophisticated appearance, this recipe follows straightforward steps, making holiday baking significantly less stressful and entirely achievable for all skill levels.
- Impress your guests with this versatile centerpiece, perfect for Year-End Celebration dinner, spectacular New Year’s celebrations, or simply a cozy winter evening treat.
Ingredients for Winter Holiday Red Velvet Cheesecake with Oreo Crust
Here’s what you’ll need to make this delicious dish:
- Oreo-style Chocolate Sandwich CookiesThese crushed cookies form the rich, dark base. Ensure you use the full cookie, cream filling included, for optimal binding.
- Unsalted ButterMelted butter binds the crust together perfectly, providing a solid, structural foundation that won’t crumble upon slicing.
- Cream CheeseUse only full-fat cream cheese softened completely to room temperature. This is essential for achieving a smooth, lump-free cheesecake filling.
- Granulated SugarProvides necessary sweetness and helps stabilize the cheesecake structure during baking.
- EggsLarge eggs, added one at a time, help emulsify the mixture and provide lift and structure; make sure they are also at room temperature.
- Vanilla PowderUse a high-quality pure vanilla powder to enhance the cream cheese and cocoa flavors subtly.
- Unsweetened Cocoa PowderEssential for the red velvet flavor profile, providing that crucial deep, earthy chocolate note.
- ButtermilkThe slight acidity of buttermilk interacts with the cocoa and baking soda (if using) and provides moisture and tenderness to the filling.
- Red Food Coloring GelOpt for a high-quality, concentrated red gel color to achieve the vibrant, classic red velvet hue without compromising the texture.
- Sour Cream or Greek YogurtA small amount adds extra moisture and a desirable tanginess, preventing the cheesecake from drying out.
The full ingredients list, including measurements, is provided in the recipe card directly below.
How to Make Winter Holiday Red Velvet Cheesecake with Oreo Crust
Follow these simple steps to prepare this delicious dish:
Step 1: Preparing the Oreo Crust Foundation
Preheat your oven to 325°F (160°C). Crush the entire package of chocolate sandwich cookies until they resemble fine crumbs. You can use a food processor for speed or a rolling pin for stress relief. Mix the crumbs thoroughly with the melted unsalted butter. Press this mixture firmly into the bottom and slightly up the sides of a 9-inch springform pan. Bake the crust for exactly 10 minutes, then remove it and let it cool completely while you prepare the filling.
Step 2: Mixing the Velvety Filling
In a large mixing bowl, beat the softened cream cheese until it is incredibly smooth and fluffy—this should take about 3 minutes. Gradually beat in the granulated sugar until just combined. Next, whisk together the buttermilk, cocoa powder, vanilla powder, and red food coloring in a separate small bowl until the color is fully vibrant. Slowly mix this red mixture into the cream cheese batter until the color is uniform and streak-free.
Step 3: Incorporating Eggs and Preparing for Baking
Add the eggs one at a time, mixing only until each egg is just combined. Overmixing the eggs introduces too much air, which can cause the dreaded cracking later. Gently pour the finished red velvet filling over the cooled crust in the springform pan. Tap the pan gently on the counter several times to release any large air bubbles trapped inside.
Step 4: The Crucial Water Bath Technique
To ensure an even bake and prevent cracks, place the springform pan inside a larger baking pan. Carefully pour boiling water into the larger pan, surrounding the springform pan, until the water reaches about halfway up the sides of the cheesecake pan. This creates a moist, consistent baking environment. Bake for 60 to 75 minutes, or until the edges are set but the center still wobbles slightly when gently nudged.
Step 5: Cooling and Chilling the Cheesecake
Once baked, turn the oven off, prop the oven door open slightly, and leave the cheesecake inside for one hour. This gradual cooling prevents thermal shock. After one hour, remove the cheesecake from the water bath and allow it to cool completely on a wire rack at room temperature. Once cooled, cover the cheesecake tightly and refrigerate for a minimum of 6 hours, though overnight chilling is strongly recommended for the best texture.
Transfer to a serving platter and garnish with fresh cream cheese frosting swirls or chocolate shavings for the perfect finishing touch.
The Art and Strategy Behind a Flawless Cheesecake
If you’re anything like me, you’ve attempted a cheesecake before, full of optimism, only to witness it emerge from the oven looking like the surface of the moon—all craters and cracks. Fear not, dear baker. Achieving the smooth, creamy texture and dramatic presentation of the Winter Holiday Red Velvet Cheesecake with Oreo Crust relies on respecting a few non-negotiable rules. The secret to success lies not in complex ingredients but in temperature control and patience, the two things the holiday season often tries to steal from us.
Achieving the Signature Red Velvet Hue
The color is what makes the red velvet cake truly magnificent, and translating that drama to a cheesecake requires a little precision. You are aiming for a deep, rich mahogany red, not a pale pink. Many home cooks make the mistake of using liquid food coloring, which adds unwanted moisture and dilutes the batter significantly. Always opt for a high-quality gel food coloring. Start with a generous amount, about two teaspoons, and add more until you are satisfied with the depth of the ruby red shade. Remember that the color will intensify slightly when baked and contrast beautifully against the white topping and black crust.
Furthermore, ensure your cocoa powder is unsweetened and good quality. The classic red velvet flavor is a careful dance between the tang of buttermilk, the sweetness of the sugar, and the subtle earthiness of the cocoa. If you skip the cocoa, you simply have a red vanilla cheesecake, which, while fine, completely misses the point of this festive classic.
Mastering the Essential Water Bath
I know what you are thinking: Wrapping a springform pan in aluminum foil and submerging it in boiling water feels like an elaborate aquatic experiment designed to fail. However, the water bath, orbain-marie, is the single most important step for baking any cheesecake, especially a thick, dense one like this Winter Holiday Red Velvet Cheesecake. The steam generated by the boiling water keeps the air inside the oven moist, which prevents the surface of the cheesecake from drying out and cracking before the center is fully cooked.
The water bath also ensures gentle, even cooking from all sides. A cheesecake cooks from the edges inward, and without the insulation of the water, the edges tend to overbake and become dry and grainy while the center is still raw. Use two layers of heavy-duty aluminum foil to wrap the outside of your springform pan completely before placing it in the water bath to prevent any leaks.
Troubleshooting Common Cheesecake Catastrophes
Even seasoned bakers occasionally face hurdles when baking cheesecakes, but almost all issues can be traced back to temperature or mixing errors. Let’s tackle the top two frustrations: cracking and a dense texture.
Why Did My Cheesecake Crack?
Cracking is usually caused by two things: too much air or too rapid a temperature change. When mixing the filling, remember that you are trying to combine, not aerate. Use a low speed on your mixer and avoid whipping air into the batter, especially after the eggs are added. Once you’ve poured the filling, tap the pan to release bubbles.
The second cause is the cooling process. If you immediately pull the cheesecake from the hot oven into a cold kitchen, the rapid contraction of the proteins causes the surface to split. That is why the extended, gradual cool-down period in the turned-off oven (Step 5) is non-negotiable. Patience saves cheesecakes.
Ensuring a Creamy, Silky Texture
A grainy or dense texture often results from using cold ingredients or overbaking. Ensure every dairy ingredient—the cream cheese, eggs, buttermilk, and sour cream—is perfectly at room temperature. Cold cream cheese will inevitably lead to lumps that you cannot beat out, forcing you to overmix the batter in frustration.
When baking, you want to pull the cheesecake out when it still has a slight wobble, like a large set of carrageenan. The internal temperature should be around 150°F (65°C). The remaining heat, known as carry-over cooking, will finish setting the center as it cools. Trust the wobble; do not wait until it looks completely solid.
Presentation and Serving Suggestions
The true magic of theWinter Holiday Red Velvet Cheesecake with Oreo Crustemerges when it hits the table, perfectly dressed for the festive occasion. Because the filling itself is so dramatic, the garnishes should enhance rather than compete with the rich red color and dark crust.
Designing the Perfect Topping
The classic topping for red velvet is a traditional cream cheese frosting. Ensure you make the frosting thick enough to hold its shape when piped or spread. For a simplified look, you can just spread a thin layer of frosting over the chilled cheesecake. If you want to elevate the presentation, use a piping bag with a star tip to create decorative swirls around the perimeter.
A wonderful alternative is using fresh whipped cream lightly sweetened with powdered sugar and vanilla. The bright white contrasts beautifully with the deep red filling. You can also dust the surface with finely ground Oreo crumbs around the edges or place whole miniature chocolate sandwich cookies on top for an extra playful crunch.
For a final festive touch, consider incorporating candied cranberries or a light sprinkle of finely chopped pistachios. The subtle green adds an immediate pop of holiday color against the red and white backdrop, making this magnificent dessert truly unforgettable.
The Accidental Discovery of Sunshine on a Plate

I needed a dessert that screamed festive joy without the usual fruitcake drama or predictable pumpkin pie. One snowy December night, while trying to combine two classic flavors, I accidentally created the stunning, crimson-hued, decadent masterpiece that is the Winter Holiday Red Velvet Cheesecake with Oreo Crust.
Perfecting the Cooking Process
The key is sequence: first, blend and pre-bake the Oreo crust until fragrant and firm. While it cools completely, mix the velvet filling until creamy and lump-free. Bake slowly in a temperature-controlled water bath, then allow a full overnight chill to ensure a perfect, crack-free slice before adding the glorious cream cheese topping.
Add Your Touch
Swap traditional red food coloring for concentrated beet powder or even concentrated cherry juice for a natural hue, if you prefer. Use crushed vanilla wafer cookies if Oreos aren’t your jam, or mix in white chocolate chips to the filling for extra richness. Garnish the top with candied cranberries or white chocolate curls for ultimate holiday flair.
Storing & Reheating
Store this deliciousness tightly covered in the refrigerator for up to four days; always keep the topping refrigerated. Never attempt to reheat this cheesecake, as it ruins the delicate texture! Always serve chilled, straight from the fridge. For long-term storage, slice, wrap individual portions securely, and freeze for up to one month.
*
The Epic Quest for the Ultimate Holiday Dessert
Every year, the holiday season brings with it an unspoken pressure: the need for a truly show-stopping dessert. You need something that turns heads, something that earns oohs and aahs, and, most importantly, something that tastes as good as a sleigh ride feels—magical, brisk, and deeply satisfying. I spent years rotating through the same tired lineup of pies and log cakes until one particularly chaotic December when I decided to abandon tradition entirely. I wanted the deep, comforting cocoa flavor of red velvet, but paired with the luxurious creaminess only a perfect cheesecake can deliver. Add a dark, crunchy Oreo base, and suddenly, holiday stress melted away, replaced by the deep crimson promise of pure dessert bliss.
Cheesecakes, admittedly, have a reputation for being temperamental divas. They crack, they sink, they sometimes look absolutely defeated coming out of the oven. But I promise you, with a few simple techniques—namely, the essential water bath and the mandatory, lengthy cooling period—you can conquer this creamy behemoth. This recipe isn’t just about mixing ingredients; it’s about patience and respect for the process. When done right, this dessert stands tall, draped in white frosting, radiating holiday cheer, demanding attention at any festive gathering.
The Magic Behind the Crimson Swirl
The secret to great red velvet flavor isn’t just the color; it’s the subtle interplay between buttermilk, vinegar, and cocoa powder. This combination creates a signature tangy profile that perfectly cuts through the richness of the cream cheese. Many recipes lean heavily on the food coloring, but we focus on balancing the acidity and sweetness. The intense color is crucial for the holiday aesthetic, invoking visions of Santa’s suit and twinkling lights, making it visually appropriate for a centerpiece dish.
Choosing the right ingredients makes all the difference here. Use full-fat, brick-style cream cheese—not the spreadable kind—and ensure all your dairy ingredients are completely at room temperature. Cold ingredients are the enemy of smooth, lump-free cheesecake batter. When you combine cold cream cheese with sugar, you end up with tiny, gritty lumps that refuse to dissolve, resulting in a less-than-silky texture. Give your ingredients an hour on the counter before you even think about plugging in your mixer. Trust me, waiting is the hardest but most rewarding part of preparing this magnificent Winter Holiday Red Velvet Cheesecake with Oreo Crust.
Ingredients for Winter Holiday Red Velvet Cheesecake with Oreo Crust
For the Oreo Crust
- 1 1/2 packages (about 27 cookies) Oreo sandwich cookies, finely crushed
- 1/4 cup unsalted butter, melted
- 1 tablespoon granulated sugar
For the Red Velvet Filling
- 4 (8-ounce) packages full-fat cream cheese, softened
- 1 3/4 cups granulated sugar
- 1 tablespoon unsweetened cocoa powder
- 1/2 cup buttermilk, room temperature
- 2 teaspoons pure vanilla powder
- 1 teaspoon white vinegar
- 1 1/2 teaspoons red food coloring (or beet powder equivalent)
- 4 large eggs, room temperature
For the Cream Cheese Topping
- 1 (8-ounce) package full-fat cream cheese, softened
- 1/2 cup unsalted butter, softened
- 3 cups powdered sugar, sifted
- 1 teaspoon pure vanilla powder
- 1-2 tablespoons milk or cream (as needed for consistency)
Step-by-Step Assembly Instructions
Preheating your oven to 325°F (160°C) is the absolute first step. You will also need to prepare a 9-inch springform pan by wrapping the exterior tightly in heavy-duty aluminum foil. This foil barrier is essential to prevent water from the bath seeping in and ruining the crust.
Step 1: The Crust Foundation.In a medium bowl, combine the crushed Oreos, melted butter, and granulated sugar. Press this mixture firmly and evenly into the bottom and slightly up the sides of the prepared springform pan. Use the bottom of a measuring cup to compact it tightly. Bake the crust for 8 minutes, then remove it and let it cool completely while you prepare the filling.
Step 2: The Velvet Filling.Using an electric mixer, beat the softened cream cheese until it is completely smooth and fluffy—about two minutes. Gradually add the granulated sugar and cocoa powder, mixing well until thoroughly combined, scraping down the bowl constantly. In a separate small bowl, combine the buttermilk, vanilla powder, vinegar, and red food coloring. Pour this mixture into the cream cheese batter and beat on low speed until the color is uniform and streak-free.
Step 3: Integrating the Eggs.This is the most crucial step for texture! Add the eggs one at a time, mixing only until just combined after each addition. Over-mixing the eggs introduces too much air, which causes the cheesecake to rise rapidly and then inevitably crack as it cools. Pour the finished red velvet batter over the cooled Oreo crust.
Baking and Cooling Perfection
Carefully place the foil-wrapped springform pan inside a large roasting pan. Place the roasting pan into the oven, and then pour boiling water into the roasting pan, ensuring the water level comes halfway up the sides of the springform pan. This water bath technique ensures the cheesecake bakes slowly and evenly, providing humidity that prevents cracking.
Bake for 60 to 75 minutes. The center should still have a slight jiggle, like firm carrageenan. Turn the oven off, crack the oven door slightly, and let the cheesecake cool inside the oven for one full hour. This gradual temperature reduction is key to preventing that dreaded sunken center.
Remove the cheesecake from the water bath, remove the foil, and let it cool completely on a wire rack at room temperature. Once cooled, cover it and refrigerate it for a minimum of 12 hours, but preferably overnight. This dedicated chilling time ensures the cheesecake slices cleanly and achieves its ultimate dense, velvety texture.
Step 4: The Fluffy Topping.Once the cheesecake is fully chilled, prepare the topping. Beat the softened cream cheese and butter until fluffy. Gradually beat in the sifted powdered sugar and vanilla powder. Add milk or cream one tablespoon at a time until the desired light and spreadable consistency is reached. Spread the frosting generously over the chilled cheesecake just before serving. Garnish as desired.
Here are some insider tips for absolute success with your holiday masterpiece:
- Ensure the crushed Oreos and melted butter are packed very tightly; a solid, compact base prevents crumbling disaster when slicing the chilled dessert.
- Scrape down the sides of the mixer often when preparing the filling to prevent lumps, and mix only until combined, rigorously avoiding over-mixing the eggs.
- The full 12-hour chill is non-negotiable. This prolonged time is vital for setting the internal texture and achieving that iconic, picture-perfect cheesecake slice.
The first time I served this, my usually stoic uncle actually cheered. He said it reminded him of being a kid at Year-End Celebration, proving the power of the Winter Holiday Red Velvet Cheesecake with Oreo Crust to evoke pure, delicious nostalgia.
Conclusion for Winter Holiday Red Velvet Cheesecake with Oreo Crust
The Winter Holiday Red Velvet Cheesecake with Oreo Crust is far more than just a dessert; it’s an edible celebration designed to be the undisputed centerpiece of your holiday table. By meticulously following the steps for the creamy filling, respecting the water bath baking technique, and giving it the necessary time to chill, you guarantee a dessert that is rich, perfectly structured, and unbelievably flavorful. This recipe blends the comforting familiarity of red velvet with the luxurious indulgence of classic cheesecake, all sitting atop a sturdy, dark chocolate crust. Prepare this culinary delight and watch your guests swoon. It is the perfect sweet end to any festive meal, guaranteeing you praise and ensuring holiday cheer is served right alongside the slices.
Print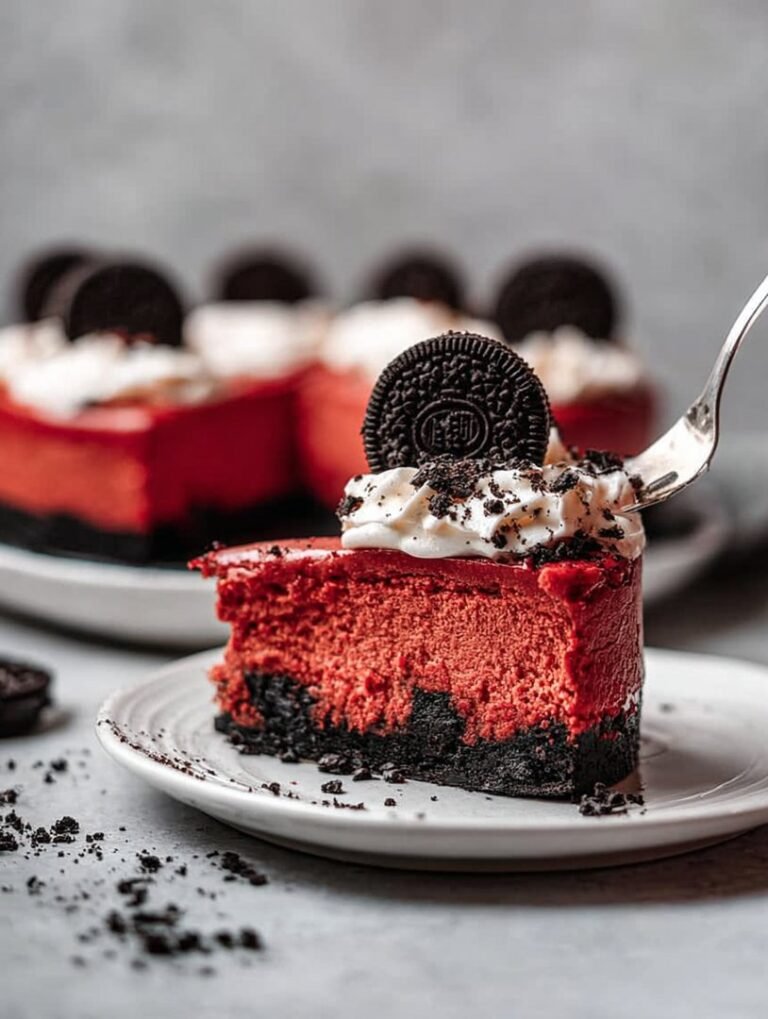
Winter Holiday Red Velvet Cheesecake with Oreo Crust
Luxurious Red Velvet Cheesecake: a stunning holiday dessert featuring a deep crimson filling, tangy sour cream, and a dark, crumbly Oreo crust.
- Total Time: 35 minutes
- Yield: 4 servings 1x
Ingredients
- 3 (8 oz) packages cream cheese, softened
- 1 cup granulated sugar
- 3 large eggs
- 1/2 cup sour cream
- 2 tablespoons red gel food coloring
- 1 tablespoon unsweetened cocoa powder
- 24 Oreo sandwich cookies, finely crushed
- 6 tablespoons unsalted butter, melted
Instructions
- Step 1: Preheat the oven to 325°F (160°C). Prepare a 9-inch springform pan by wrapping the exterior tightly in heavy-duty foil. Combine the crushed Oreos and melted butter, then press the mixture firmly into the bottom of the prepared pan to form the crust.
- Step 2: Beat the softened cream cheese and sugar in a large bowl using an electric mixer until the mixture is completely smooth and lump-free, scraping down the sides as needed.
- Step 3: Mix in the sour cream, cocoa powder, and red gel food coloring until the mixture is uniform and a vibrant red. Ensure all ingredients are well combined before proceeding.
- Step 4: Gently beat in the eggs one at a time, mixing only until each egg is just incorporated. Overmixing the eggs can cause the cheesecake to crack. Pour the red velvet filling over the Oreo crust.
- Step 5: Place the foil-wrapped pan into a large roasting pan and fill the roasting pan halfway up the sides of the springform with hot water (this is a water bath). Bake for 60 to 75 minutes, or until the edges are set and the center jiggles slightly.
- Step 6: Turn off the oven, crack the door slightly, and allow the cheesecake to cool in the oven for 1 hour. Remove from the water bath, cool completely on a wire rack, and chill in the refrigerator for at least 6 hours before slicing.
Notes
- Keep leftover cheesecake covered tightly in the refrigerator for up to 5 days; for longer storage, freeze individual slices and thaw overnight in the fridge.
- This cheesecake is best served thoroughly chilled; ensure it rests in the refrigerator for at least 8 hours—or preferably overnight—to achieve the perfect firm texture for clean slicing.
- Elevate the festive presentation by garnishing each slice with a dollop of fresh whipped cream and a light sprinkle of reserved Oreo crumbs or holiday edible glitter before serving.
- To ensure a truly vibrant, deep red color characteristic of classic red velvet, use a high-quality gel food coloring (not liquid) and make sure the cocoa powder is fully dispersed before adding the eggs.
- Prep Time: 15 minutes
- Cook Time: 20 minutes
- Method: Stovetop
- Cuisine: American


Leave a Comment