
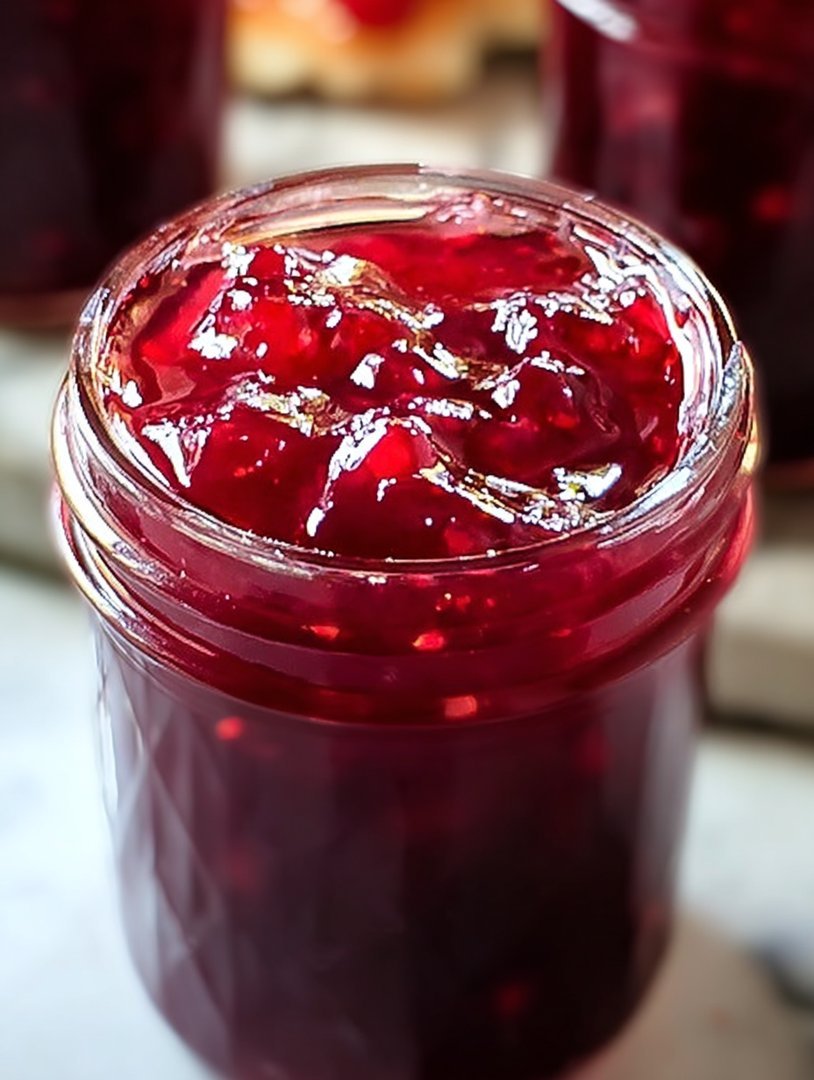
The sweet, tangy, and subtly spiced aroma of plums simmering on the stove promises a jar full of sunshine, perfect for brightening even the dullest morning toast. Homemade Plum Jelly is a delightful way to capture the essence of summer’s bounty.
Imagine spreading this jewel-toned jelly on warm biscuits, the rich plum flavor dancing on your tongue – a simple pleasure that elevates any meal. This recipe brings the joy of homemade goodness right to your kitchen.
- Crafting **Homemade Plum Jelly** is surprisingly easy, requiring minimal ingredients and equipment, making it a delightful project even for beginner cooks.
- The flavor profile balances the natural sweetness of ripe plums with a hint of warmth from cinnamon and cloves, creating a complex and satisfying taste.
- Its vibrant color and translucent texture make it a visually stunning addition to any breakfast table or dessert platter, impressing guests with its homemade charm.
- Beyond toast, this jelly shines as a glaze for grilled chicken, a topping for creamy cheeses, or even a unique filling for thumbprint cookies, showcasing its remarkable versatility.
Ingredients for Homemade Plum Jelly
Here’s what you’ll need to make this delicious dish:
The full ingredients list, including measurements, is provided in the recipe card directly below.
How to Make Homemade Plum Jelly
Follow these simple steps to prepare this delicious dish:
Step 1: Prepare the Plums
Wash and pit the plums, then roughly chop them. Place the chopped plums into a large, heavy-bottomed saucepan. Crushing some of the plums will release their juices and help with the cooking process.
Step 2: Cook the Plum Mixture
Add the granulated sugar, lemon juice, cinnamon, and cloves to the saucepan with the plums. Stir well to combine. Bring the mixture to a rolling boil over medium-high heat, stirring constantly to prevent scorching.
Step 3: Add Pectin and Boil Again
Once the mixture reaches a rolling boil that cannot be stirred down, quickly add the apple pectin. Stir vigorously to ensure it’s fully incorporated. Return the mixture to a rolling boil for exactly one minute, continuing to stir constantly. This is crucial for activating the pectin and ensuring the jelly sets properly.
Step 4: Test for Setting Point
Remove the saucepan from the heat. To test if the jelly is ready to set, place a small spoonful of the hot jelly onto a chilled plate. Place the plate in the freezer for one minute. If the jelly wrinkles when you push it with your finger, it is ready. If not, return the mixture to a boil for another minute and test again.
Step 5: Jarring the Jelly
Carefully pour the hot jelly into sterilized jars, leaving about ¼ inch of headspace at the top. Wipe the rims of the jars clean with a damp cloth. Place sterilized lids on the jars and secure them with jar rings.
Step 6: Processing the Jars
Process the filled jars in a boiling water bath for 10 minutes to ensure a proper seal. Remove the jars from the water bath and let them cool completely on a wire rack. As the jars cool, you should hear a popping sound, indicating that the lids have sealed properly. Store the sealed jars in a cool, dark place. If any jars don’t seal, store them in the refrigerator and use them within a few weeks.
Spread your homemade plum jelly on toast, biscuits, or scones for a delightful breakfast treat.
Perfecting the Cooking Process

To achieve jelly nirvana, start by thoroughly washing and pitting the plums. Cook them down until softened before straining. This ensures a smooth, lump-free jelly that will make you the envy of all your toast-loving friends. Don’t rush this process!
Add Your Touch
Feeling adventurous? Infuse your homemade plum jelly with a hint of spice! A pinch of cinnamon or a star anise during cooking can add a warm, intriguing twist. For a brighter flavor, try a squeeze of lemon juice. Get creative and make it your own!
Storing & Reheating
Once cooled, store your homemade plum jelly in sterilized jars in a cool, dark place. It will keep for several months, ready to brighten any breakfast. No reheating needed; just spread and enjoy the sweet, fruity goodness!
Here are some tips for making stellar plum jelly:
- Thoroughly sterilize your jars to prevent spoilage and ensure a longer shelf life for your gorgeous, ruby-red creation.
- Use a jelly bag or several layers of cheesecloth to strain the cooked plums, guaranteeing a perfectly clear and smooth final product.
- Test for the “jelly set” by placing a small spoonful on a chilled plate; if it wrinkles when pushed, it’s ready to be jarred!
(Personal anecdote formated as paragraph subheading)
I remember one batch I made for a friend’s birthday. She claimed it was the best thing she had ever tasted and demanded I open a jelly shop. Maybe someday!
Here’s a bit about crafting the perfect **Homemade Plum Jelly**: It’s not just about following a recipe; it’s about embracing the juicy goodness of plums and turning them into a shimmering, spreadable delight. Think of it as capturing sunshine in a jar. This isn’t your store-bought, bland jelly. We’re talking about an explosion of flavor, a testament to the power of simple ingredients transformed into something truly special. So, grab your plums, dust off your canning gear, and let’s get started on this fruity adventure.
Why Plum Jelly Rocks (and Store-Bought Jelly Doesn’t)
Let’s be honest, the supermarket aisles are lined with jellies that promise the world but deliver… well, something vaguely fruity and mostly artificial. But with **Homemade Plum Jelly**, you control everything! You pick the plums, you adjust the sweetness, and you get to bask in the satisfaction of knowing exactly what’s going into your body. Plus, have you ever tried explaining the ingredients list on a store-bought jar? It reads like a chemistry textbook! Our version? Plums, sugar, maybe a little lemon juice. Simple, honest, and utterly delicious. Think of all the bragging rights you’ll earn. Your friends will think you’re some sort of culinary wizard.
Plum Types: Choosing Your Jelly Champion
Not all plums are created equal, and the variety you choose will significantly impact the flavor of your **Homemade Plum Jelly**. For a sweet and slightly tart jelly, go for Santa Rosa plums. Their vibrant red flesh yields a beautiful color and balanced flavor. If you prefer a deeper, more intense plum flavor, try Damson plums. They’re smaller and tarter but pack a serious punch. And if you can find them, Japanese plums offer a unique sweetness with a hint of spice. The best part? Experimenting! Try blending different varieties to create your signature jelly blend. Just imagine the possibilities!
Gather Your Arsenal: The Essential Equipment
Okay, so you’ve got your plums, now what? Before you dive headfirst into jelly-making madness, let’s make sure you have the right tools for the job. First, you’ll need a large, heavy-bottomed pot. This will ensure even cooking and prevent your precious plum mixture from scorching. A jelly bag or several layers of cheesecloth are crucial for straining out the solids and achieving that crystal-clear jelly texture. A candy thermometer will help you monitor the temperature and ensure your jelly reaches the proper setting point. And, of course, you’ll need sterilized jars and lids for preserving your liquid gold. Don’t skip the sterilization step; trust me, it’s worth it to avoid any unwanted moldy surprises.
Mastering the Jelly-Making Process: A Step-by-Step Guide
Alright, let’s get down to business! Here’s your roadmap to **Homemade Plum Jelly** perfection:
1. **Prep the Plums: ** Wash your plums thoroughly and remove the pits. Quarter or roughly chop them to help them break down during cooking.
2. **Cook ‘Em Down: ** In your large pot, combine the plums with a bit of water (just enough to prevent sticking) and bring to a boil. Reduce the heat and simmer until the plums are soft and mushy, about 20-30 minutes. Stir occasionally to prevent sticking.
3. **Strain the Goodness: ** Pour the cooked plum mixture into your jelly bag or cheesecloth-lined colander. Let it drip for several hours, or even overnight. Resist the urge to squeeze the bag, as this can result in cloudy jelly. Patience is key!
4. **Sugar Time: ** Measure the plum juice. For every cup of juice, add about ¾ cup of sugar. Adjust to taste, depending on the sweetness of your plums.
5. **Boil and Bubble: ** Combine the plum juice and sugar in your pot and bring to a rolling boil over medium-high heat. Stir constantly to prevent scorching. Use your candy thermometer to monitor the temperature. You’re aiming for 220°F (104°C), which is the jelly setting point.
6. **The Wrinkle Test: ** If you don’t have a candy thermometer, you can use the wrinkle test. Place a small spoonful of the hot jelly on a chilled plate and let it cool for a minute. Push it with your finger. If it wrinkles, it’s ready!
7. **Jar It Up: ** Carefully pour the hot jelly into your sterilized jars, leaving about ¼ inch of headspace. Wipe the rims clean, place the lids on, and screw on the bands.
8. **Process for Perfection: ** Process the jars in a boiling water bath for 10 minutes to ensure a proper seal. This will help prevent spoilage and keep your jelly fresh for longer.
9. **Listen for the Pop: ** As the jars cool, you should hear a satisfying “pop” as the lids seal. This is music to a jelly-maker’s ears!
Troubleshooting Jelly Jitters: Common Problems and Solutions
Even the most experienced jelly-makers encounter hiccups along the way. Here are some common problems and how to fix them:
- **Jelly Won’t Set:** This could be due to insufficient pectin, not enough sugar, or not reaching the proper setting point. Try adding a commercial pectin product, increasing the sugar slightly in your next batch, or cooking the jelly a bit longer.
- **Cloudy Jelly:** This is often caused by squeezing the jelly bag or using plums that aren’t fully ripe. Avoid squeezing and use ripe (but not overripe) plums.
- **Mold Growth:** This is a sign of improper sterilization or sealing. Ensure your jars and lids are thoroughly sterilized and that the lids are properly sealed.
Beyond Toast: Unleashing the Versatility of Plum Jelly
**Homemade Plum Jelly** is delicious slathered on toast, but its uses extend far beyond breakfast! It makes a fantastic glaze for roasted chicken, turkey, or lamb. It can be stirred into yogurt or oatmeal for a burst of fruity flavor. It’s a delightful accompaniment to cheese and crackers. You can even use it as a filling for thumbprint cookies or a topping for cheesecake. The possibilities are endless! So, don’t limit yourself to toast. Get creative and explore the many delicious ways to enjoy your homemade masterpiece. You might just discover your new favorite flavor combination.
Elevating Your Jelly Game: Expert Tips and Tricks
Want to take your **Homemade Plum Jelly** to the next level? Here are some insider tips:
- **Add a Splash of Flavor:** A squeeze of lemon juice brightens the flavor and helps with setting. A pinch of cinnamon or ginger adds warmth. A vanilla bean infused during cooking adds a touch of elegance.
- **Use Quality Ingredients:** The better the plums, the better the jelly. Choose ripe, flavorful plums from a reputable source.
- **Patience is a Virtue:** Don’t rush the straining process. Let the plum mixture drip naturally for the best results.
Remember, making **Homemade Plum Jelly** is a journey, not a destination. Embrace the process, experiment with flavors, and most importantly, have fun! You’ll be rewarded with a delicious, homemade treat that’s sure to impress. Happy jelly-making!
Conclusion for Homemade Plum Jelly:
Making Homemade Plum Jelly is simpler than you think, and the payoff is huge! You get a burst of fresh plum flavor without any artificial additives. From choosing your favorite plums to enjoying it on toast, yogurt, or even as a glaze for chicken, the possibilities are endless. The key is to follow the steps carefully and enjoy the process. With a little effort, you can create a truly special treat that will impress your family and friends. So grab some plums and get ready to create deliciousness!
Print
Homemade Plum Jelly
Delicious homemade plum jelly recipe with detailed instructions and nutritional information.
- Total Time: 35 minutes
- Yield: 4 servings 1x
Ingredients
- 4 pounds ripe plums, any variety
- 6 cups water
- 1/4 cup lemon juice
- 1 box (1.75 oz) powdered fruit pectin
- 5 1/2 cups granulated sugar
- 1/2 teaspoon butter (optional, to reduce foaming)
- 1/4 teaspoon ground cinnamon (optional)
Instructions
- Step 1: Wash and pit the plums. Cut them into quarters and place them in a large, heavy-bottomed pot or Dutch oven. Add the water and lemon juice.
- Step 2: Bring the mixture to a boil over medium-high heat, then reduce the heat and simmer for about 20-25 minutes, or until the plums are very soft. Stir occasionally to prevent sticking.
- Step 3: Pour the cooked plum mixture into a jelly bag or a colander lined with several layers of cheesecloth set over a bowl. Let the juice drip naturally for at least 4 hours or overnight. Do not squeeze the bag or cheesecloth, as this will make the jelly cloudy.
- Step 4: Measure 4 cups of the plum juice into a clean pot. Add the pectin, butter (if using), and cinnamon (if using). Bring the mixture to a rolling boil over high heat, stirring constantly.
- Step 5: Add the sugar all at once and continue stirring constantly. Return to a full rolling boil that cannot be stirred down and boil hard for exactly 1 minute, stirring constantly.
- Step 6: Remove from heat and skim off any foam with a metal spoon. Immediately pour the hot jelly into sterilized jars, leaving 1/4-inch headspace. Wipe jar rims clean, place lids and rings on jars, and process in a boiling water bath canner for 10 minutes (adjust time for altitude). After processing, remove jars from the canner and let cool completely. Check seals before storing.
Notes
- Store properly sealed jars of plum jelly in a cool, dark pantry for up to a year.
- If your jelly sets too firmly, a quick zap in the microwave (in a microwave-safe bowl) will soften it for easier spreading.
- Spread this vibrant plum jelly on scones with clotted cream for a delightful afternoon treat.
- Don't be tempted to squeeze the plum pulp to get more juice; patience is key for a clear and beautiful jelly.
- Prep Time: 15 minutes
- Cook Time: 20 minutes
- Method: Stovetop
- Cuisine: American
FAQs:
What makes this Homemade Plum Jelly recipe special?
Forget those store-bought jellies that taste like sugary nothingness! This Homemade Plum Jelly recipe explodes with fresh, vibrant plum flavor. We’re talking about a taste of summer sunshine in every spoonful. Plus, it’s surprisingly simple to make. You control the ingredients, ensuring a naturally delicious and additive-free spread. Seriously, once you try this, you’ll wonder why you ever settled for anything less. It’s the perfect way to elevate your breakfast toast or add a sweet touch to your desserts. Give it a try; your taste buds will thank you!
How do I store this Homemade Plum Jelly?
Once your Homemade Plum Jelly is made, proper storage is key to maintaining its delightful taste and quality. If you’ve processed the jars correctly in a boiling water bath, they can be stored in a cool, dark place like a pantry for up to a year. Once opened, keep the jar in the refrigerator. Properly refrigerated, it will stay fresh for several weeks. Always check for any signs of spoilage before consuming, such as mold or an off odor. With proper storage, you’ll enjoy your homemade plum jelly for months!
Can I use different types of plums for this Homemade Plum Jelly?
Absolutely! One of the best things about making Homemade Plum Jelly is the flexibility to experiment with different plum varieties. Each type of plum will bring its unique flavor profile to the jelly. For example, Damson plums offer a tart and rich flavor, while Santa Rosa plums provide a sweeter and more delicate taste. Feel free to mix and match different plums to create a truly custom blend. Just remember that the sweetness and pectin content may vary, so you might need to adjust the sugar and lemon juice accordingly.
What can I do with Homemade Plum Jelly besides spreading it on toast?
Oh, the possibilities are endless! While it’s amazing on toast, Homemade Plum Jelly is incredibly versatile. Use it as a glaze for roasted chicken or turkey to add a sweet and tangy touch. Stir it into yogurt or oatmeal for a flavor boost. It’s also fantastic as a filling for thumbprint cookies or as a topping for ice cream. You can even use it as part of a cheese board, pairing it with sharp cheeses like cheddar or brie. Get creative and discover your favorite ways to enjoy this delicious homemade jelly!


Leave a Comment