

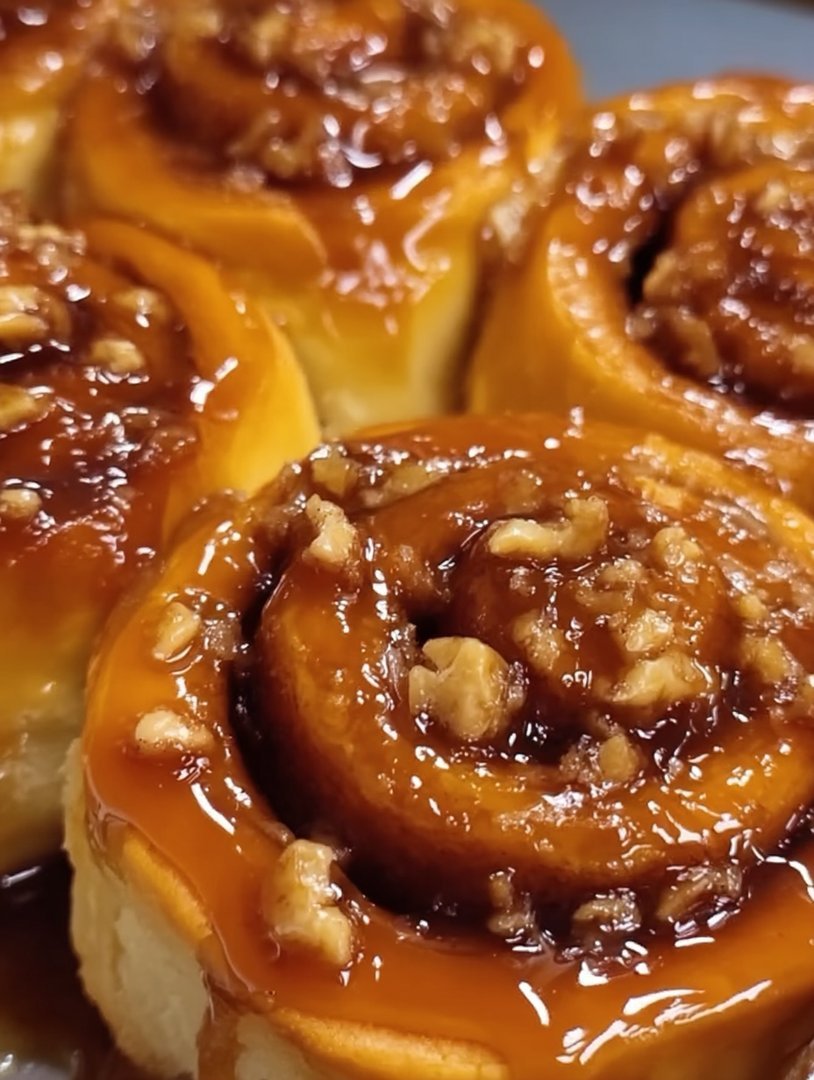
The smell of butter, brown sugar, and yeast is the olfactory equivalent of a warm hug from Grandma. Forget your worries; we are diving headfirst into the magnificent, sticky world ofOld-Fashioned Caramel Rolls.
These aren’t just breakfast pastries; they are edible monuments to comfort food, promising ooey-gooey perfection that requires exactly zero fancy brunch invitations.
Standout Features of This Recipe:
- Achieve unparalleled, deep caramel flavor using simple kitchen staples, guaranteeing a rich, buttery sweetness in every bite.
- The dough technique is surprisingly straightforward, resulting in fluffy, tender rolls without requiring advanced baking expertise.
- These golden-brown spirals, drenched in glistening amber sauce, offer a visually stunning centerpiece for any weekend breakfast spread.
- Prepare these rolls the night before for effortless morning baking, making them perfectly versatile for busy holidays or leisurely Sunday mornings.
Ingredients for Old-Fashioned Caramel Rolls
Here’s what you’ll need to make this delicious dish:
- All-Purpose FlourUse unbleached flour for the best texture, ensuring the rolls are light and airy, not dense.
- Granulated SugarThis sweetens the dough and aids the yeast activation process, providing the necessary food for rising.
- Active Dry YeastEssential for lift, make sure your yeast is fresh and proofed properly in warm milk to ensure a successful rise.
- MilkScalding and then cooling the milk is crucial as it tenderizes the dough by dissolving proteins.
- Unsalted ButterUsed both in the dough and in the filling/caramel, butter provides richness and that irresistible melt-in-your-mouth quality.
- Brown SugarThe foundation of the famous caramel topping, packed firmly to ensure accurate measurement and depth of flavor.
- CinnamonA generous amount adds warmth and spice to the filling, beautifully contrasting the sticky sweetness of the caramel.
- SaltA pinch of salt balances the sweetness in both the dough and the caramel, enhancing all the other flavors.
- EggsUsed at room temperature, eggs add structure, color, and richness to the tender yeast dough.
The full ingredients list, including measurements, is provided in the recipe card directly below.
How to Make Old-Fashioned Caramel Rolls
Follow these simple steps to prepare this delicious dish:
-
Step 1: Activate the Yeast and Prepare the Dough
Gently warm the milk until it reaches about 105°F (40°C), ensuring it is not too hot, which would kill the yeast. Pour the warm milk into a large mixing bowl and sprinkle the yeast and a teaspoon of sugar over the top. Allow this mixture to sit for 5 to 10 minutes until it looks foamy and active. Once proofed, incorporate the softened butter, remaining sugar, salt, and eggs, mixing thoroughly. Gradually add the flour, kneading the mixture either by hand or using a stand mixer with a dough hook until a smooth, elastic ball forms that clears the sides of the bowl.
-
Step 2: Rise and Chill
Place the dough ball into a lightly oiled bowl, turning once to coat. Cover the bowl tightly with plastic wrap or a kitchen towel and let it rise in a warm, draft-free spot for 1 to 1.5 hours, or until the dough has doubled in size. If you plan to bake the next morning, punching down the dough gently and placing it in the refrigerator overnight yields an even better flavor and easier handling.
-
Step 3: Craft the Sticky Caramel Base
While the dough is rising, or immediately before rolling if using the overnight method, prepare the sticky caramel sauce. Melt 1/2 cup of butter in a saucepan over medium heat. Once melted, stir in the brown sugar, ensuring it dissolves completely. Bring the mixture to a gentle boil, stirring constantly for one minute, then remove from the heat. Pour this luxurious mixture evenly into the bottom of a 9×13 inch baking dish; you can sprinkle pecans or walnuts over the caramel if desired.
-
Step 4: Roll, Fill, and Slice
Punch down the risen dough and turn it out onto a lightly floured surface. Roll the dough into a large rectangle approximately 1/4 inch thick. Spread the remaining softened butter evenly across the dough, then generously sprinkle the surface with the cinnamon-sugar mixture. Starting with the long side, carefully roll the dough into a tight cylinder. Use a sharp knife or unscented dental floss to slice the cylinder into 12 equally sized rolls, roughly 1.5 inches thick.
-
Step 5: Second Rise and Bake
Arrange the sliced rolls, cut-side down, slightly spaced apart on top of the prepared caramel base in the baking dish. Cover the pan loosely and allow the rolls to undergo their second proofing for about 30–45 minutes until they look visibly puffy. Preheat your oven to 375°F (190°C). Bake the rolls for 25 to 30 minutes, or until the tops are golden brown and the internal temperature reaches 200°F (93°C).
-
Step 6: Invert and Serve
CRITICAL WARNING: As soon as the rolls emerge from the oven, they must be inverted. Place a large serving platter or cutting board over the baking dish, and with oven mitts protecting your hands, quickly and confidently flip the entire assembly over. Wait 30 seconds for the caramel to drip down, then carefully lift the dish away. Transfer to plates and drizzle with any remaining sticky sauce for the perfect finishing touch.
The History of the Sticky Bun’s Glorious Reign
Why do we love these sticky concoctions so much? The tradition of sweet, yeasted rolls baked in a sugar-butter glaze didn’t just pop up overnight. While many cultures have variations—from the German Schnecken to the American sticky bun—the classic preparation involving a generous drowning of butter and brown sugar before baking truly cemented the recipe’s fame in North American kitchens. Think of these rolls as the sophisticated cousin to the everyday cinnamon roll, elevated by that luxurious, clinging caramel. Making a batch ofOld-Fashioned Caramel Rollsconnects you directly to generations of bakers who understood that life’s stickiest problems are often solved with the stickiest desserts.
My grandmother, who could measure flour merely by sensing the humidity in the air, swore by the power of the slow, overnight rise. She believed the dough absorbed the flavors more deeply, resulting in an ethereal texture that simply vanished in your mouth. If you want true professional results, embrace the patience of the slow rise; the subtle tang and improved structure are absolutely worth the wait. Skipping this critical step is a rookie mistake, akin to cheering for the wrong team during the final minutes of a game.
Mastering the Magic: Tips for Perfect Caramel Rolls
Baking bread-based desserts can sometimes feel like a high-stakes science experiment run by a slightly mad scientist (that’s you!). However, achieving bakery-quality sticky buns is entirely possible if you pay attention to a few crucial details. These rolls require precision, but also a willingness to get your hands messy. Remember, sticky fingers are a sign of a job well done.
The Secret to Super Fluffy Dough
The texture of the dough determines the success of the entire operation. If your rolls are dense, they become sugar bricks rather than fluffy clouds. The key lies in the hydration and the kneading. Ensure your flour is spooned into the measuring cup, not packed, which prevents adding too much dry material. Kneading should last around 8 to 10 minutes until the dough passes the windowpane test—where you can stretch a small piece thin enough to see light through it without tearing. This indicates proper gluten development, trapping the carbon dioxide produced by the yeast effectively.
Achieving the Perfect Caramel Consistency
The caramel topping needs to be liquid enough to pour easily but thick enough to cling lovingly to the rolls. We are aiming for the consistency of warm, flowing honey. When preparing the topping, ensure you melt the butter and brown sugar slowly and stir until the sugar crystals fully dissolve. If you boil the mixture too hard or for too long, you risk hardening the caramel into a difficult-to-manage candy shell once it cools slightly. If your caramel base appears too thin after boiling for a minute, add a tiny splash more brown sugar off the heat and whisk vigorously until incorporated, always avoiding the temptation to over-cook. The perfect caramel ensures every crevice of yourOld-Fashioned Caramel Rollsis coated in gooey goodness.
Troubleshooting Common Sticky Roll Issues
Baking mishaps happen to everyone, even seasoned professionals. Knowing how to quickly pivot saves your sticky rolls from disaster. If you notice things going slightly awry, a quick adjustment can often salvage your beautiful breakfast treat. We’ve all been there, staring forlornly at a batch that didn’t quite behave, but don’t fret; these simple fixes will help you achieve perfection next time.
Why are my rolls dry or tough?
Dryness usually stems from overbaking or using too much flour. Always check the rolls at the lower end of the baking time. If the tops are browning too fast but the center isn’t cooked, cover the pan loosely with aluminum foil and continue baking. If the dough felt stiff before baking, try adding a tablespoon of milk next time to increase the dough’s overall hydration, yielding a much softer crumb structure.
Why did my rolls not rise?
The most frequent culprit here is dead yeast or milk that was too hot. Yeast dies above 140°F (60°C). Always use a thermometer when heating the milk, aiming for that optimal 105°F range. Ensure your rising environment is warm—the top of a running dryer or inside an oven that was briefly warmed and then turned off makes an excellent proofing box for winter baking.
Why did the caramel stick to the bottom of the pan?
The crucial, defining moment of these rolls is the flip. If you wait even five minutes too long, the cooling caramel hardens and fuses to the dish. You must flip the rolls immediately after removing them from the oven. If the worst happens, set the pan back over low heat on the stovetop for 30 seconds to gently remelt the edges before attempting the flip again, ensuring you wear protective oven mitts.
Variations to Elevate Your Caramel Rolls
While the traditional recipe is flawless, bakers often enjoy adding their unique twist to personalize this classic treat. Adding flavor infusions can transform your rolls from simple breakfast fare into an extravagant dessert. Remember that any additions should be sturdy enough to withstand the heat of the oven and the moisture of the caramel, ensuring they don’t burn or turn soggy during the baking process.
Adding Texture with Nuts and Dried Fruit
Pecans are the traditional choice, offering a crunchy contrast to the soft roll and sticky sauce. Toasting the pecans lightly before adding them to the caramel base drastically improves their flavor depth and adds a nutty warmth. For a chewier variation, mix dried cranberries or finely diced dried apricots into the cinnamon filling before rolling. These additions provide a tart counterpoint to the extreme sweetness, making the rolls feel lighter and brighter on the palate.
Spice it Up: Flavor Infusions
Elevating the spice profile goes beyond cinnamon. Try incorporating a quarter teaspoon of ground cardamom into the filling mixture—it offers a bright, citrusy, and slightly floral note that pairs beautifully with brown sugar. Alternatively, mixing in a pinch of ginger or even a small amount of finely ground espresso powder into the filling can provide a wonderful, deep complexity to your sticky buns, enhancing the richness of the caramel base.
Old-Fashioned Caramel Rolls FAQ
What is the difference between caramel rolls and cinnamon rolls?
While both use a sweet yeast dough, the difference lies entirely in the topping. Cinnamon rolls are traditionally finished with a creamy, powdered sugar glaze or frosting applied after baking. Caramel rolls, conversely, are baked directly on top of a buttery brown sugar sauce, which becomes a thick, sticky caramel when inverted, resulting in a significantly richer and gooier texture and a much messier, but more satisfying, eating experience.
Can I use rapid-rise yeast instead of active dry yeast?
Yes, you absolutely can, but you should adjust the method. Rapid-rise (instant) yeast does not need proofing. You can mix it directly into the dry ingredients. Be aware that rapid-rise yeast makes the dough rise much faster, so monitor the first proofing closely, often needing only 30 to 45 minutes instead of the standard hour or more.
How do I store and reheat leftover caramel rolls?
Store cooled rolls tightly wrapped or in an airtight container at room temperature for up to three days. To reheat them, the microwave works quickly, but for the best texture, wrap a single roll loosely in aluminum foil and warm it in a 350°F (175°C) oven for about 10 minutes. This reactivates the caramel without making the rolls soggy, restoring that glorious stickiness and serving them warm is always recommended.
Can I make the dough without a stand mixer?
Definitely! Kneading by hand is excellent exercise and a very traditional method. Expect to spend about 12 to 15 minutes kneading the dough on a lightly floured surface until it becomes smooth and elastic. The finished dough should spring back lightly when poked, indicating it is ready for the first rise.
There is a special category of baked goods that instantly transports you back to childhood, usually involving high levels of butter and a delightful mess. TheseOld-Fashioned Caramel Rollsfall squarely into that category. They are the epitome of comfort baking, demanding patience but rewarding that effort with a sticky, tender perfection that nothing store-bought can match. I call them “sticky buns,” you might call them “sweet rolls,” but by any name, they require serious commitment to the oozy, dripping caramel life.
This recipe comes straight from the era when slow Sundays were measured by how many times you peeked through the oven door. It starts with an incredibly soft, rich yeast dough, spirals into a buttery cinnamon filling, and finishes with a deeply caramelized brown sugar and cream base that turns into a glossy glaze when inverted. If you’re looking for a baking project that truly pays dividends in happiness, grab your mixing bowl. We are about to make some memories—and probably make a glorious mess in the kitchen.
The Anatomy of Perfect Caramel Rolls
For the Soft Yeast Dough
- 1 cup whole milk, slightly warmed (around 105°F)
- 2 ¼ teaspoons active dry yeast (one standard packet)
- ¼ cup granulated sugar, plus a pinch
- ½ cup (1 stick) unsalted butter, melted and cooled
- 2 large eggs, lightly beaten
- 1 teaspoon fine sea salt
- 3 ½ to 4 cups all-purpose flour, divided
The Sticky Caramel Topping and Filling
- 1 cup (2 sticks) unsalted butter
- 1 ½ cups packed light brown sugar
- ½ cup heavy cream or whole milk
- 2 tablespoons light corn syrup (prevents crystallization)
- 1 cup chopped pecans or walnuts (optional, but highly recommended)
For the Cinnamon Filling:
- ½ cup (1 stick) unsalted butter, softened
- 1 cup packed light brown sugar
- 2 tablespoons ground cinnamon
Step-by-Step Guide to Sticky Glory
Phase 1: Dough Development
First, we awaken the yeast! In a large bowl or the bowl of a stand mixer, combine the warm milk, yeast, and a pinch of sugar. Let this mixture sit for 5 to 10 minutes until it looks foamy and bubbly. This shows your yeast is alive and ready to work magic, which is the most critical first step for airy, tender rolls.
Next, mix in the remaining ¼ cup of sugar, the melted butter, beaten eggs, and salt. Gradually add the flour, starting with 3 ½ cups. If using a stand mixer, knead the dough on low speed for about 5 to 7 minutes until it pulls away from the sides of the bowl and feels smooth and elastic. If kneading by hand, prepare for a good workout, requiring closer to 8 to 10 minutes of robust work.
Place the dough in a lightly oiled bowl, turning it once to coat the entire surface. Cover the bowl securely with plastic wrap or a clean kitchen towel. Let the dough rise in a warm, draft-free spot for 1 to 1.5 hours, or until it has noticeably doubled in size. This first rise is critical for developing gluten and achieving that signature fluffy texture.
Phase 2: Creating the Caramel Bath
While the dough is enjoying its rest, prepare the glorious, deep caramel topping. In a medium saucepan, melt the butter over medium heat. Stir in the brown sugar, heavy cream, and corn syrup. Bring this luxurious mixture to a gentle simmer, stirring constantly for about two minutes until all the sugar dissolves completely and the mixture is smooth. Remove the caramel from the heat immediately.
Pour the molten caramel mixture evenly into a 9×13 inch baking dish. Ensure the bottom of the pan is completely coated. If you are including nuts in yourOld-Fashioned Caramel Rolls, sprinkle the chopped pecans or walnuts directly over the caramel base now. This step ensures the nuts toast perfectly and stick securely to the top of the rolls after inversion.
Phase 3: Roll, Slice, and Bake
Punch down the risen dough gently to release the accumulated air. Turn the dough out onto a lightly floured surface. Roll it into a large rectangle, roughly 12×18 inches. Make sure the dough thickness remains consistent across the entire surface for even baking and uniform spirals.
Prepare the cinnamon filling by mixing the softened butter, brown sugar, and cinnamon together until you achieve a wonderfully smooth, spreadable paste. Spread this filling evenly over the rolled-out dough, leaving a small ½ inch border along one long edge uncovered.
Starting with the long edge opposite the border, roll the dough tightly into a log. A tight roll is key to beautiful, defined spirals. Use a sharp, unflavored dental floss or a very sharp knife to slice the log into 12 equally sized rolls. Arrange these rolls cut-side down, nestled snugly on top of the caramel in the prepared pan. They should be close but not touching.
Phase 4: The Final Rise and Reveal
Cover the pan loosely with plastic wrap. Let the rolls rest for the second rise (the crucial proofing stage) for about 30 to 45 minutes, or until they look puffy and have filled out the space in the pan. Preheat your oven to 375°F (190°C) near the end of the proofing time.
Bake the rolls for 25 to 30 minutes, or until the tops achieve a beautiful golden brown color. If you notice the tops browning too quickly, loosely tent the pan with aluminum foil for the remaining bake time.
This part requires speed and bravery: immediately upon removing the pan from the oven, place a sturdy serving platter or sheet pan over the top of the baking dish. Wearing oven mitts, invert the rolls sharply. Let the caramel drip down and settle over the rolls for a minute or two before lifting the pan away. Try not to eat them all before they cool enough not to blister your tongue! These sticky buns are best served warm.
Perfecting the Cooking Process
Achieving outstanding results requires precision in timing. Start by activating the yeast and preparing the dough for the first proof. While the dough rises, prepare and pour the caramel topping into the baking dish. Finally, assemble, proof, and bake the sticky buns immediately to capture maximum freshness and fluffiness.
Add Your Touch
Spice up the classic formula by adding a pinch of cardamom or a dash of nutmeg to the cinnamon filling for warmth. You can substitute heavy cream with full-fat canned coconut milk for a slightly different richness. For a fruitier twist, include a layer of finely diced, dried apples over the cinnamon mixture.
Storing & Reheating
Store fully cooledOld-Fashioned Caramel Rollsin an airtight container at room temperature for up to three days. To reheat, wrap individual rolls loosely in foil and bake them in a 350°F (175°C) oven for 10 to 15 minutes. This revives the fluffy texture and melts the caramel back into gooey submission.
My first attempt at these rolls resulted in caramel sticking to the bottom of the pan like cement, but my neighbor, Chef Maria, told me to always invert them immediately while molten. That advice was a game-changer.
Expert Tips for Flawless Sticky Rolls
- Ensure your milk is precisely the right temperature (105-115°F) when proofing the yeast; too hot kills it, and too cold prevents activation.
- Do not over-flour the work surface when rolling out the dough. Too much flour results in dry, tough rolls that will resist the glorious stickiness.
- Use unflavored dental floss to slice the rolls instead of a knife; it gives you perfectly clean, non-squished spirals every single time.
Troubleshooting Common Sticky Bun Issues
Even seasoned bakers occasionally face hurdles, especially when dealing with yeast dough. If your dough didn’t rise, the likely culprit is either expired yeast or water that was too hot, which killed the yeast cells. Always double-check your ingredient freshness and use a thermometer for the milk temperature to guarantee success. If your caramel separated or became grainy, ensure you stirred the caramel mixture constantly while simmering and avoid scraping the sides of the pan when pouring.
The Joy of Imperfection
Remember that baking, especially something as rustic and wonderful as these classic sweet rolls, doesn’t need to be perfect. The rolls should be delightfully messy when you pull them apart. The edges might be slightly crispy, and the centers should be gloriously oozy. Embracing the imperfection is part of what makes homemade baking so wonderful and memorable. Serve these classic sweet rolls slightly warm with a strong cup of coffee and prepare for a serious dose of sticky happiness. Enjoy every messy, wonderful bite of these unforgettableOld-Fashioned Caramel Rolls!
Frequently Asked Questions About Classic Caramel Rolls
Can I prepare the dough ahead of time?
Absolutely! After arranging the sliced rolls in the caramel-coated pan (Phase 3), cover the pan tightly with plastic wrap and refrigerate overnight (up to 12 hours). The next morning, let the rolls sit at room temperature for about 1.5 to 2 hours until they have adequately proofed and look puffy before baking.
What if I don’t have corn syrup?
Corn syrup primarily serves to prevent the crystallization of the caramel, ensuring a smooth, silky texture. While you can omit it, your caramel might be slightly more prone to crystalizing. You can substitute a tablespoon of light-colored honey or rice malt syrup, though the flavor profile may change slightly.
How do I know when the rolls are done baking?
The rolls are ready when the tops are a rich, deep golden brown and the internal temperature reaches 200°F (93°C). Don’t rely solely on color, as they might look done but still be doughy inside. Use a probe thermometer to confirm doneness, especially in the middle rolls where heat penetration is slowest.
Is there a secret to making the caramel extra thick?
To ensure a thick, indulgent caramel sauce that coats every surface of your sweet buns, make sure you use heavy cream (not milk) and allow the mixture to simmer slightly longer (about three minutes) before removing it from the heat. This reduces the water content, resulting in a richer, stickier sauce when inverted.
The Sticky Saga of the Sunday Morning Old-Fashioned Caramel Rolls
There are two types of people in this world: those who believe breakfast is merely a means to an end (a granola bar shoved in the face at 7:00 AM) and those who understand that Sunday demands ceremony. I fall firmly into the latter camp. My ceremony involves flour on the ceiling, yeast bubbling like a witch’s cauldron, and the heavenly scent of brown sugar melting into molten gold. If you’ve ever tried to replicate your grandmother’s legendary sticky buns, you know the struggle—the dough that refuses to rise, the caramel that crystallizes, the existential dread that maybe, just maybe, you aren’t worthy of the Old-Fashioned Caramel Rolls.
Fear not, fellow kitchen warrior. We are banishing flat rolls and brittle glazes forever. This recipe strips away the complexity and delivers pure, unapologetic, sticky perfection. Forget subtlety; these rolls are meant to be eaten while wearing pajamas and possibly covered head-to-toe in caramel.
Building the Perfect Foundation: The Dough
The secret to a truly great sweet roll isn’t just the sticky topping; it’s the cloud-like, barely-there texture of the dough. We need a dough that’s resilient enough to hold the cinnamon filling but tender enough to surrender completely to the caramel bath after baking. Think of it as a soft hug wrapped around pure indulgence.
Ingredients for the Rolls
- 4 ½ teaspoons active dry yeast (two packets)
- 1 cup warm whole milk (about 105–115°F)
- ½ cup granulated sugar, divided
- ½ cup unsalted butter, melted
- 2 large eggs
- 1 teaspoon salt
- 4 to 4 ½ cups all-purpose flour, plus extra for dusting
Crafting the Cloud-Soft Dough
Start by waking up your yeast. Pour the warm milk into a large bowl (or the bowl of a stand mixer) and sprinkle in the yeast and a pinch of the sugar. Let this mixture sit for about five to ten minutes until it’s beautifully frothy—this is proof that your yeast is alive and ready to perform magic. If it looks dormant, start over; a sleeping yeast is a sad yeast.
Once activated, whisk in the remaining sugar, the melted butter, salt, and eggs. Gradually add the flour, one cup at a time, until the dough comes together. If using a stand mixer, switch to the dough hook and knead on medium-low speed for about 8 minutes. If kneading by hand, prepare for a workout; knead on a lightly floured surface for 10 to 12 minutes until the dough is smooth and elastic.
Place the dough in a greased bowl, turning it once to coat. Cover the bowl loosely with plastic wrap and set it in a warm spot. This first rise should take about 60 to 90 minutes, depending on the temperature of your kitchen. The dough should double in size, puffing up like a triumphant balloon.
The Molten Core: Filling and Glaze
While the dough is performing its important swelling act, we turn our attention to the components that define these sticky Old-Fashioned Caramel Rolls: the filling and the famous caramel glaze. This isn’t just melted sugar; this is the luxurious foundation that flips the rolls upside down upon serving, covering them in a rich, buttery syrup.
Ingredients for the Sticky Glaze and Filling
- 1 cup (2 sticks) unsalted butter
- 1 ½ cups packed light brown sugar
- ¼ cup honey or maple syrup (for depth of flavor)
- ½ teaspoon vanilla powder
- ½ cup chopped pecans or walnuts (optional, but highly recommended)
- For the filling: ½ cup softened butter, 1 cup brown sugar, 3 tablespoons ground cinnamon
Preparing the Golden Caramel Base
In a small saucepan, melt the butter over medium heat. Stir in the packed brown sugar and the honey or maple syrup. Bring the mixture to a low simmer, stirring constantly, for just one minute until everything is smooth and glossy. Remove it from the heat and stir in the vanilla powder. If using nuts, sprinkle them into the bottom of the pan now.
Pour this luxurious glaze evenly into a 9×13 inch baking pan. Ensure the entire bottom of the pan is coated; this is where the rolls will land and soak up all that goodness.
The Great Swirl and Bake
Once the dough has doubled, gently punch it down—it’s oddly satisfying—and turn it out onto a lightly floured surface. Roll the dough into a large rectangle, roughly 12 inches by 18 inches. Make sure the thickness is consistent so the rolls bake evenly.
Assembling the Rolls
In a small bowl, mix the filling ingredients: softened butter, brown sugar, and cinnamon. Spread this filling mixture evenly over the entire surface of the dough, leaving a small ½-inch border on the long edge opposite you. Start rolling the rectangle tightly from the long edge nearest you, creating a long cylinder. Pinch the seam closed to seal it.
Using a sharp knife or, even better, unflavored dental floss (it cuts cleaner without squishing the roll!), slice the cylinder into 12 equal rolls. They should be about 1 ½ inches thick. Arrange the rolls cut-side down in the prepared caramel pan. Leave a little space between them; they still have a job to do.
The Second Rise and Baking
Cover the pan loosely with plastic wrap or a kitchen towel. Let the rolls rise again in a warm spot for about 30 to 45 minutes. They should look puffy and be touching each other now. This second rise is crucial for light, tender texture.
Preheat your oven to 375°F (190°C). Bake the rolls for 25 to 30 minutes, or until the tops are golden brown. If they start browning too quickly, you can loosely tent the pan with aluminum foil.
The moment of truth arrives immediately after they exit the oven. Wait only about two minutes—just long enough to gather your courage and a sturdy serving platter. Quickly and carefully invert the pan onto the platter. The caramel, now hot and flowing, will coat the rolls completely. Scrape any remaining caramel from the bottom of the pan onto the rolls. Now, run, do not walk, to the table and enjoy your magnificent Old-Fashioned Caramel Rolls while they are still warm and perfectly gooey.
Conclusion for Old-Fashioned Caramel Rolls
Mastering the classic sticky bun transforms your weekend kitchen into a bakery, and these Old-Fashioned Caramel Rolls deliver all the nostalgia and flavor without the fuss. We achieved a tender, pillowy dough by ensuring the yeast was active and avoiding excess flour, creating the perfect spiral for the rich cinnamon filling. The key to the irresistible messy joy is the caramel—a simple blend of brown sugar, butter, and a touch of maple syrup, cooked briefly to ensure maximum stickiness. Follow these steps for the perfect rise and glorious inversion, and you will consistently create a breakfast treat worthy of absolute devotion. Enjoy every sticky, sweet bite!
Print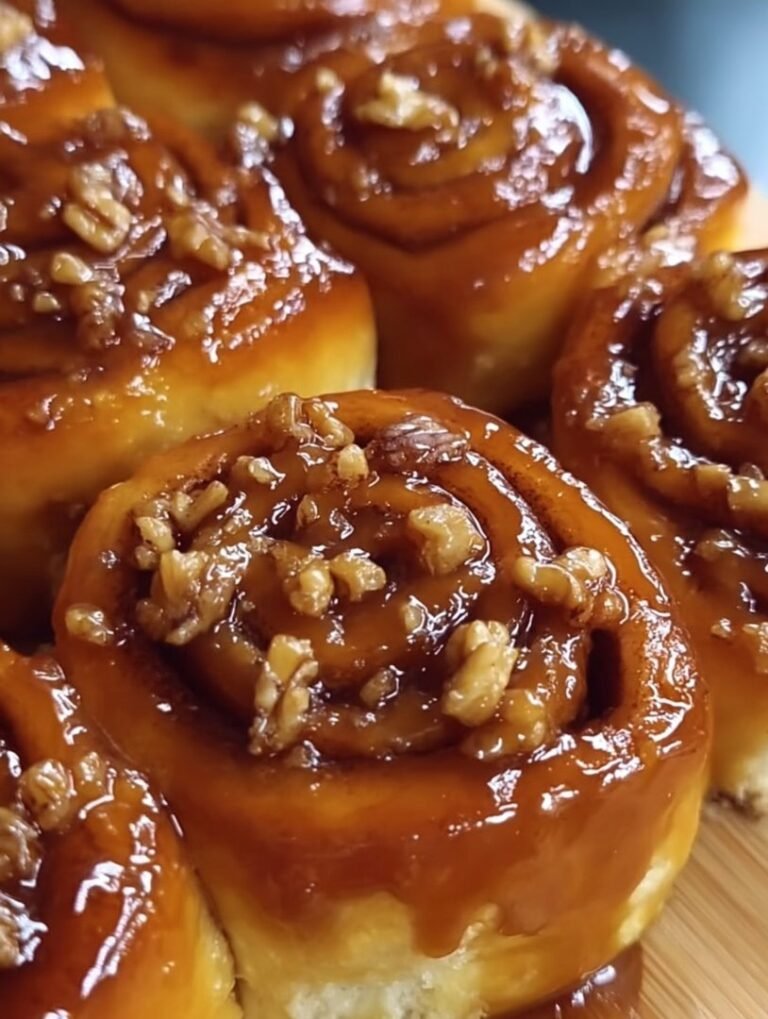
Old-Fashioned Caramel Rolls
Achieve sticky perfection! These yeast-risen rolls feature 1 1/2 cups of rich brown sugar caramel poured *before* baking. The ultimate sweet breakfast flip.
- Total Time: 35 minutes
- Yield: 4 servings
Ingredients
- All-purpose flour: 4 cups
- Whole milk: 1 cup, warmed
- Active dry yeast: 2 1/4 teaspoons (1 packet)
- Unsalted butter: 1 cup (divided for dough, filling, and topping)
- Light brown sugar: 1 1/2 cups
- Granulated sugar: 1/4 cup
- Salt: 1 teaspoon
- Heavy cream: 1/4 cup
Instructions
- Step 1: In a large mixing bowl, dissolve the active dry yeast in the warmed milk (105-115°F). Add the granulated sugar, salt, and 1/4 cup of softened butter. Gradually mix in the flour until a soft dough forms. Knead the dough on a floured surface for 5-7 minutes, then place in a greased bowl, cover, and let rise in a warm place until doubled (about 1 hour).
- Step 2: Prepare the caramel topping by melting 1/2 cup of butter with the brown sugar and heavy cream in a saucepan over medium heat, stirring until smooth. Pour this mixture evenly into the bottom of a 9×13 inch baking pan.
- Step 3: Punch down the risen dough and roll it out into a large rectangle (approximately 12×18 inches). Spread the remaining 1/4 cup of softened butter evenly over the surface, followed by a sprinkle of brown sugar (optional) or cinnamon sugar.
- Step 4: Roll the dough tightly starting from the long side. Use a sharp knife or dental floss to cut the roll into 12 equal slices. Place the slices cut-side up onto the caramel mixture in the prepared pan.
- Step 5: Cover the pan and let the rolls rise for a second time until they are puffy (30-45 minutes). Preheat the oven to 375°F (190°C). Bake for 25–30 minutes, or until the tops are golden brown.
- Step 6: Immediately upon removing from the oven, carefully invert the pan onto a large serving platter. Allow the caramel to drip down over the rolls for 5 minutes before lifting the baking pan. Serve warm.
Notes
- To maintain their soft texture, store leftover rolls, well-covered, at room temperature for no more than two days; refrigeration tends to dry out the dough quickly.
- Reheat rolls quickly in the microwave (15 seconds per roll) or tent them with foil and bake at 300°F for 10 minutes to re-melt the caramel and soften the dough.
- Enhance the deep caramel flavor and balance the richness by adding a slight sprinkle of flaky sea salt or a dollop of crème fraîche right before serving.
- To ensure the perfect coating, the final inversion must be done immediately after baking while the caramel is molten; allow five full minutes for the topping to drip before carefully lifting the pan.
- Prep Time: 15 minutes
- Cook Time: 20 minutes
- Method: Stovetop
- Cuisine: American
FAQs
The only thing better than baking a flawless batch of sweet rolls is having all your sticky questions answered before you start.
What is the best way to store and reheat leftover caramel rolls?
These classic sticky buns taste best fresh, but if you miraculously have leftovers, store them tightly wrapped in aluminum foil at room temperature for up to two days. If you need to keep them longer, store them in the refrigerator for up to a week. To reheat them, the key is moisture. Wrap them individually in foil and bake them in a 300°F oven for about 10 minutes. The foil traps the steam, ensuring the Old-Fashioned Caramel Rolls remain tender and gooey, just like the day you baked them.
Can I prepare the Old-Fashioned Caramel Rolls overnight to save time in the morning?
Absolutely! This is the professional baker’s secret weapon for fresh morning treats. After arranging the sliced rolls in the pan, cover them tightly with plastic wrap and place them immediately in the refrigerator (this slows the yeast activity). The next morning, pull the rolls out while the oven preheats and let them sit at room temperature for about 45 to 60 minutes to finish their final rise before baking. This cold fermentation actually enhances the flavor of the dough, making these classic rolls even better.
My caramel topping hardened after cooling; how can I achieve that signature gooey texture?
Caramel hardening usually means you cooked the glaze too long, causing the sugar concentration to become too high. For a truly sticky glaze, ensure you only simmer the brown sugar and butter mixture for a maximum of one minute before pouring it into the baking dish. If your topping has already hardened after cooling, you can often remedy this by placing the rolls (still in the pan) back into a low oven (250°F) for five to ten minutes before flipping them, allowing the caramel to gently melt and re-liquefy.
Why is my dough dense instead of light and fluffy, and how can I fix it?
Dense dough is a common issue often stemming from two main problems: using expired yeast or adding too much flour. Ensure your yeast is active (it should froth within 10 minutes of hitting the warm milk). When adding flour, stop mixing once the dough pulls away from the sides of the bowl; the dough should still be slightly tacky, not dry. Over-kneading can also lead to tough results, so stick to the recommended kneading times. Always use a generous second rise to ensure the final baked result is beautifully light.

Leave a Comment